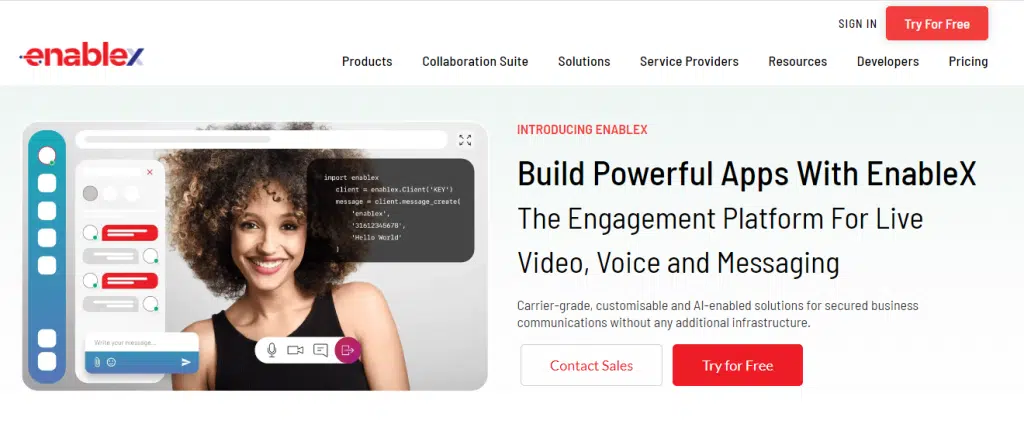
For various industries and use cases, WebRTC video conferencing can help build an instant connection between organisations and customers. With endless applications and rich features, WebRTC video calling can be easily integrated into any website or app.
In this blog, we will share a complete end to end implementation guide for WebRTC video calling into your app.
Before getting started, please open a free trial account here. If you need more information, you can visit our developer section here.
Contents
1. Introduction and getting started guide
1.2. Registration on the EnableX Platform
1.3. Understanding the Interface
2. Building Video Application Using Video Server APIs
3. Pre-Requisites for Building Video Application
3.1 Add Video Service to your project
3.1.1 Create a new Video Service project with EnableX
3.1.2 Add Video Service to an Existing Project
4. Setting Up the Video Application Server
4.1.1. Understanding Provisioning Need
4.1.2. Understanding Reporting Need
6 Developing a Client End Point Application
6.3 Subscribing to Remote Streams
6.6 Disconnecting from the Room
8 Configure Features in Video Project
9 Configure Settings in Video Project
9.1 Configure Recording and Delivery Settings
9.1.1 Transfer to FTP/SFTP Host
9.1.4 Transfer to Google Drive
9.1.5 Transfer to Microsoft Azure
9.2 Configure Webhook Settings
9.3 Configure Media Zone Settings
10. Configuring PSTN Integration to Video Project
- Introduction and getting started
1.1 Introduction
Video conferencing is now integral to modern communication. Its relevance has surged in recent years, aiding businesses in collaboration, customer engagement, and productivity. As the demand grows, integrating efficient video conferencing systems into digital platforms becomes crucial.
This comprehensive guide is designed to assist you in harnessing the full potential of EnableX Video Service—a robust WebRTC based video calling platform that empowers developers to seamlessly integrate real-time, high-quality interactive video applications into their web browsers, iOS, and Android devices. EnableX allows you to choose between two distinct integration methods, each tailored to meet your specific requirements and development expertise.
1.2 Registration on the EnableX Platform
- Visit the EnableX portal https://portal.enablex.io.
- For new users:
– Click on Try For free.
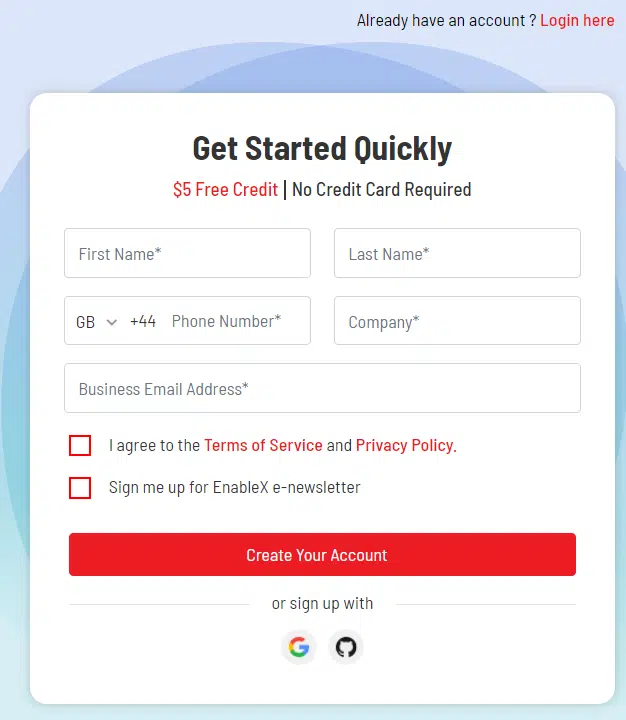
– Fill in the required details: Name, Phone number, Company, email address and check the box for Terms of Service and Privacy Policy.
– Click on Create Your Account.
– A verification email will be sent to the given address. Verify your account by clicking on the link in this email.
– Users can also sign up with Google or GitHub.
- For returning users:
Navigate to and click on SIGN IN located at the top right corner. On the resulting login page, enter your login credentials and click on SIGN IN.
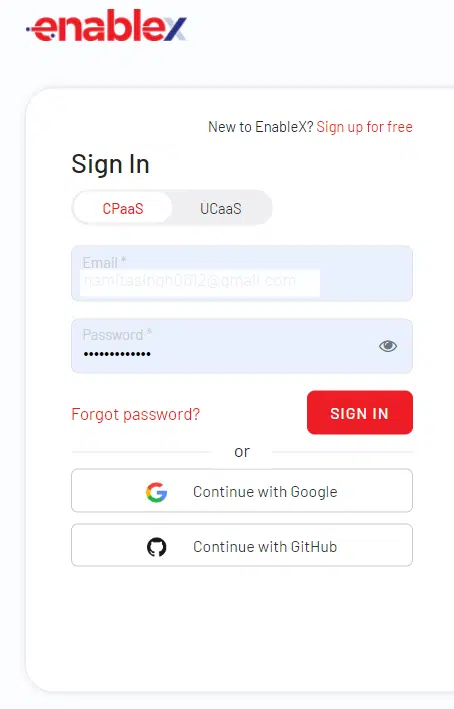
-Optionally, use Google ID or GitHub ID for login.
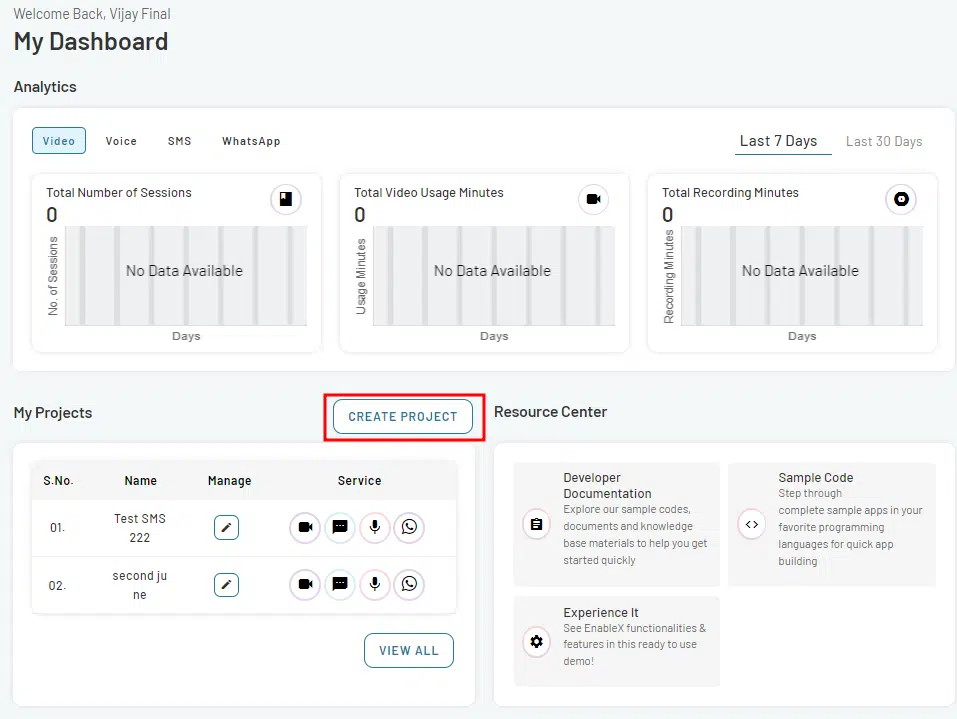
- After logging in, users will be directed to My Dashboard which offers various information options.
1.3 Understanding the Interface
The EnableX platform provides a user-centric dashboard that offers a quick glimpse into the user’s activities, projects, and resource tools. This allows for quick navigation and easy access to the most used features.
Menu Options:
- My Dashboard: The home page of the platform, displays a summary of the user’s activities and vital stats.
- My Projects: A list of all the projects created by the user with management options.
- Analytics: Provides insight into the user’s activity over a specified period.
- My Projects: Lists projects, allows for easy management, and shows associated services.
- Resource Center: Dive into developer documentation, sample codes, and test EnableX’s features via a live demo.
- Video, Voice, SMS, WhatsApp: Different communication channels available for integration. Clicking on each would likely lead to specific settings and configurations for that service.
- Billing: Check your billing details and payment history.
- My Wallet: Overview of your financial details and transactions.
- Support: Direct access to help and customer support.
2. Building Video Application Using Video Server APIs
EnableX offers two methods to build a video application: through APIs or using the Low Code option. The registration, login, and project creation processes are identical for both methods. This guide proceeds with the APIs. If you opt for Low Code, the steps up to this point remain unchanged.
2.1 Building the WebRTC video calling UI Yourself
Developing Video UI:
- To create a customized video user interface (UI), it is necessary to have expertise in front-end UI development.
- Familiarize yourself with the available Software Development Kits (SDKs) and refer to the provided documentation to build the UI according to your specific requirements.
- Please note that this option requires a more substantial investment of time and effort during the development process.
Server-Side Coding:
- To enable the integration of video functionalities, you must work with the server API, a RESTful API service for provisioning needs.
- Understand and utilize the server API to facilitate the necessary backend coding and provisioning for your video application.
3. Pre-Requisites for Building Video Application
- Add Video Service to your project
- Create a new video project
- Add Video to the existing projects
- Get App ID and App Key
- Get an SSL Certificate
3.1 Add Video Service to your project
To integrate Video API into your project, you need to utilize Video as a Service. There are two ways to add video capabilities to your project:
- Create a New Project and Add Video as a Service
If you’re starting a new project, you can create a fresh project and incorporate Video as a Service into it. This approach allows you to build your project from scratch while seamlessly integrating video functionalities.
2. Add Video as a Service to an Existing Project
If you already have an ongoing project, you can enhance it by adding Video as a Service. This way, you can leverage the power of video communication within your existing project without the need for a complete overhaul.
3.1.1 Create a new Video Service project with EnableX
To begin developing a WebRTC video application with , the first step is to create a project on the platform. Follow these steps to create a project:
Path# 1
- Login to the EnableX Portal.
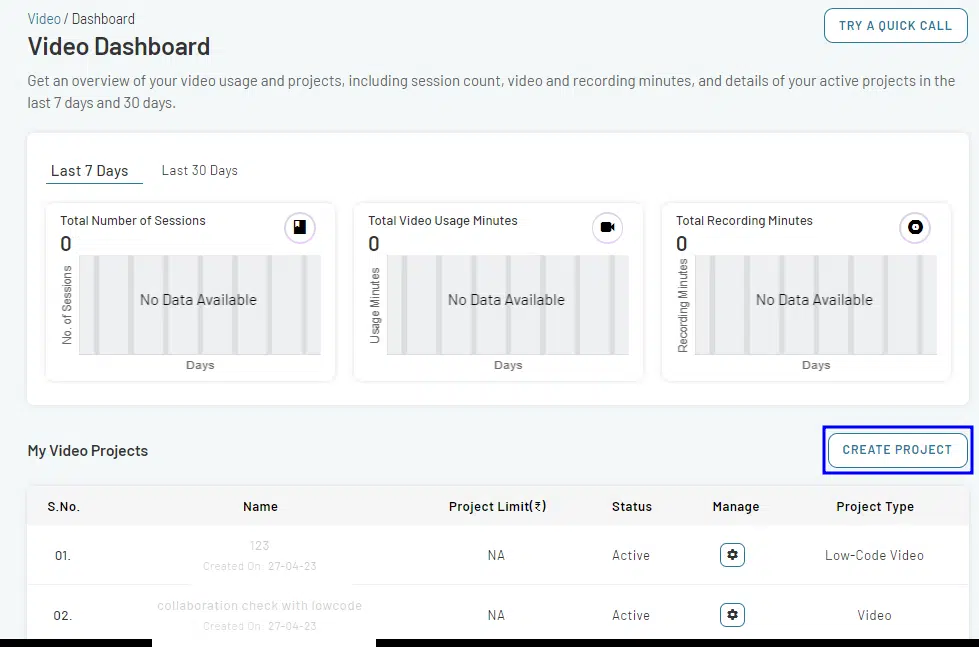
- After successfully logging in, users are redirected to My Dashboard. From there, follow these steps to create a new project:
- Navigate My Projects section on the page.
- Click on CREATE PROJECT button. This opens Create Project page.

- On this page, provide the necessary information for your project, including the Project Name, Application, and Project Description.
- Navigate the Channels section on the page. Within this section, you can enable specific services for your project.
- To add video service to your project, toggle video option in the Channels section. This ensures that the video functionality will be available within your project.
- Click on CREATE PROJECT button to create your project.
- The project has been successfully created and a confirmation popup will appear.
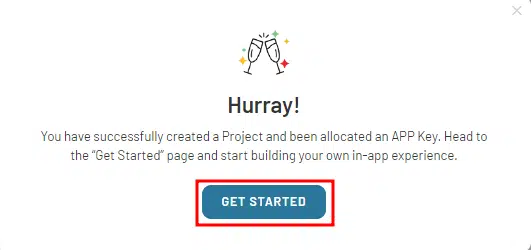
- In the pop-up dialog, click on GET STARTED button. This will take you to the next stage of the setup process.
- If the project creation process fails, review the previous page and ensure that all mandatory fields are completed.
- you can add more services to it by going to the My Projects section.
Path# 2
- Navigate to My Dashboard
- Go to Left Menu Bar and select Video
- Navigate to the My Video Projects section
- Click on CREATE PROJECT
- This will take you to the same Create Project form as explained in Path# 1.
- Follow the same process as explained.
To proceed, click on the GET STARTED within the popup.
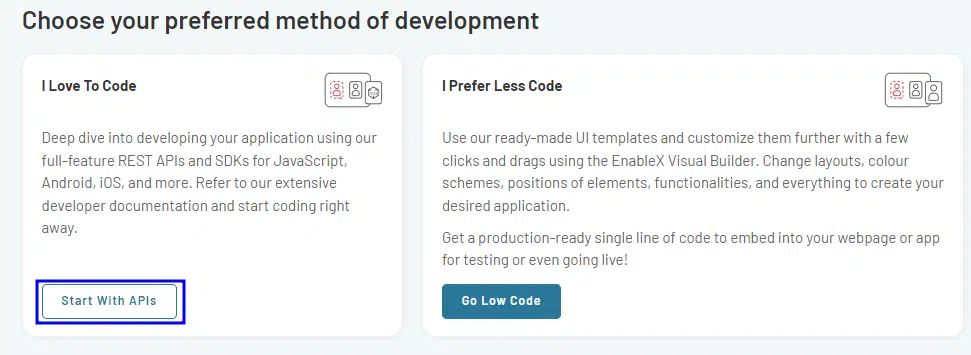
- Select the development method that best fits your preferences and requirements
- Select <I Love To Code> option from the available choices and click on Start With APIs.
This will give you access to the necessary APIs and SDKs for your project, enabling you to begin coding and developing your application with EnableX’s extensive tools and resources.
3.1.2 Add Video Service to an Existing Project
This process involves a few simple steps to configure your Video integration within your existing projects, whether it is Voice, SMS or WhatsApp Project. To add video service to an existing project:
- Navigate to My Dashboard
- Go to My Projects section
- To add services to a project, select the project you want to modify and click on the Edit icon. This will open the project summary page.
- On the Project Summary page, click on EDIT Tab.
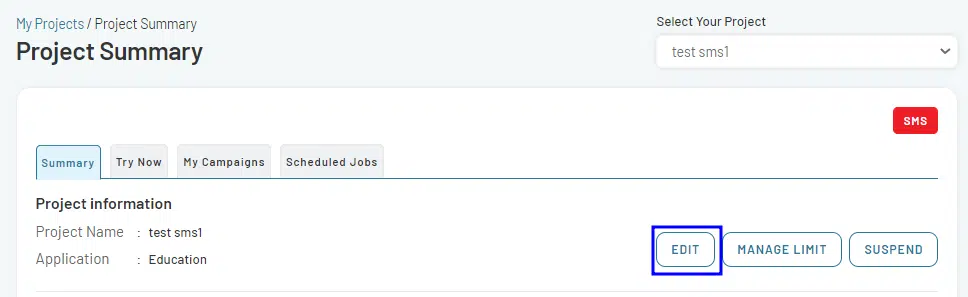
- A Edit Project Information form will open, using which you can add new services to the Project or remove any existing service.
- Enable Video option in the Channels section.
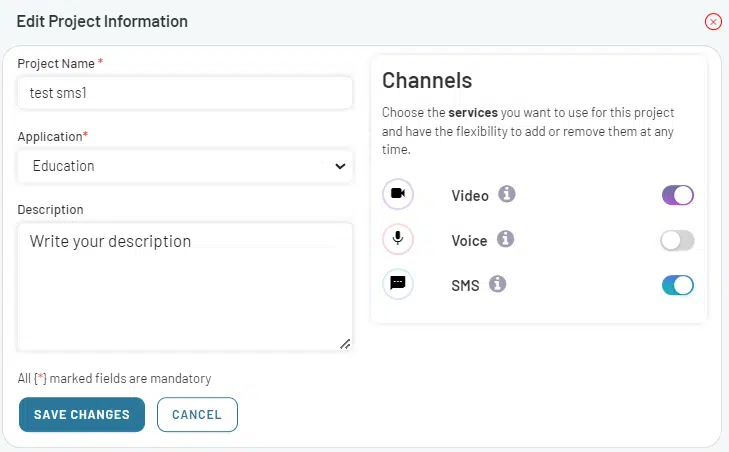
- Click on SAVE CHANGES.
- A new Video service has been integrated into your existing project.
- The updates will be immediately reflected on the Dashboard.
3.2 Get App ID and APP Key
Before you embark on your application development journey with the EnableX platform, it’s essential to obtain an API Credential. This credential includes an App ID and App Key, which serve as the username and password, respectively, in the HTTP Base Authentication Request Header of our Video Server API Call.
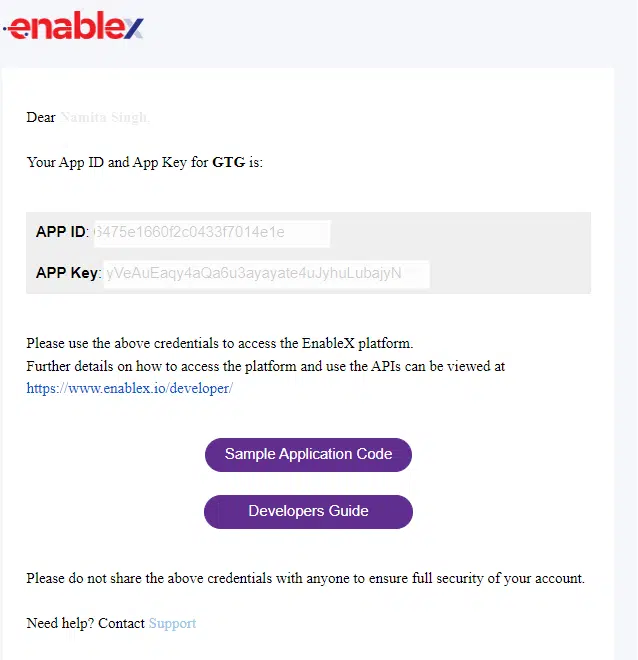
When you create a project, the API Access Credentials are sent to you via email. However, you may need to reset API Key or resend API Credentials. Follow these steps to get your project’s access credentials reset or resend.
- Navigate to the My DASHBOARD, select the project you want credentials for, and then click on Manage icon.
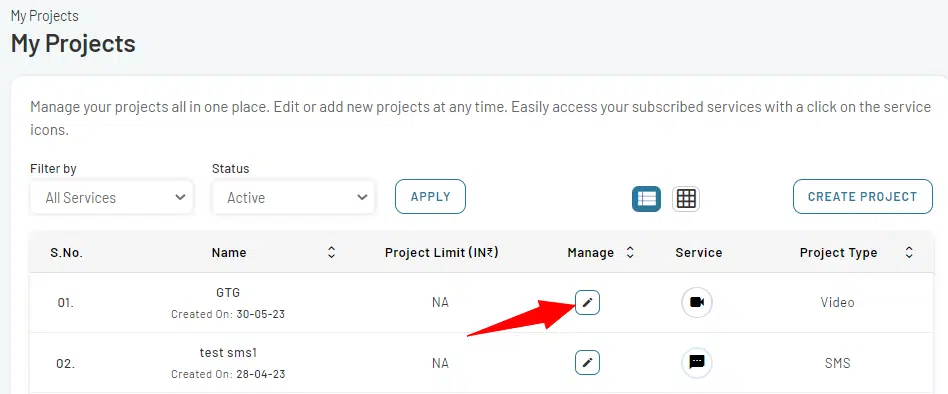
- This will take you to the Project Summary page.
- Go to the Project Credentials section on this page.
- Locate the SEND CREDENTIALS and RESET APP KEY buttons.
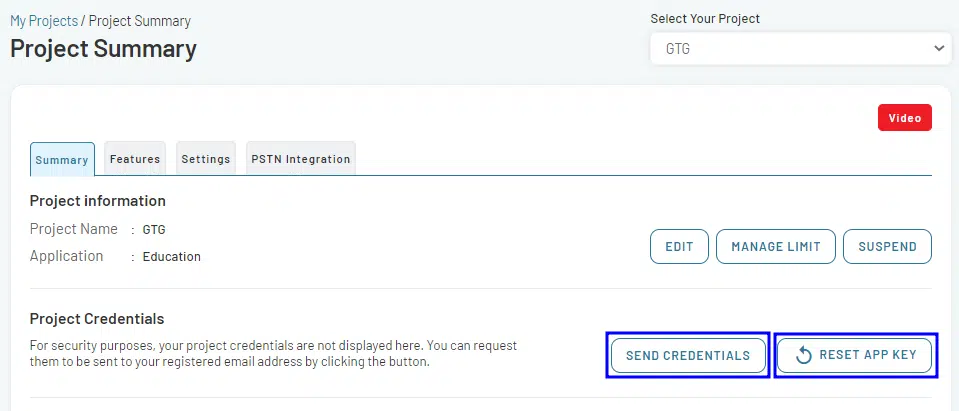
- If necessary, use the RESET APP KEY option to reset the application credentials.
- Use the SEND CREDENTIALS option to resend the application credentials to your registered email address.
- Now you have obtained the App ID and App Key, Use these in your Application Server for Video Server API Call.
Note: Make sure that you use the App ID as the username and the App Key as the password in the HTTP Base Authentication Request Header.
3.3. Get SSL Certificate
If you have created a Browser based Application, the Application Server serving the Video Session pages must run on https. You will require a valid SSL Certificate for your Application Server domain to connect to the EnableX platform. However, you may also use Self-Signed Certificate or Snakeoil Certificate to run the application locally. Below are a few ULRs to obtain a Self-Signed Certificate:
- https://letsencrypt.org/
- https://www.sslchecker.com/csr/self_signed
- https://www.akadia.com/services/ssh_test_certificate.html
3.3.1 How to use SSL Certificate Files?
After you have registered a Certificate or created a Self-Signed Certificate copy of the Certificate Files (.key and .crt files) in a designated directory within the Application Server, you may then refer these files with the absolute path in server/config.js file.
To use SSL Certificate Files with any Web Server, please refer respective Web Server’s Documentation / Directives.
4. Setting Up the Video Application Server
Use an Application Server for efficient video application workflows. This server manages provisioning, workflow automation, and reporting by leveraging the Video Server API and receiving notifications via a Web-hook URL when needed.
Overview
Host your Application Server on a secure, publicly-accessible web server using HTTPS. This server:
- Manages provisioning.
- Hosts the Video Session Web Pages.
- Generates reports.
- Handles Webhook URL notifications.
- You can choose your web server and programming language.
4.1 Video Server API
Use the Video Server API, our RESTful service, for provisioning and reporting tasks. Ensure you call these APIs from your Application Server.
4.1.1 Understanding Provisioning Need
To start a video session, create a Video Room. Users need a token to join a session in this room, accessible through a web browser or mobile app. Design video rooms based on your needs. Depending on their definition, you can use them for one or multiple video sessions.
4.1.2 Understanding Reporting Need
Retrieve historical video session data when needed. EnableX offers an API to access the Call Detail Report (CDR) and recording & chat files. We recommend storing this data in your internal Information System for versatile data management and reporting.
4.2 Using Webhook
Webhook delivers real-time notifications about meeting events in JSON payload format. EnableX sends these notifications via an HTTP POST request. Set up a URL for your EnableX Video Project to use this feature. Read More – Notification Webhook
4.2.1 Automation Requirements
Webhook streamlines your application’s workflow by integrating with EnableX. Here’s how:
- Receive end-of-session notifications. Immediately call an API to get CDR reports and update your Information System.
- Get alerts when recording files are ready. Download these files programmatically and allow video playback directly from your server.
5. Understanding the Video SDK
The Video SDK empowers your applications to communicate smoothly between the EnableX Server and various client endpoints. EnableX offers a broad range of SDKs tailored for web and mobile apps.
SDK offers functions built on APIs using Web Sockets, allowing effective communication with EnableX Servers. Additionally, it conveys a range of events to endpoints, keeping users informed about session activities and updates.
5.2. Types of SDKs
EnableX offers SDKs to cater to various platforms and application frameworks:
Web SDK: JavaScript library tailored for browser-based video applications.
Native SDK:
- Android SDK: Craft native apps for Android devices.
- iOS SDK: Design native apps for iOS devices.
Hybrid SDK:
- React Native SDK: Designed for the React Native framework.
- Flutter SDK: Tailored for the Flutter framework.
- Cordova SDK: Developed for the Cordova platform.
Download SDKs Here.
5.3 Working with SDKs
The SDK seamlessly integrates into client-end applications. It establishes and maintains a connection to video sessions, gracefully handling network fluctuations. It manages media transfer between the client and the EnableX Server for a smooth session.
5.3.1 Key features include:
- Socket Connection: Establishes a connection to the EnableX Server via Web Sockets. Communication interruptions only occur if the Web Socket connection is disrupted. The SDK can also attempt reconnection to restore sessions.
- Method Usage: Execute actions in the client application by invoking the relevant SDK method. These methods function asynchronously. After a method call, the SDK sends a request to the EnableX Server and expects an immediate response.
For instance, in the Web SDK, to initiate recording, utilize the startRecord() method.
// To start recording
room.startRecord( function( result, error ) {   // Method call & Callback
  if (result == 0) {
      // Recording started
  }
});
- Event Notifications: The EnableX Server dispatches notifications via Web Sockets for various events to connected clients. Your application should listen to these notifications and act accordingly.
For example, in the Web SDK, to be informed when recording begins:
// Notification recording started to all
room.addEventListener( "room-record-on", function(event) {
  // Recording started, Update UI
  // event.message.moderatorId = Moderator who stated recording.
});
- Media Stream Handling: The SDK handle of the flow of media streams between the client End Point and the EnableX Media Server. If standard UDP ports are unavailable (common in some corporate networks), the SDK routes media through the EnableX TURN Server using a standard HTTPS port, ensuring communication even if not of the optimum quality.
Note: EnableX uses UDP ports ranging from 20,000 to 60,000 for media streaming. To ensure optimum Video Communication, you need to ensure that these Ports are not restricted in your Network.
5.3.2 SDK Entities Overview
The SDK primarily works with four entities:
- Room:
- Represents the client-side session.
- Manages connections, local stream broadcasting, and remote stream access.
- Creates a room object by using a token that users have previously obtained from your service. To retrieve this token, you will need to use the Server API as it functions as a user access token.
2. Stream:
- Symbolizes an individual’s stream, which can be a combination of audio, video, and data.
- Helps in identifying the source and determines where it should be displayed.
3. Events:
- Denotes notifications pertaining to client-side operations. This includes:
– Room Events: Notifications concerning room connections.
– Stream Events: Alerts related to streams within a specific room.
4. Player:
- A versatile UI component designed for displaying streams.
- It can render streams within the browser’s Document Object Model (DOM) or within the view handler of a mobile SDK.
6. Developing a Client End Point Application
Client end points are devices participating in real-time communication (RTC). These can be browsers on PCs/laptops or mobile devices/tablets running on Android or iOS. This guide will help you navigate from connecting to a video room to eventually disconnecting, using the EnableX SDKs.
6.1. Selecting the Right SDK
Objective: Choose the appropriate EnableX Client SDK based on the device your application needs to support.
Procedure:
- Identify the device (e.g., laptop, Android tablet, iOS smartphone).
- Match the device compatibility with the corresponding EnableX SDK.
- Initiate a session using a token.
6.2 Connecting to a Room
Objective: Establish a connection to a video room using a token.
Procedure:
- Acquire a token for the client end point.
- Use the SDK’s joinRoom() method to connect.
- Upon successful connection, begin streaming audio/video to the room.
- Handle any connection errors appropriately.
Example: Web SDK – Connecting to Video Room
/* Configure your Media Stream to publish */
var PublishStreamInfo = {
  audio: true,
  video: true,
  videoSize: [640, 480, 640, 480],
  attributes : {
      name: "John",
      age: 21,
      emp_id: "EMP039"
  }
};

/* Create Empty Object, if not to publish Media Stream */
var PublishStreamInfo = {} ;

/* Connect to Video Room */
localStream = EnxRtc.joinRoom(TOKEN, PublishStreamInfo, function(success, error) {
if (error && error != null) {
 /* Handle Connection Error */
}
if (success && success != null) {
 /* Connected Room Information */
 room = success.room;
}
});
Please Read:
Connecting to video Room – Web SDK
Connecting to Video Room – Android SDK
Connecting to Video Room – iOS SDK
Connecting to Video Room — React Native SDK
Connecting to Video Room – Flutter SDK
Connecting to Video Room – Cordova SDK
6.3 Subscribing to Remote Streams
Objective: Receive and play videos from remote participants.
Procedure:
- After connection, retrieve a list of available streams in the room.
- Subscribe to all available streams using the subscribe() method.
- Note that you must subscribe to Screen Share Stream (Stream No. 101) and Canvas Stream (Stream No. 102) too to receive Screen Share and Canvas Stream respectively.
Example: Web SDK – Stream Subscription
EnxRoom.subscribe() method may be used to subscribe to individual streams available in the room. You need to listen to stream-subscribed event to know when you are subscribed.
// Room Connection call back success information
// has all Remote Stream Information
for (var i=0; i < success.streams.length; i++) {
  // Subscribe Stream
  room.subscribe(success.streams[i]);
}

// You are notified when subscription is successful
room.addEventListener("stream-subscribed", function(event) {
  console.log("Stream subscribed");
});
Please Read:
Subscribing Remote Streams – Web SDK
Subscribing Remote Streams – Android SDK
Subscribing Remote Streams – iOS SDK
Subscribing Remote Streams – React Native SDK
Subscribing Remote Streams – Flutter SDK
Subscribing Remote Streams – Cordova SDK
6.4 Playing Streams
Objective: Display both local and remote streams.
Procedure:
- Use the SDK’s play() method to render streams.
- This method will create the necessary audio/video elements within the specified DOM element to display the stream.
Example: Web SDK – Play Stream
// Play Stream
stream.play(DOM-ElementID, playerOptions);

// The Stream Object here may be a local, remote, screen share or canvas stream
Please Read:
6.5 Managing Active Talkers
Objective: Efficiently handle active talkers to conserve resources and manage specific stream types.
Procedure:
- Track Active Talkers: Utilize the provided JSON list to monitor who’s actively speaking.
- Stream Adjustment: Dynamically modify the stream display based on the current active speaker(s). Pay particular attention to special streams like Screen Sharing (StreamID# 101) and Canvas Stream (StreamID# 102).
- UI Updates: Implement the supplied event handlers to refresh your user interface as the list of active talkers and special streams shifts.
Note: Regularly updating and managing the active talkers and recognizing specific streams, especially StreamID# 101 and 102, is critical to ensure optimal resource usage and deliver a seamless user experience.
Example: Web SDK – Updated Active Talkers List
// USON Format: Updated Active Talker List received
{
  "active": true,
  "activeList": [
    {
      "clientId": "String",
      "mediatype": "audiovideo",
      "name": "String",
      "reason": "user",
      "streamId": "Number",
      "videoaspectratio": "16:9",
      "videomuted": false,
      "pinned": false
    }
  ]
}
// Handle updated AT List and Play Stream
room.addEventListener('active-talkers-updated', function (event) {
  TalkerList = event.message.activeList;
  for (var i = 0; i < TalkerList.length; i++) {
      if (ATUserList[i] && ATUserList[i].streamId) {
          var stream  = room.remoteStreams.get(ATUserList[i].streamId);
          var stream_id   = ATUserList[i].streamId;
          var username    = ATUserList[i].name;
          stream.play("DOM_ELEMENT_ID", PlayerOptions);
      }
  }
}
Please Read:
Manage Active Talkers – Web SDK
Manage Active Talkers – Android SDK
Manage Active Talkers – iOS SDK
Manage Active Talkers – React Native SDK
Manage Active Talkers – Flutter SDK
Manage Active Talkers – Cordova SDK
6.6 Disconnecting from the Room
Objective: End the video session and release resources.
Procedure:
- Utilize the SDK’s disconnect() method to end the session.
- Ensure all sockets and connections are properly closed.
Example: Web SDK – Disconnect
room.disconnect();

room.addEventListener("room-disconnected", function(event) {
     // You are disconnected
});

room.addEventListener("user-disconnected", function(event) {
     // One user is disconnected
     // event - User Information of disconnected user
 });
Please Read:
Disconnect from Room – Web SDK
Disconnect from Room – Android SDK
Disconnect from Room – iOS SDK
Disconnect from Room – React Native SDK
Disconnect from Room – Flutter SDK
Disconnect from Room – Cordova SDK
7. Use Advance Features
With the Advanced Features of EnableX, you can build more complex audio/video-enabled applications by introducing more controls on streams, data or connections.
EnableX SDK and Video Service features extensive set of Method and Events using which you can create feature rich Video Application to meet all your business needs. So, you need to choose the related Methods to support your use case.
We recommend you to look into Index of feature list supported by each SDK and find required method yourself for implementation.
Index of SDKs:
Best wishes! Happy Coding!!
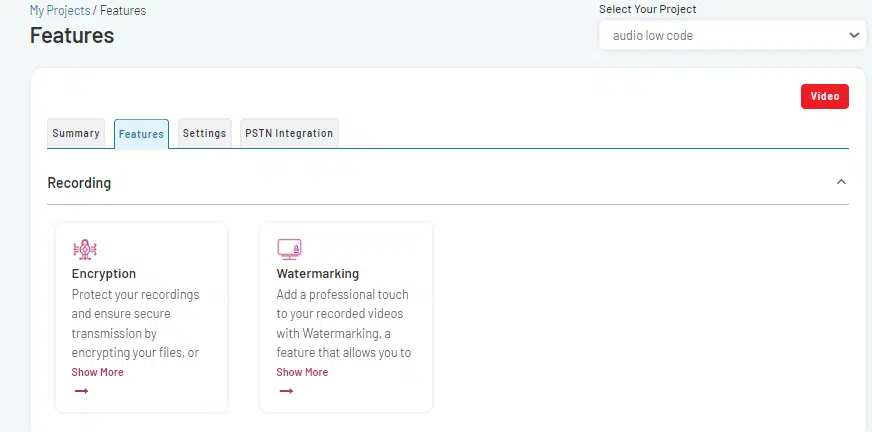
8. Configure Features in Video Project
Through the portal, users have the capability to optimize both the security and professional appearance of video recordings. Two distinct features are available for this purpose:
Encryption
With encryption, transform your videos into unreadable formats, decipherable only with the correct key, ensuring the utmost confidentiality and security.
Watermarking
Maintain the authenticity and uniqueness of your videos with watermarking. By embedding a discreet signature or logo onto your recordings, you not only claim ownership but also enhance their professional appearance.
8.1 Encryption
Video Recording Encryption is a feature that provides an additional layer of security for your EnableX Programmable Video Recordings. This feature allows you to encrypt your recordings with an encryption key, ensuring the confidentiality and integrity of the recorded content during storage and transmission.
To encrypt your video recordings:
- Enter your Encryption key and click on SAVE.
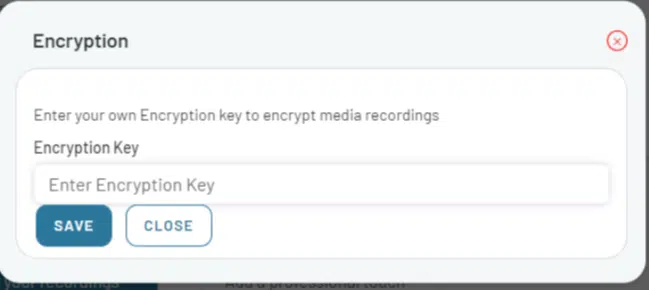
Note: Encryption is a service available with a subscription. When a user signs up for this service, the user himself needs to set an encryption key.
If you are interested in the encryption service, please contact us
8.2. Watermarking
To add a professional touch to your recorded videos with Watermarking, a feature that allows you to place your own watermark on your videos, do the following:
- Navigate to the Watermarking feature.
- Specify the mandatory settings to format the appearance of the watermark.
- Upload Watermark Image by clicking Choose File.
Note: The Image should be a .png file, no larger than 50KB and 150*150 pixels in dimension.
- Adjust the Opacity of your watermark from 1 to 5 to set the transparency level.
- Click on SAVE.
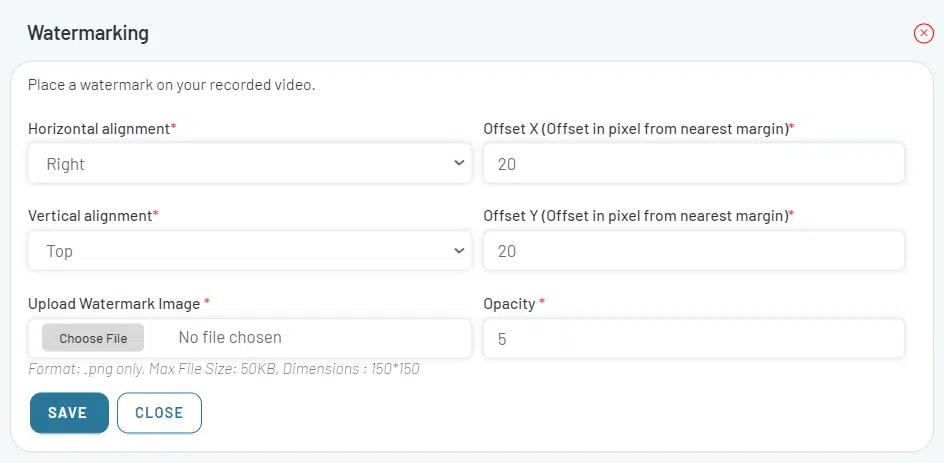
Note: Watermarking is a service available with a subscription. If you are interested in the Watermarking service, please contact us.
9. Configure Settings in Video Project
Within the Video project environment, users have various settings to optimize the functional aspects of the project. These configurations are crucial for managing recordings, ensuring efficient application-server communication, and determining user-specific media zones.
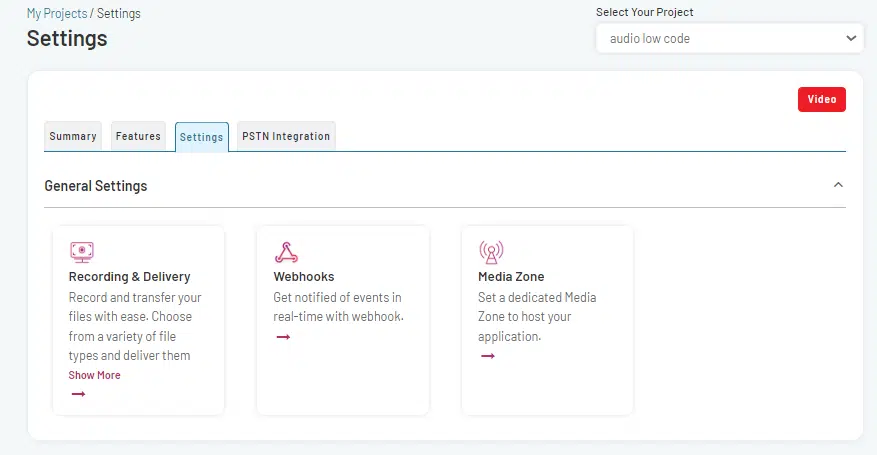
9.1 Configure Recording and Delivery Settings
You can set up an Archiving and Delivery service to capture and archive webinars and meeting room data including voice, video, captions/transcripts, and in-meeting chat messages, and make them available on a destination server, service, or platform of your choice.
- Navigate to the Recording & Delivery tab.
On the Recording & Delivery page, you have the option to choose the file types to deliver and specify the destination for the recorded files. To configure these settings:
Deliver File Types:
- Select the file type(s) you want to include in the delivery of recorded content. The available options in this case are:
- Individual Recording: Deliver each recording as a separate file.
- Live Recording: Deliver recorded content from live sessions.
- Transcoded: Deliver the content in a transcoded format.
- Meta data: Include metadata associated with the recorded content.
- Chat data: Include the chat data from the recorded sessions.
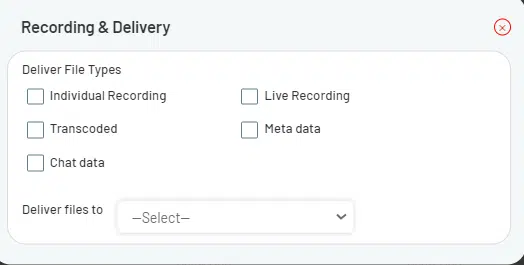
Deliver files to:
- Select the destination where the recorded file(s) will be delivered. Available destination options are:
- FTP to my server
- Secure a copy to my server
- Save on AWS S3
- Save on Google Drive
- Save on Microsoft Azure
9.1.1. Transfer to FTP/SFTP Host
- Select FTP to my server from the Deliver files to drop-down list. The FTP to my server section will display on the recording & delivery page.
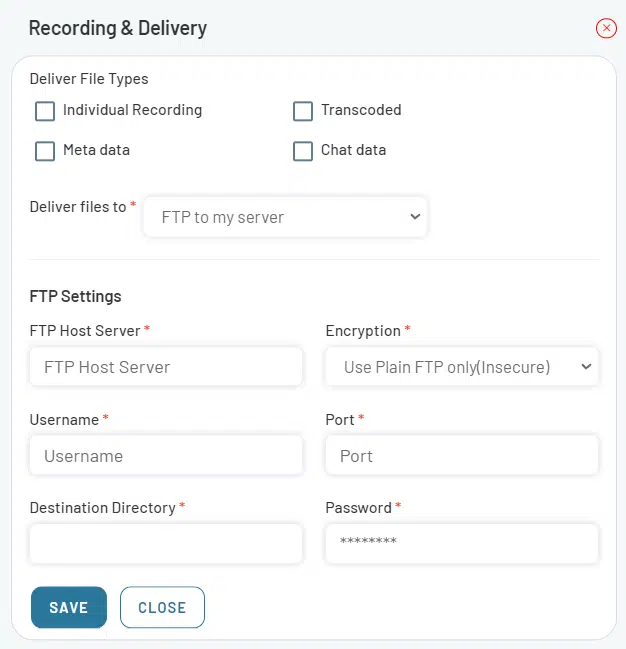
- Specify the details required for file transfer.
This includes:
- FTP server details: Enter the hostname or IP address of the FTP server where you want to transfer the files.
- Username: Specify the username associated with your FTP server account.
- Password: Enter the password for the provided username.
- Port (optional): If required, provide the port number for the FTP connection. If left blank, it will typically use the standard FTP port.
- Click on SAVE to submit the specified details.
The files will be transferred to the specified FTP server.
9.1.2 Transfer to using SCP
- Select Secure copy to my server from the Deliver files to drop-down list. The SFTP Settings section will display on the recording & delivery page.
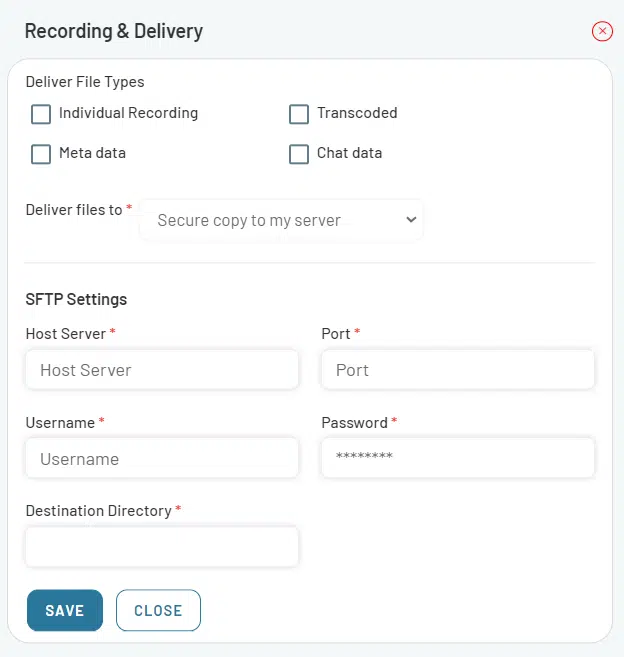
- Specify the details required for file transfer.
- Fill in the form as needed and submit it by clicking on SAVE button.
9.1.3 Transfer to AWS S3
- Select Save on AWS S3 from the Deliver files to drop-down list. The AWS S3 Settings section will display on the recording & delivery page.
- Specify the details required for file transfer.
- Fill in the form as needed and submit it by clicking on SAVE button.
9.1.4 Transfer to Google Drive
- Select Save on Google drive from the Deliver files to drop-down list. The Google drive Settings section will display on the recording & delivery page.
- Specify the details required for file transfer.
- Fill in the form as needed and submit it by clicking on SAVE button.
9.1.5 Transfer to Microsoft Azure
- Select Save on Microsoft Azure from the Deliver files to drop-down list. The Microsoft Azure Settings section will display on the recording & delivery page.
- Specify the details required for file transfer.
- Fill in the form as needed and submit it by clicking on SAVE button.
9.2. Configure Webhook Settings
Webhooks are an essential feature of the EnableX platform that allows you to receive real-time notifications about specific events. By configuring a webhook URL and selecting the desired events, you can effortlessly stay updated on crucial activities within your application. This chapter will guide you through the process of setting up webhooks and receiving notifications.
To set up webhooks and start receiving notifications, follow these steps:
- Navigate to Webhooks tab.
- Specify Webhook URL that will receive the webhook notifications.
Note: Ensure that the URL supports HTTPS and is capable of handling JSON payloads via HTTP POST requests.
Subscribe Events
- Navigate the Subscribe to the Notifications section.
- In this section, you will find a list of events that can trigger webhook notifications.
- Select the <event(s) name> you want to receive notifications for.
- Toggle the corresponding icon in front of each selected event(s).
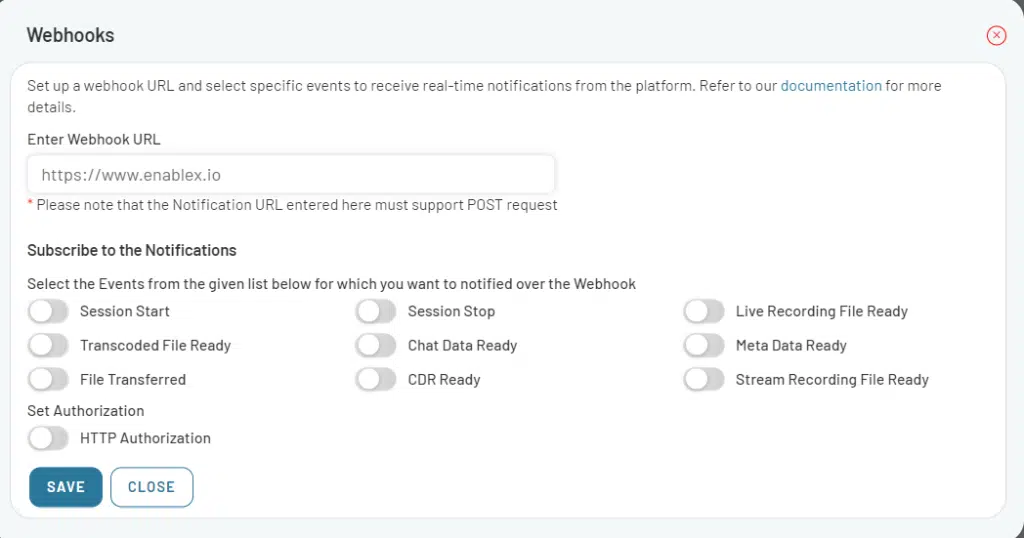
Various events that can we used via webhook are as follows-
- Session start: When a new session starts in a Video Room
- Session stop: When an ongoing session in a Video Room conclude.
- CDR Ready: When CDR is available ,you may call related Video API to get CDR.
- Stream Recording File Ready: When individual user’s recorded streams are ready for download. Notifications provide URLs to retrieve the files.
- Transcoded File Ready: When Single replayable files, transcoded from individual stream recordings, are available.The notification provide URLs of file(s) to pull/download.
- Live Recording File Ready: When live-recording file(s) (Recorded Live in-Session using Custom-UI) are available for download. The notification contains URLs of file(s) to pull/download.
- Chatdata Ready: When Chatscript File (In-Session Chat Data File) is available for download. The notification contains URL of file to pull/download.
- Metadata Ready: When Meta Data File (Session Activity Data File) is available for download. The notification contains URL of file to pull/download.
- File Transferred: When file(s) are transferred to destination server through Delivery Service. The notification contains location of the transferred files in the destination server.
Set HTTP Authorization (Optional)
You can enable HTTP authorization if you want to authenticate your users. Authorization headers provide credentials that authenticate a user agent to a server, allowing it access to protected resources. To implement secured access in your webhook, EnableX supports HTTP Basic Authentication.
- If your application requires HTTP authorization to receive webhook notifications, follow these additional steps.
- Enable HTTP Authorization option.
- Enter the <Username> and <Password> associated with your application’s HTTP authorization.
- Once you have specified the webhook URL and selected the desired event(s), click on SAVE button to finalize the webhook configuration.
When working with webhooks in the EnableX platform, it’s important to note that the Notification URL is a project-specific setting. This means that each project can have its own unique Notification URL. However, it is possible to use the same Notification URL across multiple projects if you want to receive notifications in a centralized location.
When a webhook event occurs and a notification is sent to the specified Notification URL, the JSON data posted will include the app_id parameter. This parameter carries the identifier of the project from which the event originated. You can utilize this app_id to segregate and differentiate the data received for each project if needed. This allows you to maintain project-specific logic and handle notifications accordingly.
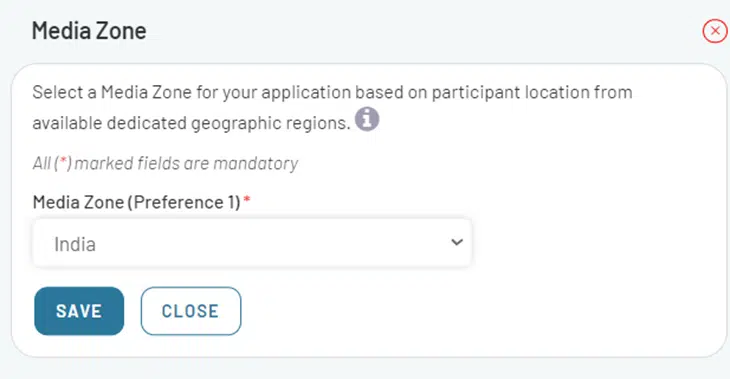
9.3. Configure Media Zone Settings
EnableX operates in multiple geographic regions through dedicated media zones. Depending on the geographic location of your participants, you can host your application in a particular media zone. The media and signalling traffic is hosted in specific regional data centers as per your preferred media zone. If you have subscribed to a different media zone, you can select it from the Media Zone (Preference 1) menu.
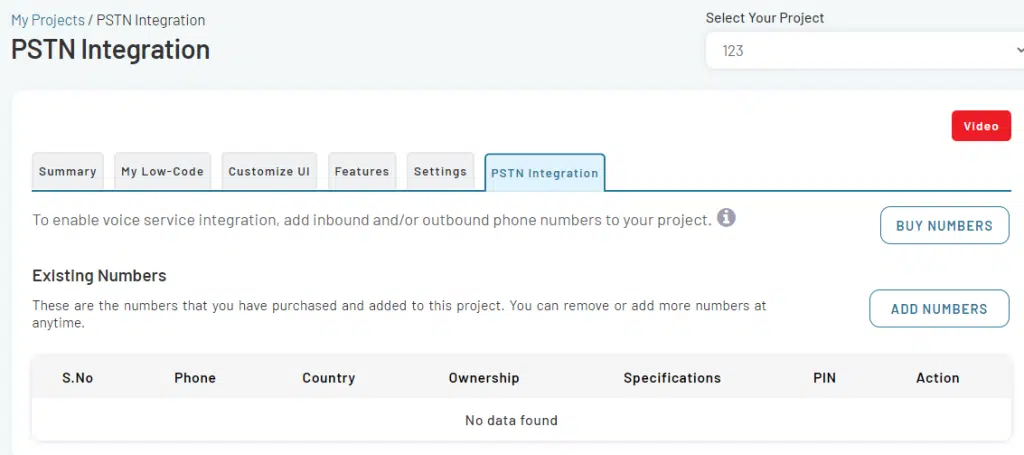
10. Configuring PSTN Integration to Video Project
If you want to integrate incoming and outgoing voice service, you need to add inbound and outbound phone numbers to your project. This helps users join the virtual sessions using a phone call, or be invited to the call through dial-out.
To add PSTN integration to your project, do the following:
- Navigate to Video section in the left menu pane and select Dashboard option from the drop-down.
- Select the project for which you want to configure PSTN voice Integration. This will take you to the project summary page.
- On the project summary page, select the PSTN Integration tab.
- The PSTN Integration form will open, where you can Buy Numbers and Add existing Numbers to the Video conference.
Buy Phone Numbers
Buy numbers from EnableX’s inventory or in case, the number of your choice is not available you can always place a request for a new number.
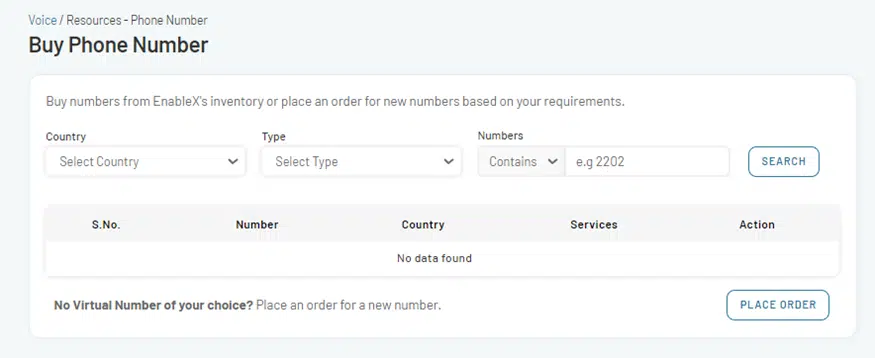
- Choose Country for which you need a number.
- Choose Type of Number you require (e.g., Toll, Toll-Free, Mobile, Fixed Line).
- SEARCH and BUY the number from EnableX inventory.
Place Order
- In case of non-availability of number of your choice, you can Place Order for a new Number.
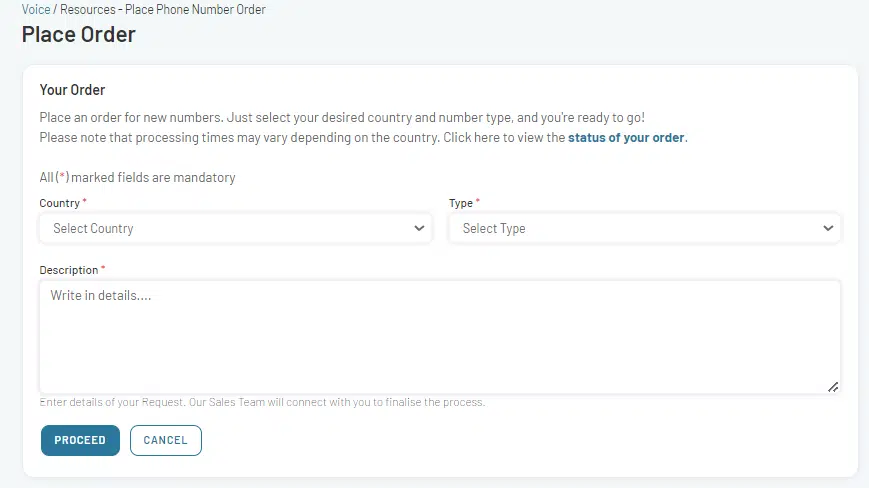
- Select the Country and Type of the Phone Number You want to buy. Write the details about your request and click on Proceed.
11. Project Management
All projects can be further managed using the manage icon next to each project name. To manage your existing Low-Code video projects, do the following:
On the Dashboard, navigate to the My Project section and identify the specific project you wish to manage. Click on the Manage icon next to the <Project>. This will direct to the Project Summary page.
The Summary page displays essential project details and offers advanced management options.
11.1. Project Details
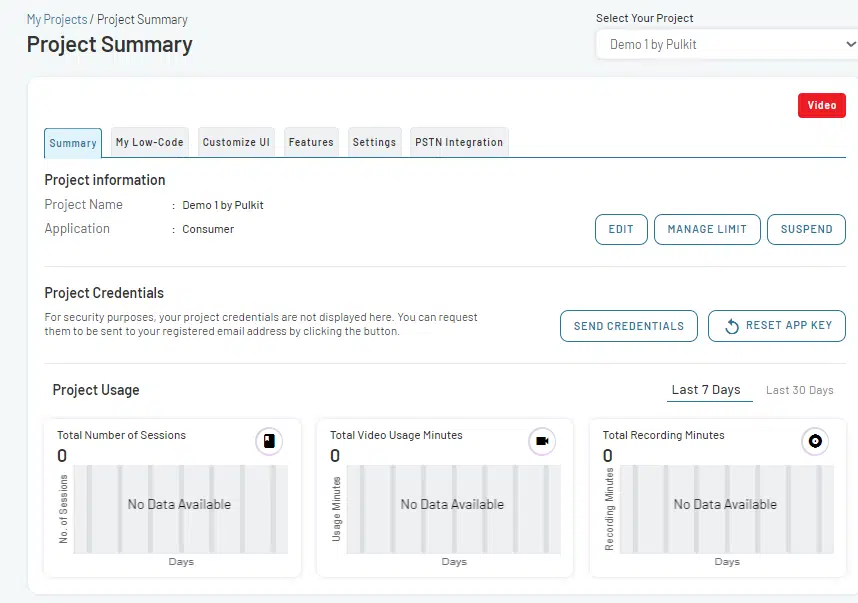
11.1.1. Project Information
In this section, basic information about the project is given.
- Project Name: Contains the name given during project creation.
- Application: Specifies the industry mentioned during project creation (e.g., Banking, Healthcare, Telecommunication).
11.1.2. Project Credentials
When you create a project, the API Access Credentials are sent to you via email. However, you may need to reset API Key or resend API Credentials. If needed, user can request Project Credentials and Reset App Key from the Summary page.
Send Credentials: This allows you to request project credentials to be sent to your registered email.
Reset App Key: This option resets the App Key (App ID & App Key).
11.1.3 Project Usage
This sections provides graphical displays for the following over the last 7 or 30 days:
- Total Number of Sessions
- Total Video Usage Minutes
- Total Recording Minutes
11.2 Advanced Manage Options
11.2.1 EDIT Option
- This option enables you to edit the Project Name, Application, Application description, and Project Description.
- You can also add other channels (Voice, SMS and WhatsApp) to your existing project.
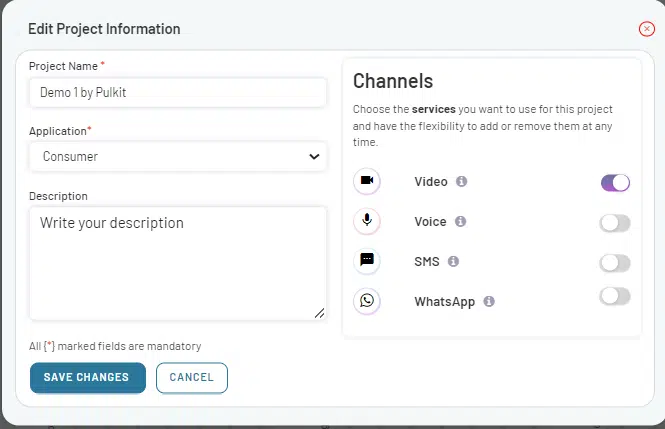
To edit the project Information, follow these steps:
- Navigate and click on EDIT tab on the Summary page.
- Make the necessary adjustments.
- Click on SAVE CHANGES.
- The updates will be immediately reflected on the Dashboard.
11.2.2. MANAGE LIMITS Option
The Manage Option is used to Manage the Wallet and the corresponding limits. Under Manage Limits Option, there are further various options which are as follows:
- Top Up
- Top Up History
- Manage Project Limit
- Allocation History
Top UP
The Top Up window provides options for managing the wallet balance. Users can either:
- Choose to add funds manually with a one-time top-up.
- Set an automated system to top up the wallet when the balance falls below a specific threshold.
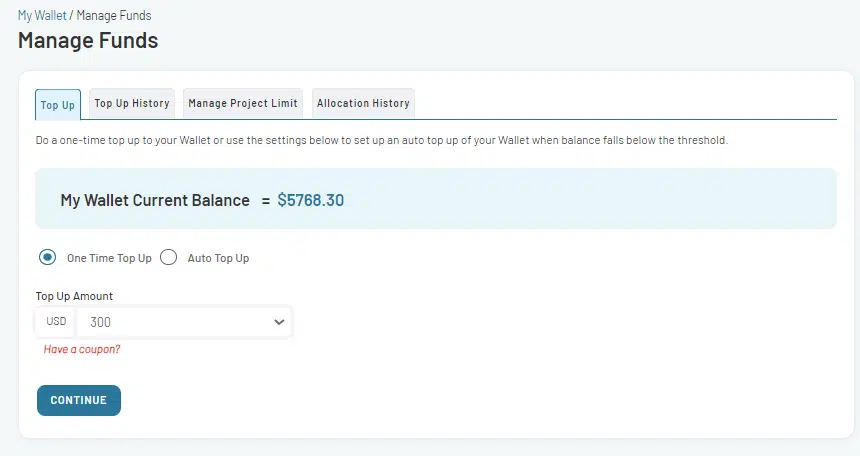
Additionally, there’s an option to apply a coupon, possibly for discounts or promotions, during the top-up process. The current balance of the wallet is also displayed for the user’s reference.
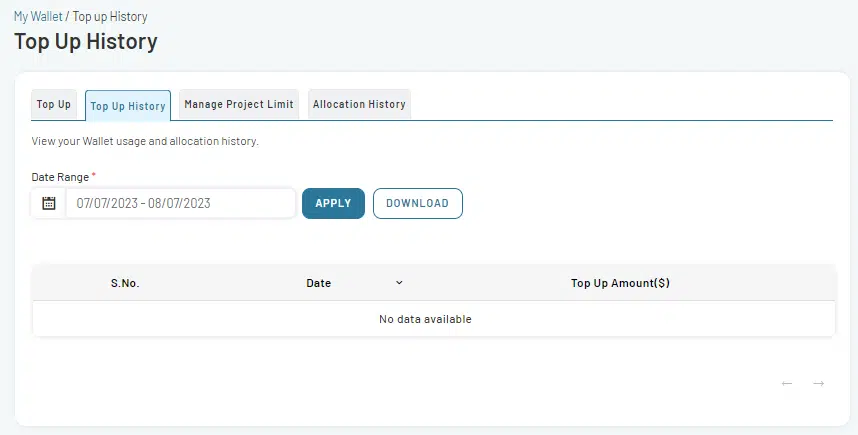
Top Up History
The Top Up History window allows users to review and track their wallet’s transaction history over a specified date range. It also provides a list of top-up amounts made to the wallet, organized by date. The user can adjust the date range to view transactions from different periods.
Manage Project Limit
The Manage Project Limit window provides tools for users to manage and adjust financial limits associated with a specific project. It allows users to allocate or release funds to/from the project from their main EnableX Wallet. All the financial values are presented in USD.
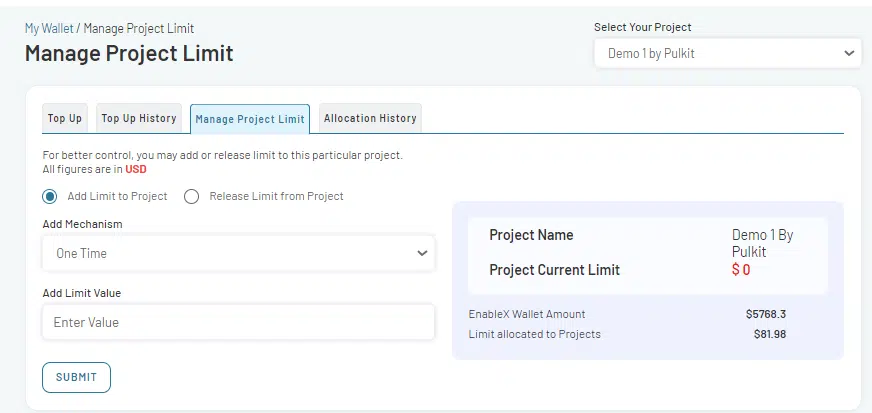
The interface offers:
- Options to either add funds to the project’s limit or release them back to the main wallet.
- A mechanism for one-time adjustments.
- Fields to specify the amount of funds to be adjusted.
- Display of the project’s name and its current financial limit.
- A view of the overall balance available in the EnableX Wallet.
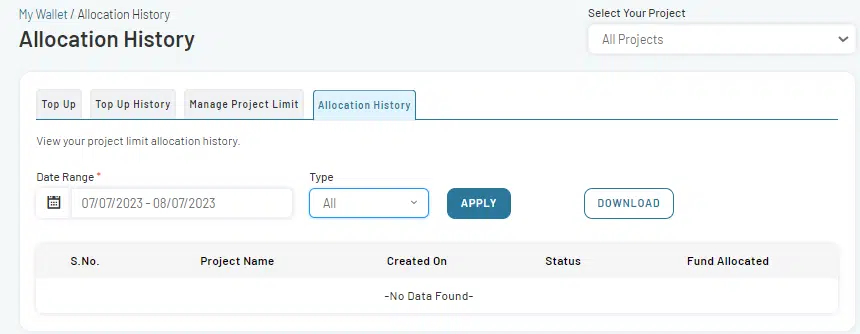
Allocation History
The Allocation History window provides an overview of the project limit allocation history, allowing users to track and manage the funds allocated to different projects within a specified date range.
Note: Options are available to load the wallet using an Auto Mechanism or when the balance falls below the minimum threshold.
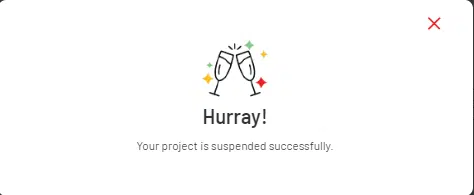
11.2.3. SUSPEND Option
This option suspends an account temporarily. Suspending a project stops all ongoing sessions.
- Click on SUSPEND.
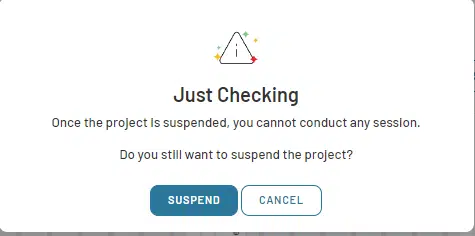
- A pop-up appears for confirmation, and the account is suspended.
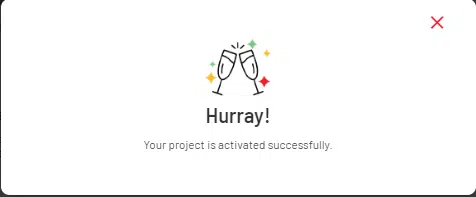
- For suspended accounts, the SUSPAND tab will change to ACTIVATE reactivation.
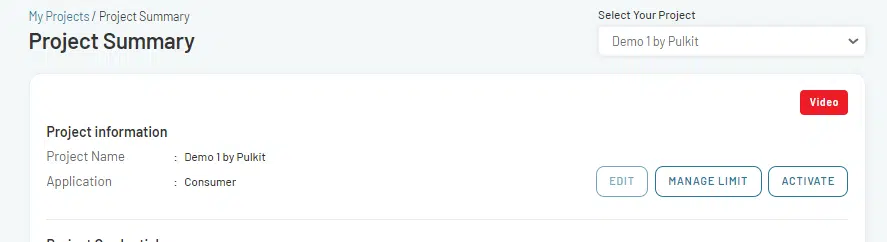
- To activate the suspended project, click on ACTIVATE tab.
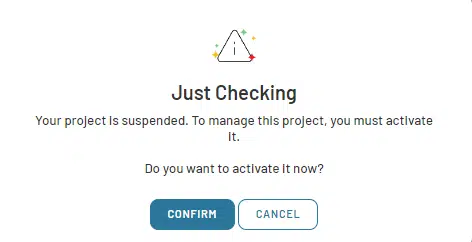
- A pop-up appears for confirmation, and the account is activated.
12. User Management
User management encompasses the systematic administration of user accounts, ensuring proper access rights within the software environment. This entails the construction, modification, and removal of user profiles, coupled with the precise delegation of permissions to various system components.
Accessing this section requires:
- From the main login interface, select the user icon located at the upper right corner.

The key functionalities provided within this section include:
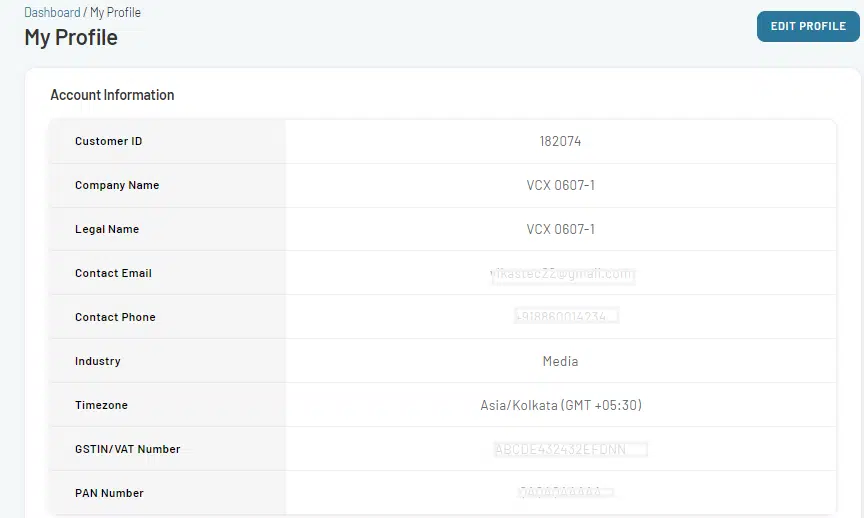
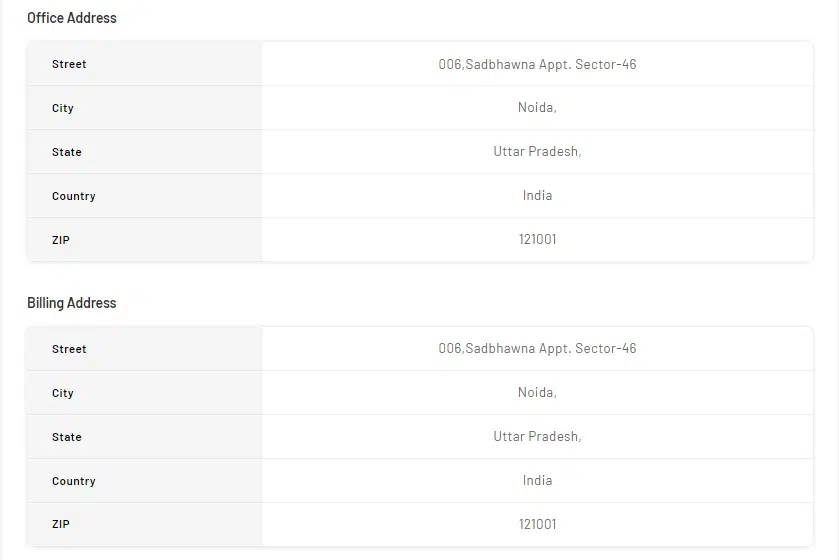
My Profile
This section presents comprehensive details related to the primary account with capabilities to modify them, ensuring the most up-to-date information is maintained. Key attributes within the profile:
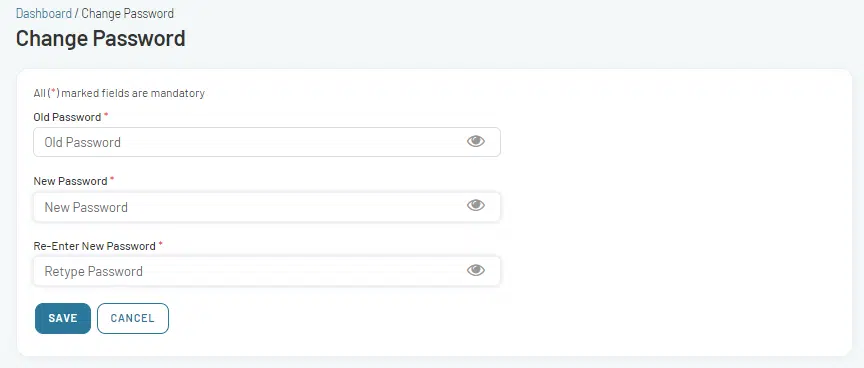
Change Password
This function facilitates a security measure where users can modify their existing password. The procedure:
User Management
For maintaining robust system security, data protection, and adherence to regulations, proficient user management is indispensable. It provides a mechanism to supervise user access, deter unauthorized activities, and optimize administrative tasks.
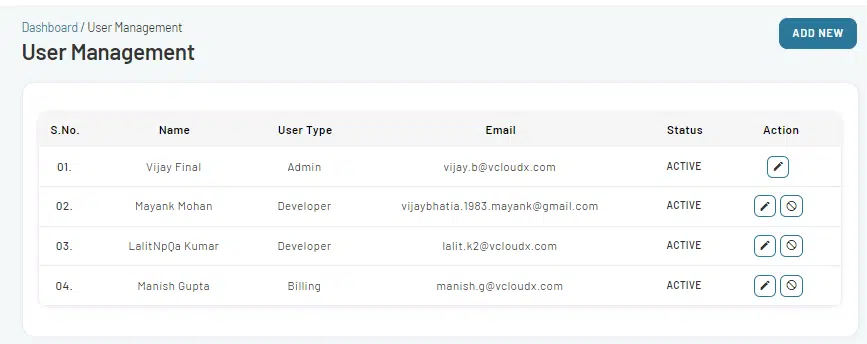
User Management serves to:
- Assign access based on specific roles and permissions.
- View a list of all created accounts with functionalities to either activate or suspend them.
Add New User
This function allows for the creation of a new user profile and the assignment of corresponding permissions.
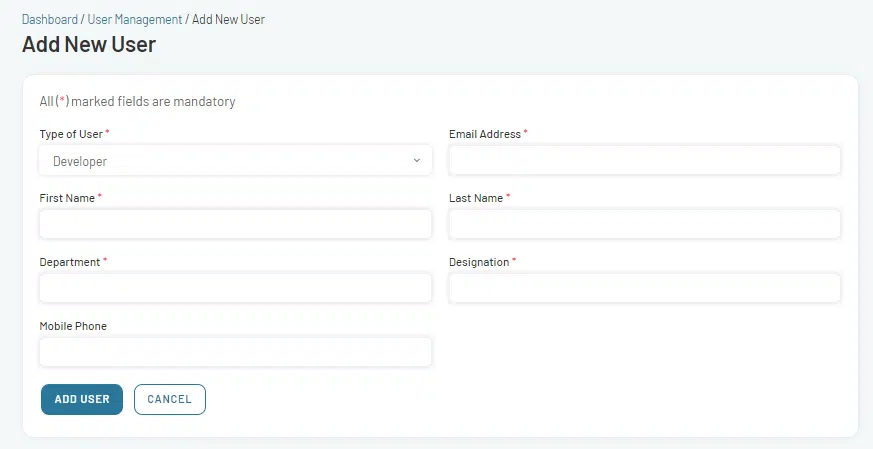
User Type
Administrators can determine the access level of a user based on their role:
Developer: For users involved in API-related development for video conferencing.
Billing: Designed for users overseeing billing and financial procedures.
Project Report: Grants users’ access to one or multiple accounts, specifically for reporting. An essential feature for an Admin Portal managing several clients. Selecting this option activates the Projects field, presenting a list of all projects for selection.