VOIP apps like Skype, WhatsApp, and Messenger paved the way for the popularity of App-to-App calling, and WebRTC has undoubtedly gone a step ahead by implementing these capabilities right into your browser or your mobile app. However, without a rich UI and a proper notification mechanism, even a very promising technology could be rendered useless. While VOIP or WebRTC takes care of the intricacies of a real-time communication session, a user is only bothered about making and receiving calls easily, which is why Apple, being focused on user experience, came up with CallKit to achieve this. In this blog, you will learn how to leverage the WebRTC-based CPaaS platform (EnableX) to develop a native dialer interface in iOS, which will mimic a similar experience for App-to-App calling. You can achieve this by using CallKit and EnableX Video APIs.
What is CallKit?
CallKit is an apple framework (introduced with iOS 10) that aims to improve the VoIP experience by allowing other call-related applications to integrate with the native phone UI. This significantly enhances the user experience, mainly in eliminating the need to open an app when answering, dropping, or blocking a call. CallKit will allow your app to:
- Displaying incoming/outgoing calls on the native call screen in both the locked and unlocked state.
- Dial any third-party calling services like any VoIP service on the iPhone for e.g., EnableX.
- Make in-app voice calls from the native phone app’s Contacts, Favourites, or Recent screens.
In a pre-CallKit era, delivering notifications was a major pain point as calls appearing under regular notifications were easy to miss. CallKit has helped software developers immensely by offering iOS native UI for VoIP apps as the apps could not be well-integrated without a rich, built-in call UI.
Note: It is also important to note that although CallKit provides a native UI, it requires Apple Push Notification Service (APNs) or any third-party notification service to notify the end-user when the call starts or ends. Therefore, while creating a certificate to notify a call to end-user, do remember to enable VoIP call option in it.
How do you use CallKit on iOS?
· Gain a basic understanding of swift/objective-c and xcode.
· Create a free developer account on EnableX portal.
· Use CocoaPods to install the project files and dependencies.
· Create a CX Provider.
· Start and answer a call using CallKit. Next, Integrate EnableX APIs with CallKit.
What is EnableX?
EnableX is a cloud-based communications platform for embedding video, voice, SMS and chat messaging into any apps and sites. Built on a carrier-grade platform, it offers developers with full stack of communications APIs and all the necessary toolkits to develop an innovative and engaging communication experience.
Prerequisites to create iOS in-app calling
Before I start laying out the detailed instructions, you need to know and set up the following
- Have a basic to intermediate understanding of swift/objective-c and xcode.
- You will also need a xcode 10 or above and iOS devices 12.0 or above as CallKit features won’t work in the simulator.
- Create a free developer’s account on EnableX. It is safe and requires no credit card information either.
- Use CocoaPods to install the project files and dependencies. Refer to CocoaPods Getting Started Guide for installing CocoaPods.
- 4.1. Open terminal, cd to your project directory and type pod install.
- 4.2. Reopen your project in Xcode using the new *.xcworkspace file.
To start using the APIs, let us first take a look at the major CallKit and EnableX classes that contain various methods required to conduct an end-to-end video communication.
Major EnableX Classes
- EnxRtc: This Class contains methods to connect to a room and join the room.
- EnxRoom: This Class contains methods to handle operations within a room. e.g. connection of End-Points to EnableX Room, publishing & subscribing streams etc.
- EnxStream: This Classhandles all Media Stream related functions. For eg., initiate, configure and transport streams to and from EnableX Media Servers, receive stream to be played etc.
- EnxPlayerView: This Class is used to display the video stream on a EnxPlayerview.
Learn more about EnableX basics on Enablex official developer documentation
Major CallKit Classes
-
- CXProviderA CXProvider object represents a telephony provider. It is responsible for reporting out-of-band notifications that occur to the system. A VoIP app should create only one instance of CXProvider and store it for use globally. A CXProvider object is initialized with a CXProviderConfiguration object to specify the behaviour and capabilities of calls. Each provider can specify an object conforming to the CXProviderDelegate protocol to respond to events, such as the call starts, the call being put on hold, or the provider’s audio session being activated.
Steps to create a provider:
- Initialize CXProviderConfiguration class and set the caller’s name to display on the dialer screen. providerConfiguration = CXProviderConfiguration(localizedName: “EnxCall”)
- Set support for call type either audio or video providerConfiguration.supportsVideo = false
- Set maximum calls per group providerConfiguration.maximumCallsPerCallGroup = 1
- Set list of call handle type namely, PhoneNumber, generic, emailAddress providerConfiguration.supportedHandleTypes = [.phoneNumber]
- Set dialer ringtown sound providerConfiguration.ringtoneSound = “callTone.caf”
- Set up a provider provider = CXProvider(configuration: type(of: self).providerConfiguration)provider.setDelegate(self as? CXProviderDelegate, queue:nil)
- CXProviderA CXProvider object represents a telephony provider. It is responsible for reporting out-of-band notifications that occur to the system. A VoIP app should create only one instance of CXProvider and store it for use globally. A CXProvider object is initialized with a CXProviderConfiguration object to specify the behaviour and capabilities of calls. Each provider can specify an object conforming to the CXProviderDelegate protocol to respond to events, such as the call starts, the call being put on hold, or the provider’s audio session being activated.
- CXProviderDelegate The CXProviderDelegate protocol defines a set of methods that are called by CXProvider when the provider begins or resets, a transaction is requested, an action is performed, or an audio session changes its activation state.
- Below is the list of useful methods in CXProviderDelegateBelow is the list of useful methods in CXProviderDeleg
| Handling Provider Events | func providerDidReset(_provider: CXProvider); Called when the provider is reset |
|---|---|
| Handling Call Actions | func providerDidReset(_provider: CXProvider); Called when the provider performs the specified start call action. func provider(_ provider: CXProvider, perform action: CXAnswerCallAction); Called when the provider performs the specified answer call action. func provider(_ provider: CXProvider, perform action: CXEndCallAction); Called when the provider performs the specified end call action. func provider(_ provider: CXProvider, perform action: CXSetHeldCallAction); Called when the provider performs the specified set held call action func provider(_ provider: CXProvider, perform action: CXSetMutedCallAction); Called when the provider performs the specified set muted call action. func provider(_ provider: CXProvider, timedOutPerforming action: CXAction); Called when the provider performs the specified action times out. |
| Handling Changes to Audio Session Activation State | func provider(_ provider: CXProvider, didActivate audioSession: AVAudioSession); Called when the provider’s audio session is activated. func provider(_ provider: CXProvider, didDeactivate audioSession: AVAudioSession) ; Called when the provider’s audio session is deactivated. |
- CXCallController CXCallController is responsible for observing and interacting with calls.It is responsible to inform the system of user-initiated requests, such as start call action. The key difference between CXProvider and CXCallController is that the provider reports to the system whereas the call controller makes requests from the system on behalf of the user. A CXCallController object interacts with calls by performing actions, which are represented by instances of CXCallAction subclasses such as CXEndCallAction(for ending the call) or CXSetHeldCallAction (for putting call on hold) etc. The call controller can request to perform one or more such actions in a single CXTransaction object using the request(_:completion:) method which is subject to approval by the system. Each CXCallController object manages a CXCallObserver object, which can be accessed using the callObserver property. You can provide an object conforming to the CXCallObserverDelegate protocol to the call observer in order to be notified of any changes to active calls.
Steps to start a call using CallKit
- Create a CXAction
let handle = CXHandle(type: .phoneNumber, value: handle) let startCall = CXStartCallAction(call: UUID(), handle: handle): handle)) - Create a transaction
let callTransaction = CXTransaction() callTransaction.addAction(startCall) - Create a label
let action = "startCall"
callContr.request(callTrans)
{ error in if let error = error {print("Error requesting transaction: \(error)") }
else
{ print("Requested transaction \(action) successfully") } }
Steps to answer a call using CallKit
- Construct a CXCallUpdate describing the incoming call, including the caller.
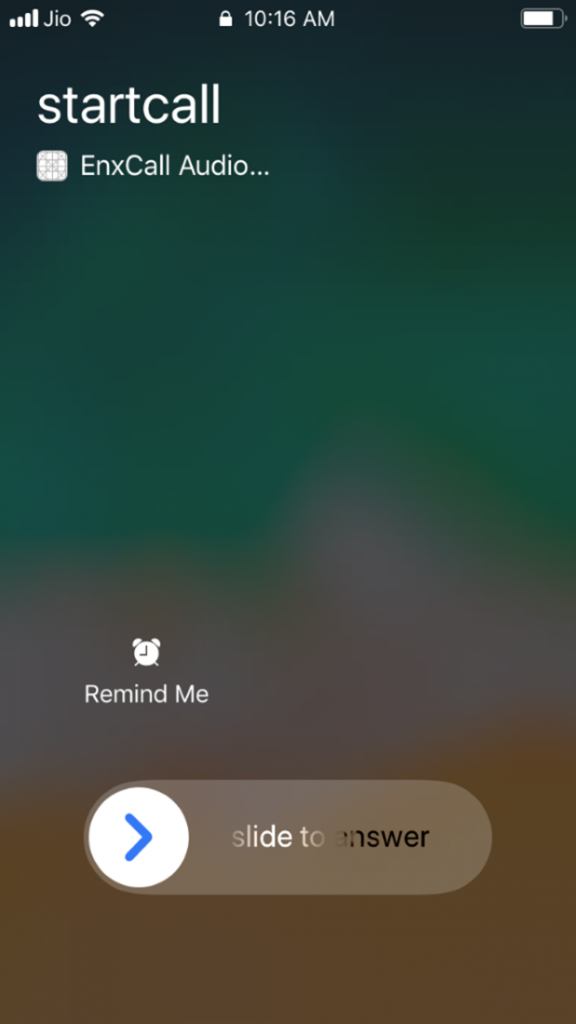
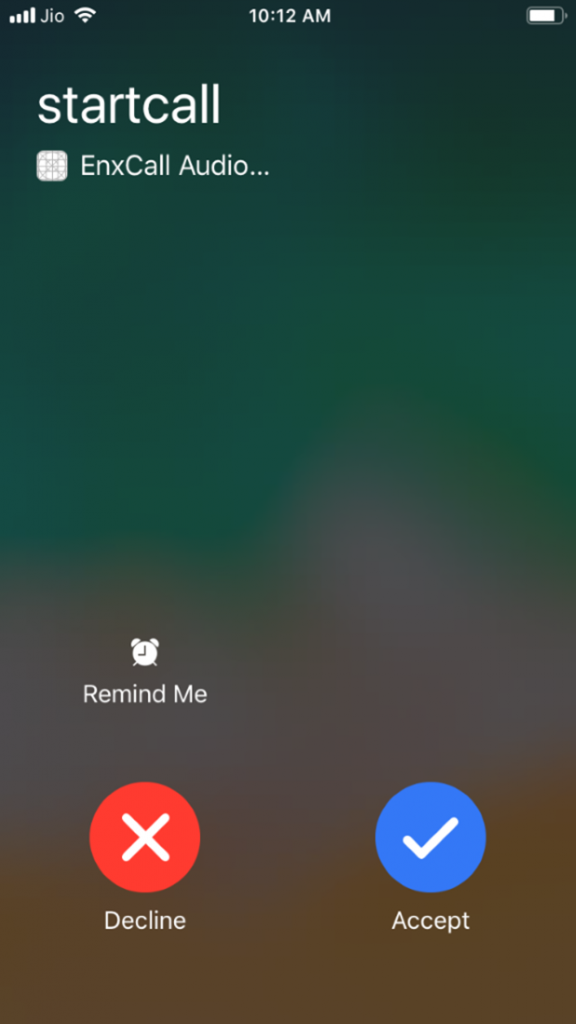
let update = CXCallUpdate() update.remoteHandle = CXHandle(type: .phoneNumber, value: handle) - Report the incoming call to the system. By invoking reportNewIncomingCall(with:update:completion:) on the provider, you will have the same experience as receiving a native phone call
provider.reportNewIncomingCall(with: uuid, update: update)
{ error in}
This adds incoming calls to the app’s list of calls only if there was no error and the call was allowed. The calls may be “denied” for various legitimate reasons. You can check CXErrorCodeIncomingCallError to find the reason. The CallKit APIs as explained above along with VoIP remote notification provide a native call UI experience.
Steps to integrate EnableX APIs with CallKit
-
- On incoming call event Once call is received from the end user, open CallKit incoming UI and add that call events to call manager.
func reportIncomingCalls(uuid: UUID , handle : String , hasVideo :Bool = true , completion: ((NSError?) -> Void)? = nil) { let update = CXCallUpdate() update.remoteHandle = CXHandle(type: .phoneNumber, value: handle)update.hasVideo = true provider.reportNewIncomingCall(with: uuid, update: update) { error in if error == nil { let call = EnxCall(uuid: uuid) call.handle = handle self.callManager.addCall(call) } completion?(error as NSError?) } } - Generate EnableX token Once the user answers the call, she is required to use an access token to connect to an EnableX room. A unique token is generated for every user in every meeting room via Rest API call. Use the following link to create token and room Id https://openapi.enablex.io/video/v1/api docs/#/Rooms
- Initiate Enablex iOS SDK and join the room after receipt of token
func joinCall(_ token : String){ //Set video size let videoSize : NSDictionary = ["minWidth" : 320 , "minHeight" : 180 ,"maxWidth" : 1280, "maxHeight" :720] //Setup room configuration let roomInfo : [String : Any] = ["allow_reconnect" :true ,"number_of_attempts" : 3 ,"timeout_interval" : 20,"activeviews" : "view"] //Local stream Configuration. let localStreamInfo : NSDictionary = ["video" : true ,"audio" : true ,"data":true ,"name" :"Jay","type" : "public","audio_only" : false , "videoSize" :videoSize] // Join Enablex Room, This method will return local stream instance. guard let steam = self.objectJoin.joinRoom(token, delegate: self, publishStreamInfo: (localStreamInfo as! [AnyHashable : Any]), roomInfo:roomInfo, advanceOptions: nil) else { return } self.localStream = steam self.localStream.delegate = self as EnxStreamDelegate } - Receive notification from EnxRoomDelegate
- On successful joining of Room
func room(_ room: EnxRoom?, didConnect roomMetadata: [AnyHashable: Any]?) - On failing to join Room
func room(_ room: EnxRoom?, didError reason: [Any]?)
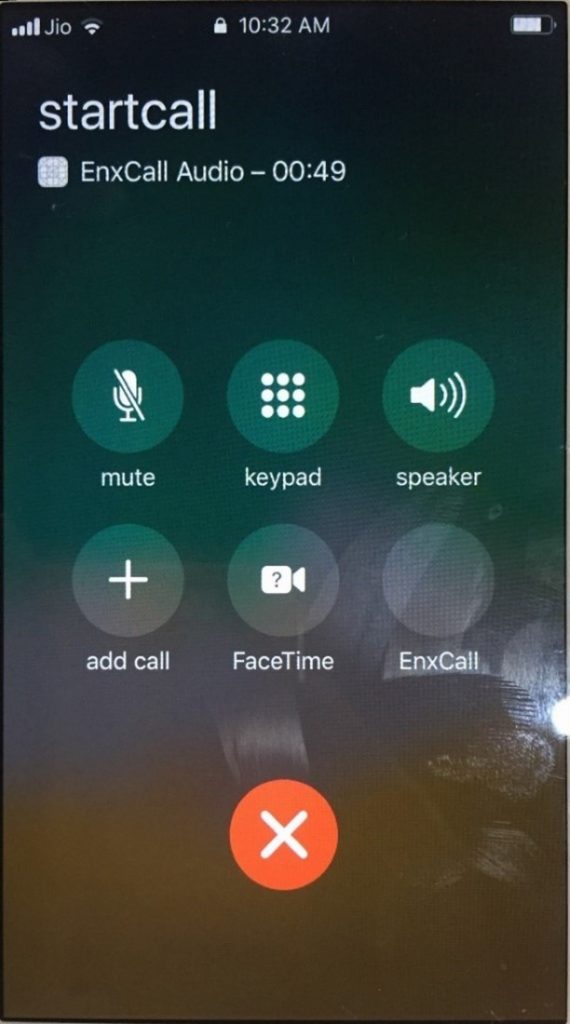
(Receiving the call after unlocking the screen)
- On successful joining of Room
- Publish local stream
- Subscribe to remote stream
- Get list of active talkers
// To get complete Active talker view func room(_ room: EnxRoom?, didActiveTalkerView view: UIView?) // To get list of active talker (EnxStream for all talkers in that conference) func room(_ room: EnxRoom?, didActiveTalkerList Data: [Any]?) - Disconnect the user
func didRoomDisconnect(_ response: [Any]?)
- On incoming call event Once call is received from the end user, open CallKit incoming UI and add that call events to call manager.
I hope this blog helped you develop an understanding on how you can facilitate app-to-app calling that mimics native iOS UI with the help of CallKit and EnableX APIs. Refer to the fully working CallKit code with EnableX API for a quick demo.