As digital communication is growing rapidly, app-to-app calling stands out as an exciting thing to try out. While it feels tempting to quickly add an audio/video calling feature into your iOS app, it’s not an easy job. That’s because building it from scratch involves plenty of coding and complex integration.
That’s where the EnableX CallKit framework comes into the picture. It makes the process quite simple and easy, and you do not need to invest much time and energy in writing unending lines of code!
This detailed tutorial on ‘How to Build an iOS Video Call App’ takes a look at how to leverage the WebRTC–based EnableX Video framework and the EnableX CallKit to enable Audio & Video features with a native dialer interface on your app.
What Is EnableX Calling UI Framework?
It’s a framework that helps developers to enable audio and video features in the app with just a few lines of code, that’s it! The framework consists of two parts:
- EnableX UIKit – Built on top of the native UI components
- EnableX iOS Audio/Video calling framework.
EnableX CallKit Framework: The Problem It Solves
Before we dive in, let’s first go over a few things that you need to know. Earlier, we had introduced iOS SDK so that you could build an iOS Video Call App with audio/video features. But it still required the creation of a Calling UI by the developers. In addition, all calling-related events also needed coding. The bottom line is that it still required plenty of coding from the developer’s side.
To make it easy & fast, EnableX introduced UIKit. Once it’s added to a project, it automatically installs required iOS SDKs, and automatically handles all the UI and calling-related events. It also helps create 100% native UI. So, with this feature, a developer can add the audio/video feature to an app with just a few lines of code. The UIKit enables a live video chat and also manages all calling-related events. Now, the question is, when you enter the room and want to add other participants/users to join the session, they need to be informed. This can be done by creating events to send notifications to end-users (or participants). But for that, a calling UI is required at their end, otherwise, they can’t join a call. It’s an essential feature for a seamless audio or video call experience. However, it again demands a lot of coding.
Apple’s CallKit tried to solve this issue by taking care of the UI part, but the problem of managing notification-related events still persisted.
The EnableX introduces the CallKit framework to take care of these issues. It intelligently replicates all native classes of CallKit framework. It wraps all classes into a single unified class, and also internally manages calling-related events. Thanks to the EnableX CallKit, a developer now needs to write just 4-5 lines of code instead of the usual 800-1,000 lines.
*The notifications can be handled by APNS or any third-party notification provider service.
* Enable VoIP service on your certificate if you want to open CallKit through notifications.
Note: To try out this code, use iPhone with iOS 12.0 or a higher version.
Note: CallKit is not supported on simulators.
Prerequisites for Building iOS Video Call App
- Basic-to-intermediate level understanding of Swift/objective-C and Xcode is required.
- The Voice-Over IP feature needs to be enabled in the application under the background mode.
- To visit the tutorial, create an EnableX Developer Account.
- Xcode 10 or higher version is needed.
- You’ll need iOS 12 or a higher version for installing EnableX CallKit.
Let’s now take a step-by-step look at how to build a simple and seamless app-to-app calling mechanism. Let’s start with installing the EnableX CallKit:
- Use CocoaPods to install the project files and other dependencies.
- To install Cocoa Pods, visit Cocoa Pods ‘Getting Started’ webpage.
Open your project podfile and add pod ‘Enx_CallKit_iOS’.
- In the terminal, go to your project directory and type ‘pod install’.
- Reopen your project in Xcode using the new *.xcworkspace file.
That’s it, you’ve installed! But before moving ahead, there are a few basic things about the EnableX CallKit framework that you need to know.
Understanding EnableX Classes
Let’s check out what EnableX Classes are and what they’re for:
- EnxRtc: It offers developers a way to connect with a meeting room and join in.
- EnxRoom: It handles various room-related functions to communicate with EnableX media, such as the endpoint connected to the EnableX meeting room, publishing self-streaming, and subscribing to remote streams.
- EnxStream: It manages all media stream-related functions, such as initiating, configuring, and transporting streams to EnableX media servers. It is also used to receive stream endpoints that need to be played.
- EnxPlayerView: It displays video streams on the EnxPlayerview.
If you want to know more about it, check out the EnableX Official Developer Documentation.
EnableX CallKit Framework Behaviors & Callbacks
The first step is to import Enx_CallKit_iOS. After that, create an object of EnxCallKit class.
For example:
var callManager = EnxCallKit(self)
First of all, you need to pass an instance of the class where you’ll receive event callbacks. You can open the EnableX CallKit UI after receiving push notifications on your app.
For example:
let backGroundTaskIndet = UIApplication.shared.beginBackgroundTask(expirationHandler: nil)
callManager.reportIncomingCall(uuid: UUID(), callerName: “Caller Name”, hasVideo: true/False){ _ in
UIApplication.shared.endBackgroundTask(backGroundTaskIndet)}
Users need to add a background task before the Calling UI loads. Once the UI loading is over, the background task should be closed. The reason behind this is simple: when an app opens in another app, the former app also remains open in the background.
To end the call, use the following API:
callManager.endCall()
After the user receives the call, EnableX CallKit starts notifying the behaviour of the user.
For example:
- Call Answered: func callAnswer():when you receive the call
- Call Rejected: func callReject(): when you reject the call
- Call Timeout: func callTimeOut(): when you don’t respond to the call within 45seconds
- Call Ended: func callEnd(): when you end the call
- Call Hold: func callHold(): when you put the call on hold
To join the EnableX room after receiving the call via CallKit, you must create an Access Token.
Generate Access Token
Every user needs a unique Access Token to connect to a room. This step is usually done by Rest API’s Call.
To generate the Access Token and Room ID, you use the link provided below: https://openapi.enablex.io/video/v1/api-docs/#/Rooms
To join the EnableX room, a user must have the Access Token from the EnableX server and EnableX iOS SDK.
This token can be generated by using EnableX UIKit or EnableX audio/video framework:
- With EnableX UIKit Framework
Install the EnableX UIKit through the pod ‘Enx_UIKit_iOS’.
Follow the steps as shown below:
Step 1: Install the EnableX UIKit Using Pod
Add this to your pod file:
pod ‘Enx_UIKit_iOS’.
Then, install the pod. EnableX UIKit SDK is now integrated. You can use it in your application.
Step 2: Import UIKit in Your Controller Where You Want to Open Your Video Class
Import ‘Enx_UIKit_iOS’. Then, initiate the EnxVideoViewClass.
For example:
let enxViewer = EnxVideoViewClass(token: “a valid room token”, delegate: self)
Step 3: Add the Following Object to Your View
view.addSubview(enxViewer)
Step 4: Set the Frame
enxViewer.frame = self.view.bounds
Step 5: Set Constraints to Auto–Adjust UI When Orientation Changes
enxViewer.autoresizingMask = [.flexibleWidth, .flexibleHeight]
The video integration is now complete. You’ll receive a callback when a user gets disconnected or if there’s any error while joining the room:
- When the room is disconnected: func disconnect (response: [Any]?)
- Error while connecting: func connectError (reason: [Any]?)
- Using EnableX Audio/Video Framework
Install EnableX iOS SDK through Pod. Add this to your pod file: pod ‘EnxRTCiOS’, and then install the Pod.
EnableX iOS SDK is now integrated and you can use it on your app. Here’s how to join the room:
func joinCall(_ token : String){
- Set Video Size
let videoSize : NSDictionary = [“minWidth” : 320 , “minHeight” : 180 , “maxWidth” : 1280, “maxHeight” :720]
- Setup Room Configuration
let roomInfo : [String : Any] = [“allow_reconnect” :true , “number_of_attempts” : 3 ,”timeout_interval” : 20,”activeviews” : “view
- Local Stream Configuration
let localStreamInfo : NSDictionary = [“video” : true ,“audio” : true ,“data” :true ,“name” :“Jay”,“type” : “public”,“audio_only” : false , “videoSize” : videoSize]
Join EnableX room. This method will return the local stream instance.
guard let steam = self.objectJoin.joinRoom(token, delegate: self, publishStreamInfo: (localStreamInfo as! [AnyHashable : Any]), roomInfo: roomInfo, advanceOptions: nil) else{
return
}
self.localStream = steam
self.localStream.delegate = self as EnxStreamDelegate
}
Once users join the EnableX room, they’ll get notified through EnxRoomDelegate as shown below. You’ll receive the following callback:
func room(room: EnxRoom?, didConnect roomMetadata: [AnyHashable : Any]?)
- If a user fails to join the room due to any other reason, you’ll receive the following callback:
func room(room: EnxRoom?, didError reason: [Any]?)
Once a user publishes a local stream and subscribes to a remote stream, they’ll get a list of Active Talker updates. To get the complete Active Talker view:
func room(_ room: EnxRoom?, didActiveTalkerView view: UIView?)
To get the list of Active Talkers (EnxStream for all Talkers in the conference)
func room(room: EnxRoom?, didActiveTalkerList Data: [Any]?)
- When A User Gets Disconnected
func didRoomDisconnect(_ response: [Any]?)
To know more about EnableX iOS SDK and APIs, check out this link:
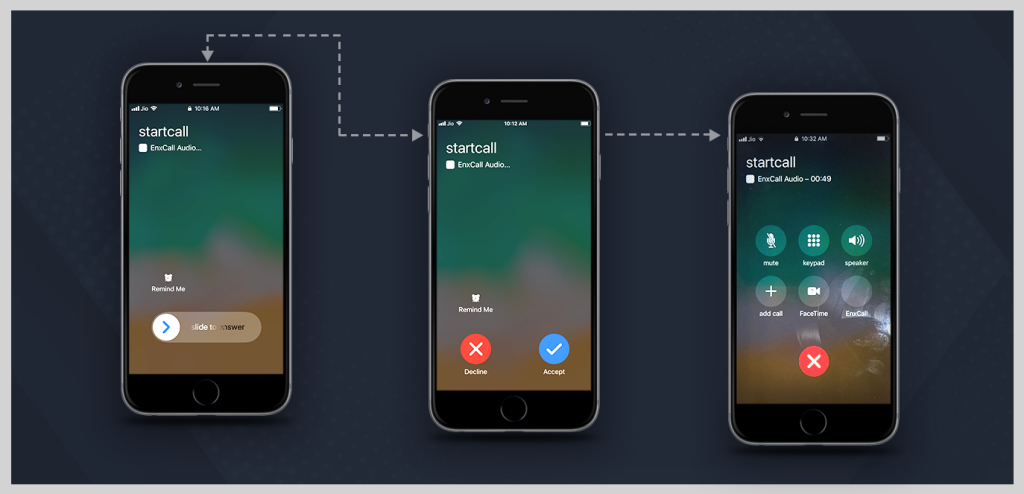
Calling UI Screen (Audio/Video Framework)
(From left to right)
- When the call starts.
- When the screen unlocks.
- After the call is received by the end-user, the native dialer interface (for audio-only call).
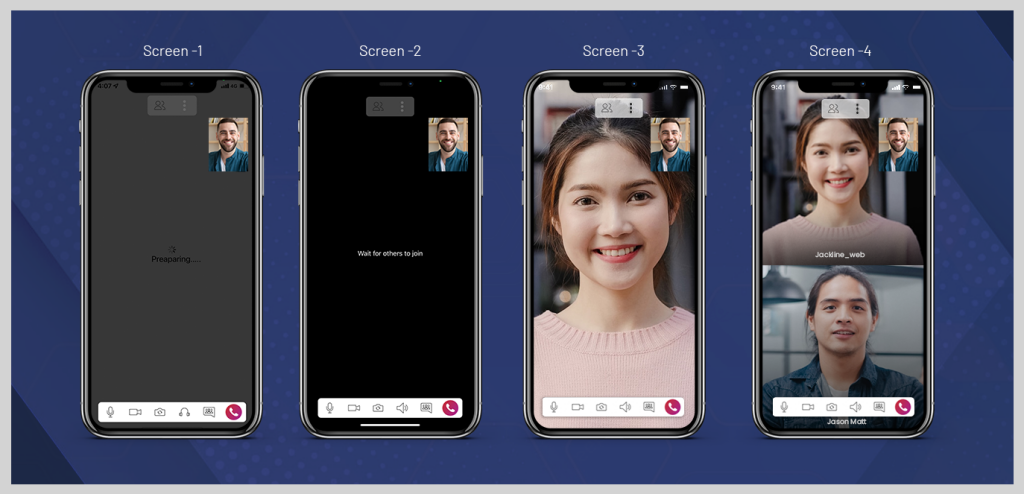
Calling UI Screen (UIKit)
- When you join using UIKit.
- When you’re waiting for other users to join the call.
- When a user joins the room.
- When multiple users join the room.
Final Words
The era of time-consuming and energy-sapping coding is gone, thanks to the EnableX CallKit framework!
Sign Up Now to build your very own iOS Video Call App with EnableX CallKit Framework in no time!
Let’s Build Something Exciting!
The EnableX Video Platform is built using the best-in-class technologies and infrastructure to deliver best possible customer experience. With the use of WebRTC as the underlying real-time communication framework, we ensure seamless communication across end points and mobile devices. We offer native APIs and SDK’s along with hybrid frameworks – both for web and mobile applications including ReactNative, Flutter and Cordova to enable quick integration by developers.


