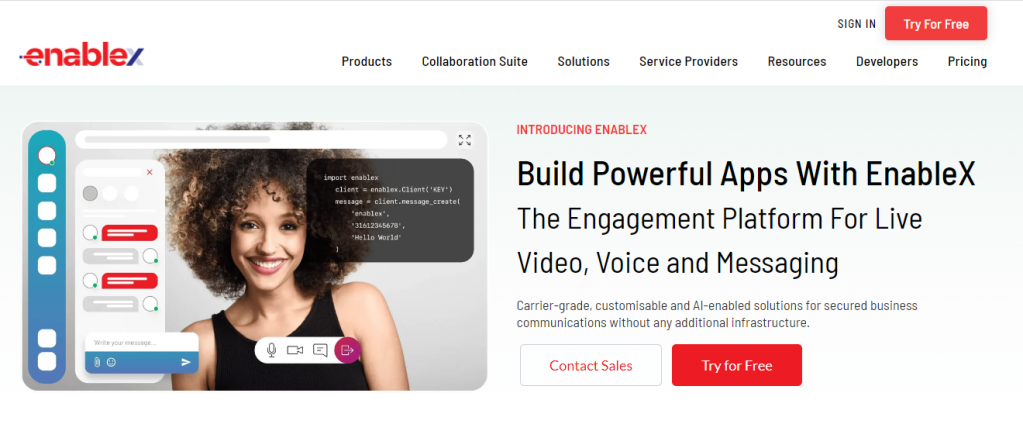
Video conferencing is now integral to modern communication. Its relevance has surged in recent years, aiding businesses in collaboration, customer engagement, and productivity. As the demand grows, integrating efficient video call APIs into digital platforms becomes crucial. With the rapid improvements made on low latency and wide compatibility, WebRTC has quickly emerged as the near default way to configure and embed video calls into any app or website.
That said, for developments teams who have not worked on developing video calling experiences, the set up can take some time. To help address this, EnableX, a leading Video API platform has launched a low code video call configuration system. This can help developers, or even technically inclined non developers, quickly put together prototypes and fully functioning video conferencing experiences in mere minutes.
EnableX’s Low-Code platform offers a straightforward solution. Designed for ease of integration, this platform simplifies the complexities of video conferencing by providing a user-friendly interface that requires minimal coding.
1.1 Introduction to WebRTC video API low code development
This guide outlines the steps to seamlessly embed video conferencing into your website or application using EnableX’s low-code platform. It’s designed for those looking to efficiently integrate video capabilities without extensive coding.
1.2 Free Trial for video API integration
- To get started, visit the EnableX site and click on Try for Free.
- For new users
- Click on Try For free.

2. Fill in the required details: Name, Phone number, Company, email address and check the box for Terms of Service and Privacy Policy.
3. Click on Create Your Account.
4. A verification email will be sent to the given address. Verify your account by clicking on the link in this email.
5. Users can also sign up with Google or GitHub.
- For returning users:
Navigate to and click on Sign In located at the top right corner. On the resulting login page, enter your login credentials and click on SIGN IN.
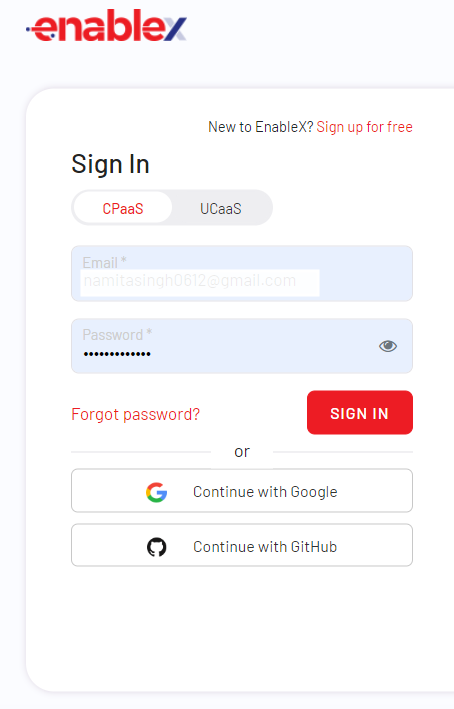
Optionally, use Google ID or GitHub ID for login.
- After logging in, users will be directed to My Dashboard which offers various information options.
1.3 Understanding the Interface
The EnableX platform provides a user-centric dashboard that offers a quick glimpse into the user’s activities, projects, and resource tools. This allows for quick navigation and easy access to the most used features.
Menu Options:
- My Dashboard: The home page of the platform, displays a summary of the user’s activities and vital stats.
- My Projects: A list of all the projects created by the user with management options.
- Analytics: Provides insight into the user’s activity over a specified period.
- My Projects: Lists projects, allows for easy management, and shows associated services.
- Resource Center: Dive into developer documentation, sample codes, and test EnableX’s features via a live demo.
- Video, Voice, SMS, WhatsApp: Different communication channels available for integration. Clicking on each would likely lead to specific settings and configurations for that service.
- Billing: Check your billing details and payment history.
- My Wallet: Overview of your financial details and transactions.
- Support: Direct access to help and customer support.
2. Create a new Video Service project with EnableX
To begin developing a video application with EnableX Lowcode, the first step is to create a project on the platform. Follow these steps to create a project:
- Login to the EnableX Portal.
- After successfully logging in, users are redirected to My Dashboard. From there, follow these steps to create a new project:
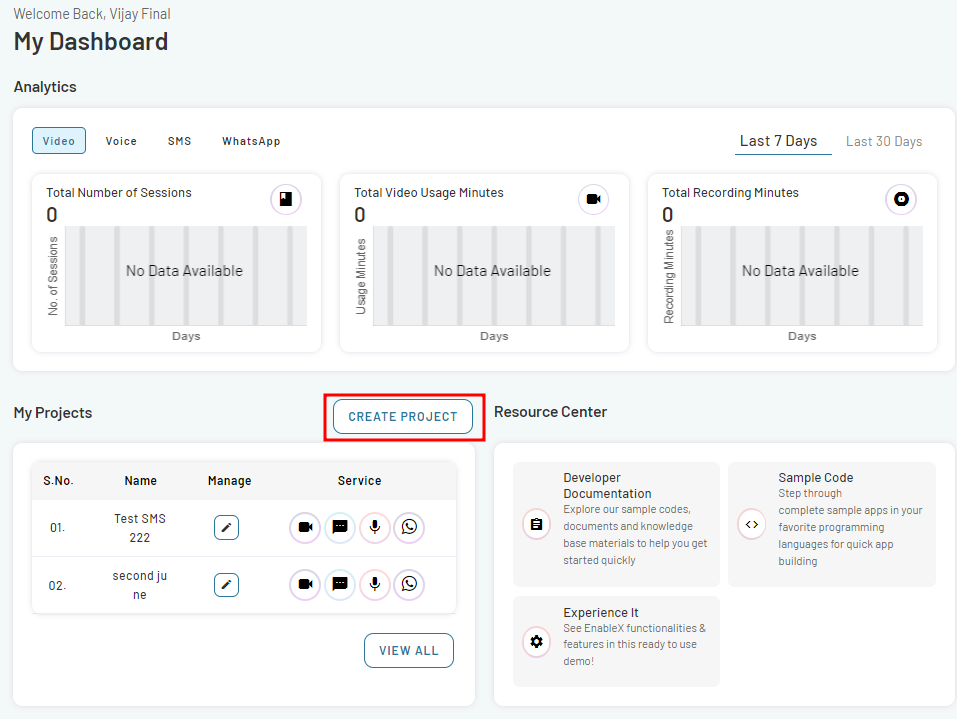
- Navigate My Projects section on the page.
- Click on CREATE PROJECT button. This opens Create Project page.

- On this page, provide the necessary information for your project, including the Project Name, Application, and Project Description.
- Navigate the Channels section on the page. Within this section, you can enable specific services for your project.
- To add video service to your project, toggle video option in the Channels section. This ensures that the video functionality will be available within your project.
- Click on CREATE PROJECT button to create your project.
- The project has been successfully created and a confirmation popup will appear.
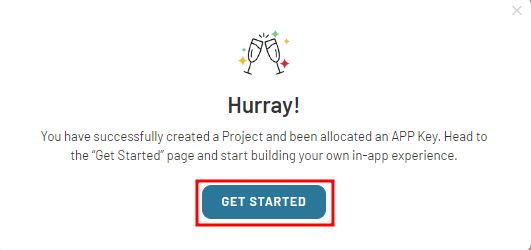
- In the pop-up dialog box, click on GET STARTED button. This will take you to the next stage of the setup process.
Alternatively, you can access the setup process by clicking on Video in the left menu bar and then selecting Dashboard from the submenu. Then follow the same steps for creating a project as given above.
Once the project creation is successful, you are now ready to build your application with Low -Code Application.
3. Building Your Low-Code Video Application
EnableX offers two methods to build a video application: through APIs or using the Low Code option. The registration, login, and project creation processes are identical for both methods. Once you reach this stage, decide which method suits your needs. This guide proceeds with the Low Code option. If you opt for APIs, the steps up to this point remain unchanged.
Choose Your Preferred Method of Development
- To proceed further, click on GET STARTED button on the confirmation dialogue box pop-up.
- The Choose your preferred method of development form will display.
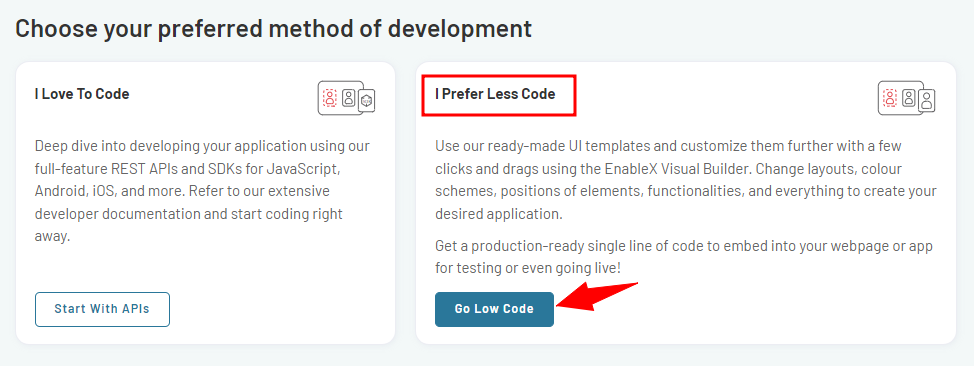
Go Low Code
- In the form, Navigate the I Prefer Less Code section.
- Click on Go Low Code option within that section.
Follow the Low-Code Wizard
- Once you click on Go Low Code, You will be directed to a wizard specifically designed for low-code video embedding.
- The wizard will guide you through the process of embedding videos using the low-code method.
- Follow each step in the wizard carefully to ensure successful integration.
3.1 Low-Code Video Application Development Wizard
Follow the steps below in the video application development wizard:
3.1.1 Choose a Template
EnableX offers a variety of video embed templates, each with different features tailored to specific types of applications. Follow these steps to choose a template:
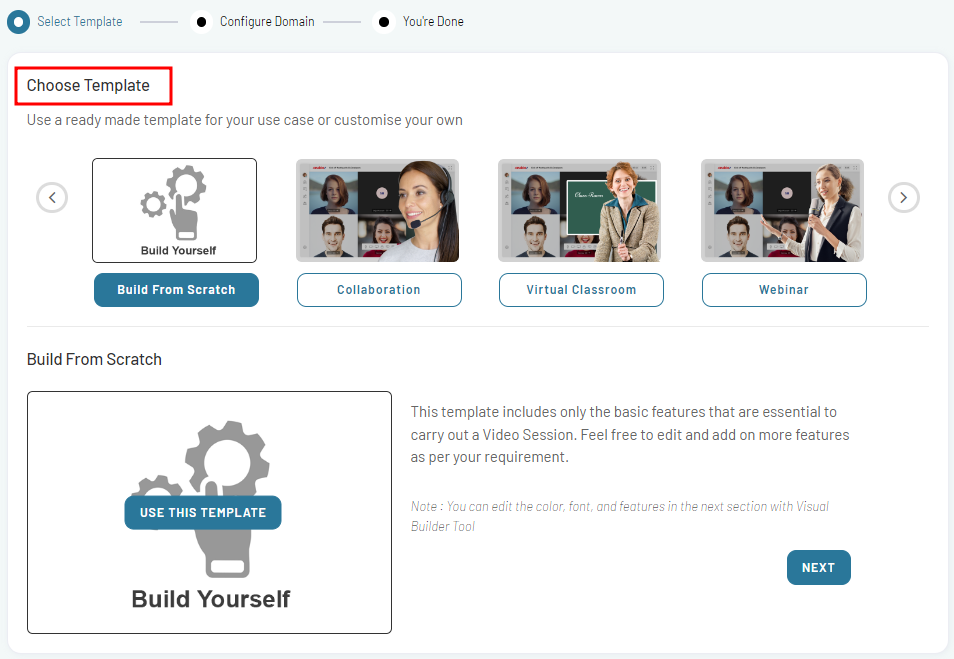
Pre-built Template
Explore the collection of Ready-Made Templates designed for various domains such as education, healthcare, corporate meetings, and more.
- Select a template that best suits your video application from the available options.
- Click on the USE THIS TEMPLATE button to proceed.
Note: The pre-configured templates serve as a foundation for your application’s layout and design. You can edit or update the selected features as required.
Example: If you select the Virtual Classroom template, you will be directed to a page where you can review the virtual classroom user interface template and its features. You can also customize the template by adding or deleting any feature using the Visual Builder tool.
EnableX offers a variety of video embed templates with different features. The pre-configured templates are designed for specific types of applications. The selected features can be edited or updated as required.
Built From Scratch Template
If you prefer complete customization and control over your video conferencing solution, you can choose the Built From Scratch template. Follow these steps:
- Explore the available templates and select the Built From Scratch option.
- Click on the USE THIS TEMPLATE button to proceed.
The Built From Scratch template gives you the freedom to create a video conferencing solution perfectly tailored to your needs.
Note: The detailed process of customization and configuration for both the Ready-Made Templates and the Built From Scratch template will be covered in detail later in this document.
Once you have selected the template for your video application, the next step is to proceed to the subdomain selection page. You will be automatically redirected to this page.
3.1.2 Configure a Subdomain
On the subdomain selection page, you can choose a unique subdomain that will serve as the hosting platform for embedded video content. Create a subdomain to host your embedded video. Your embed URLs will be qualified with this URL.
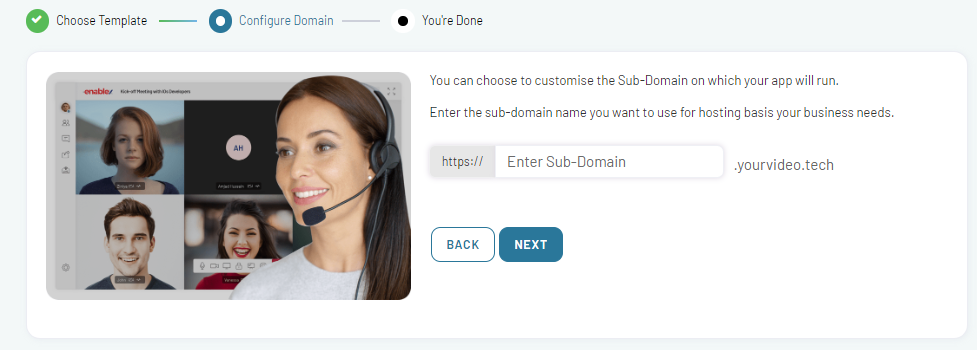
- Enter a Sub-Domain name and click on NEXT.
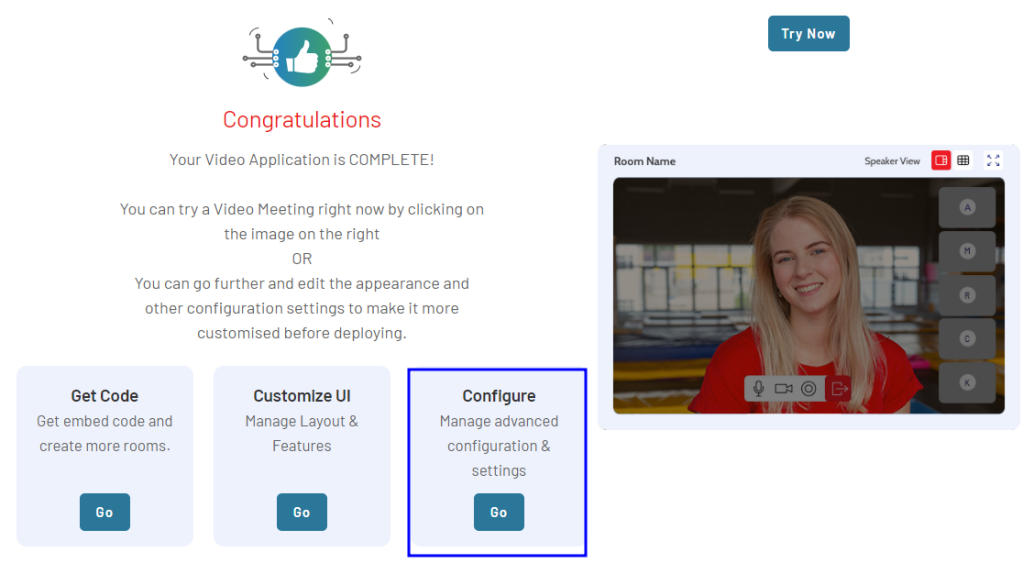
A new page is displayed where you can try video calling by clicking the Try Now option.
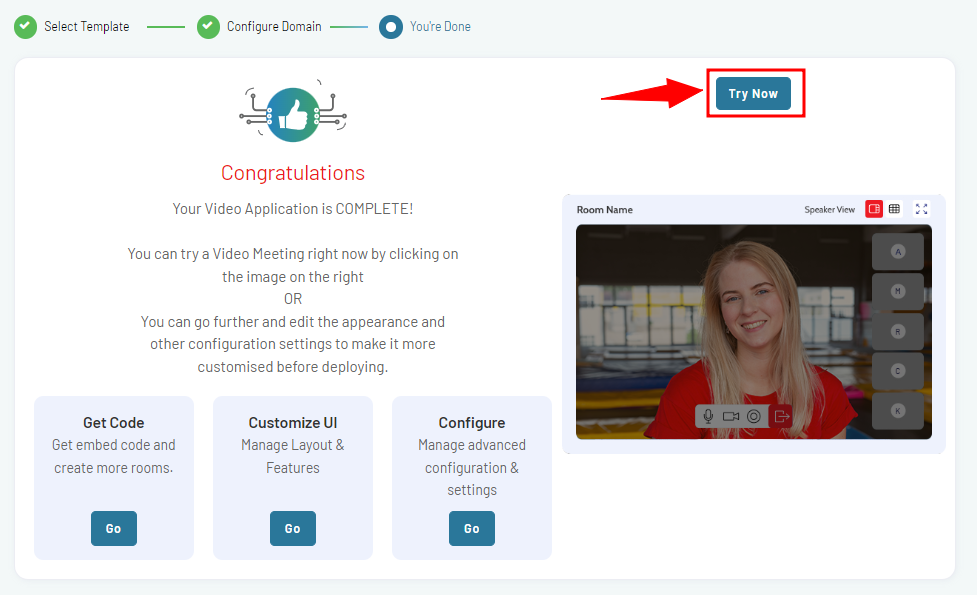
Now, your project is set up and you can go live with it.
Customize the appearance and other configuration settings before deploying the template.
4. How to get Embed Code for video API and Create Video Rooms
After successfully creating your video meeting application with EnableX, you wll obtain unique embed codes that allow both moderators and participants to access the session. Use the Embed Code Snippet to put into any Webpage to get connected to Video Session.
4.1 Get Code
To obtain the video embed code for both moderators and participants to join a video session, follow these steps:
- In the Get Code section, navigate and click on Go button.
- Once clicked, the video embed code will be displayed in separate text boxes for moderators and participants.
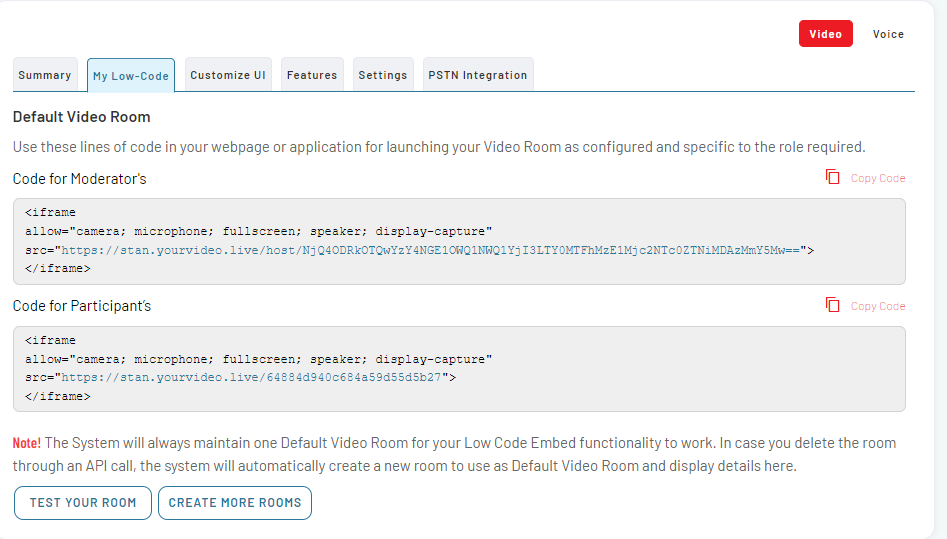
Alternatively, On the project summary page, Navigate and click the My Low-Code box. Once clicked, the video embed code will be displayed in separate text boxes for moderators and participants.
Note: The code includes an iframe element with the necessary attributes and the source URL pointing to the specific video session.
Example 1: IFRAME Embed Code for Participant Entry
<IFRAME
allow="camera; microphone; fullscreen; speaker; display-capture"
src="https://your-subdomain.host-domain/#ROOM_ID#">
</IFRAME>
Example 2: IFRAME Embed Code for Moderator Entry
<IFRAME
allow="camera; microphone; fullscreen; speaker; display-capture"
src="https://your-subdomain.host-domain/host/#HASH#">
</IFRAME>
Important: The system always maintains a Default Video Room for your Low Code Embed functionality to work. If you delete the room through an API call, the system will automatically create a new room to use as the Default Video Room, and the details will be displayed accordingly.
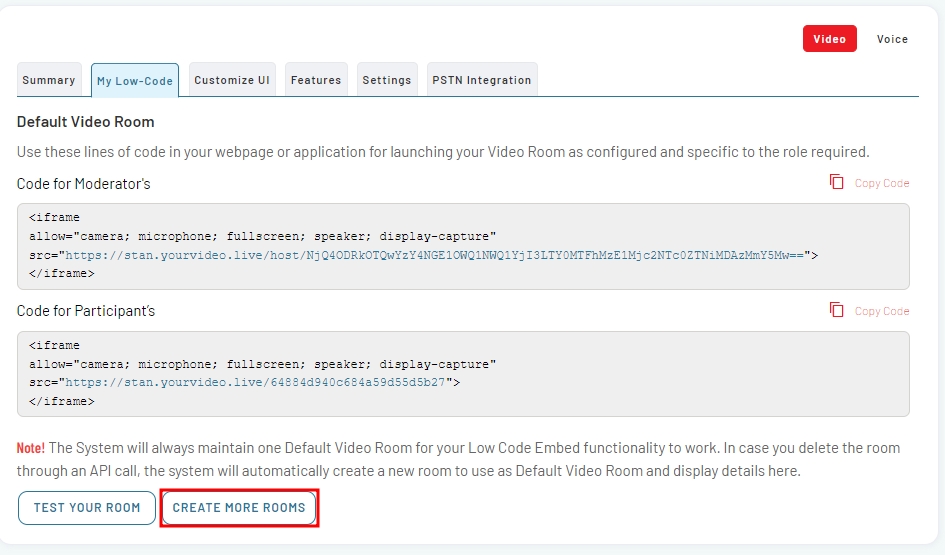
4.2 Create Rooms using WebRTC video API
It is indeed possible to set up multiple rooms for your video meeting application, each with its own accessibility but sharing the same configuration and user interface. You can achieve this using the Server API. Here are the steps to create additional rooms:
- If you only need one meeting room for testing purposes, you can click on TEST YOUR ROOM.
- If you want to create more permanent rooms, Click on Create More Rooms tab.
- A new Create Room form will open where you can fill the details of new permanent rooms.
- Next, determine the number of concurrent rooms you need to support your use case and generate iFrame codes for those rooms.
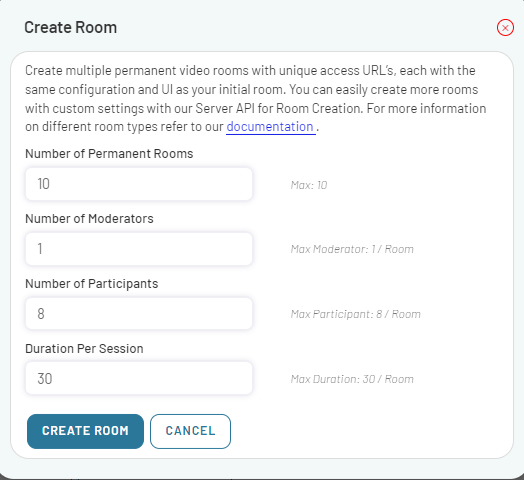
- Provide the required information in the fields and click on Create Rooms button.
- A pop-up message will indicate the successful creation of a new room.
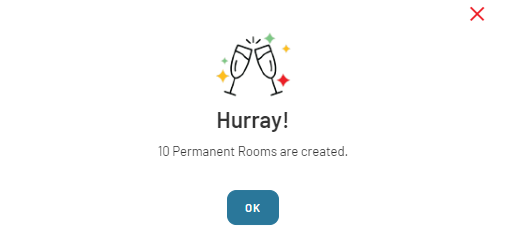
- Click on OK button on the pop-up to proceed further. A new page with rooms ID and codes for both the moderator and participants will open.
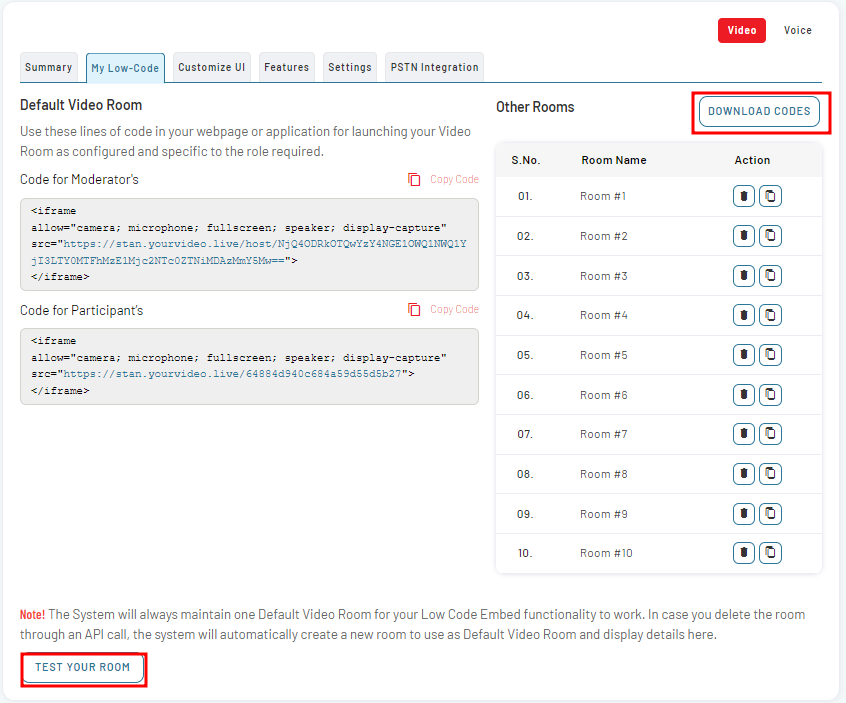
- To download the codes for all rooms in one go, click on Download button at the top right corner. This will initiate the download process for the codes of all the rooms.
- Alternatively, if you prefer to copy the code for each room separately, navigate and click to the copy code icon in front of each room listed here.
Copy the generated iFrame codes to the HTML block of your website. You can also copy the individual room code snippets.
For example:
Room-1 ID: 63a00cd198bc31055177e609
Moderator URL: https://milestone.yourvideo.live/host/NjNhMDBjZDE5OGJjMzEwNTUxNzdlNjA5LTYzYTAwNmIzZTBmZThjMzRkNTc2M2EyNw==
Participant URL: https://milestone.yourvideo.live/63a00cd198bc31055177e609
To create more permanent rooms using the API, refer to the Create meeting rooms using REST APIs documentation for detailed instructions.
Note: Once the rooms are created, you can start customizing the user interface. For more information, refer to the Customize the User Interface with Visual Builder documentation.
5. How to Customize User Interface for Video Calls
EnableX’s Low Code platform provides flexibility in designing your video application to fit your specific needs. To Customize the User Interface of your selected template, follow these steps:
- In the Customize UI box, click on the Go button. This will direct you to the Edit template page.
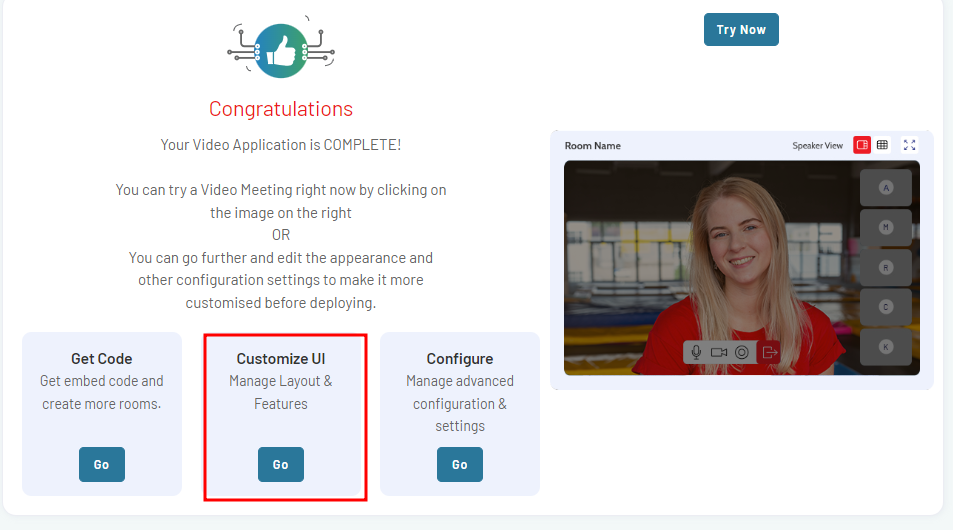
Alternatively, you can follow these steps to navigate to the Customize UI for the selected project:
- Navigate to Video section in the left menu pane and select Dashboard option from the drop-down.
- Select the low code video project for which you want to customize the UI. This will take you to the project summary page.
- On the project summary page, select the Customize UI tab.
- A new page will open, providing you with the option to Start Customization process.
- Click on START CUSTOMIZATION.
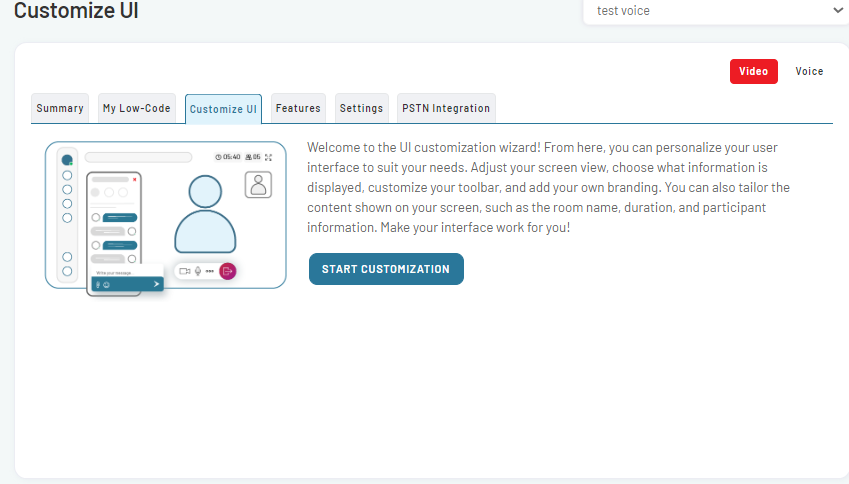
The Edit template page provides options for granular customization of the UI, features, and capabilities. It consists of four tabs, each serving a different function:
- Screen view: Customize the settings related to the screen view of your video application.
- Information Display: Configure the information display settings according to your preferences.
- Toolbar: Customize the toolbar settings, including the available options and functionalities.
- Branding: Personalize the branding elements of your video application, such as logos and colours.
The UI templates come with pre-loaded features, but you can customize them based on your specific requirements.
For more detailed information on customizing each aspect of the user interface, refer to the following sections:
Screen view Settings
Information Display
Toolbar Settings
Branding Settings
These sections will provide detailed instructions on customizing each aspect of the user interface to match your requirements.
5.1 Customize UI and UX for video calls applications
On the Customize UI page, follow these steps to customize the screen view settings:
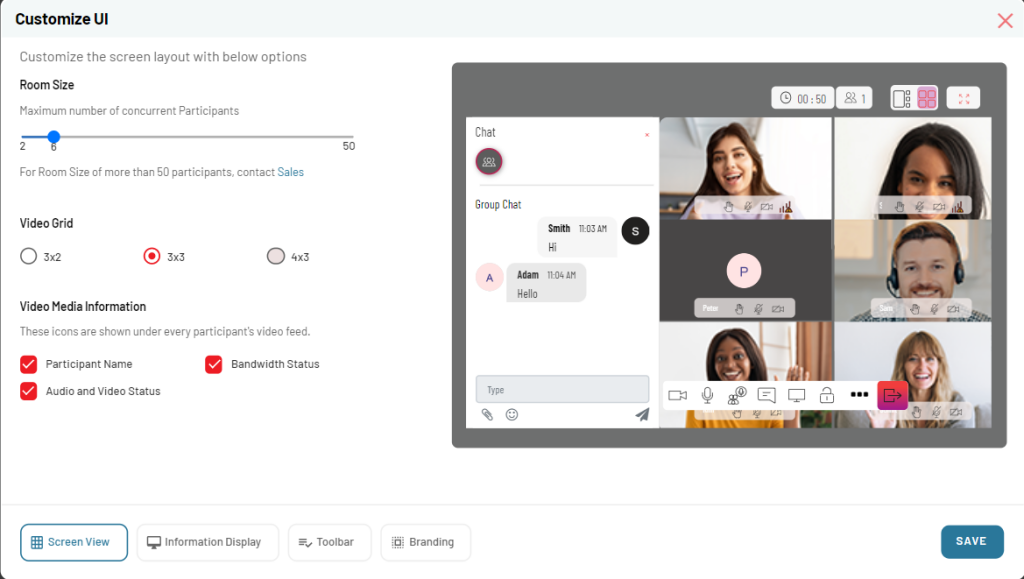
- Select the Screen View tab. This tab is usually open by default when you access the Customize UI page.
- In the Screen View tab, you will find options to specify the room size, video grid, and video media information.
Room Size
- Specify the desired Room Size by selecting the appropriate value. This determines the maximum number of participants that can join the room, ranging from 2 to 50 participants.
Video Grid layout
- Choose the preferred Video Grid layout. This determines how participant videos will be displayed on the screen. Available grid sizes include 3×2, 3×3, and 4×3.
Video Media Information
- Select the icons you wish to display under each participant’s video feed. You can choose to display:
- Participant name
- Bandwidth Status
- Audio & Video Status.
- After adjusting the Screen settings to your preference, click the ‘Save’ button. Your chosen features and functionalities will be enabled immediately. It’s that easy!
After specifying the screen view settings, proceed to configure information display settings.
5.2 How to set up user controls for WebRTC video API calls
In the Information Display tab, you can customize which features are displayed in the top bar and the gallery display providing participants with relevant information during video sessions. Follow these steps:
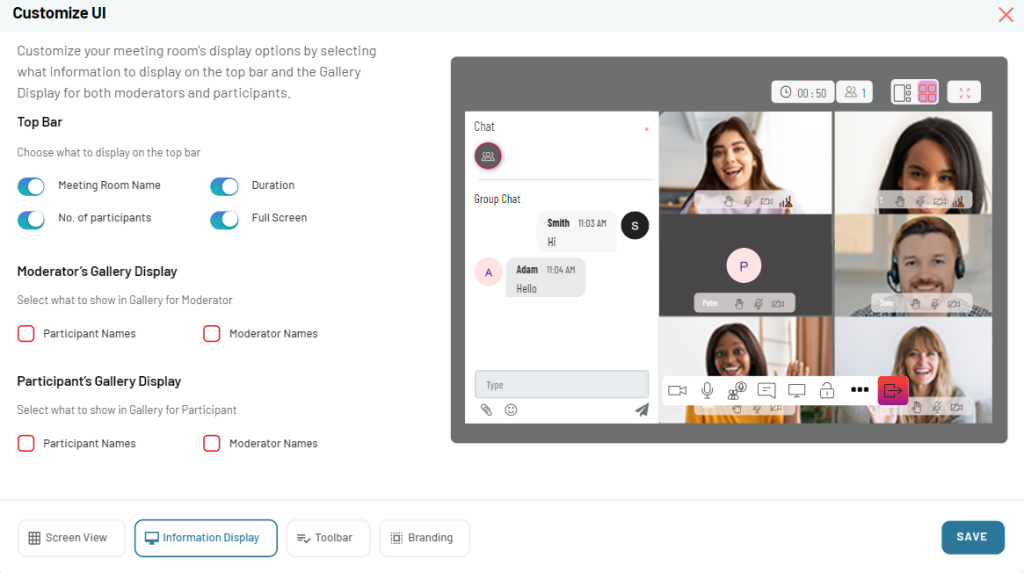
- On the Customize UI page, navigate to Information Display tab.
- In the Top Bar section, toggle the options to enable or disable the features that you want to display.
- You can choose from the following options:
- Meeting Room Name
- Duration
- Number of participants
- Full-Screen
- In the Moderator’s Gallery Display section, select the features that you want to show in the gallery for moderators.
You can choose to display from the following options:- Participant Names
- Moderator Name
- Both
- In the Participant’s Gallery Display section, select the features that you want to show in the gallery for participants.
- You can choose to display from the following options:
- Participant Names
- Moderator Names
- Both (Participant & Moderator Names)
- After specifying the information display settings, you can proceed to configure the toolbar settings.
After making the desired selections, click on SAVE NOW button to save your information display settings.
5.3 Customize Toolbar Settings for video conferencing
The toolbar in your video calling application allows you to choose and display the buttons and features that are essential for your video conferencing sessions. Follow these steps to configure the toolbar settings:
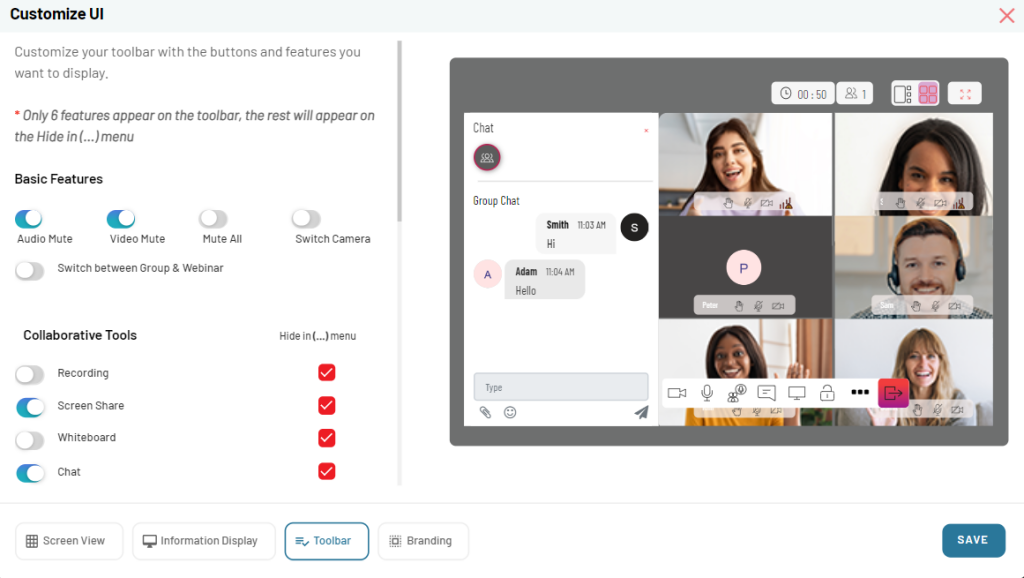
- On the Customize UI page, navigate to Toolbar section.
Note: Only six features can appear on the toolbar, while the rest will be accessible through the Hide in (…) menu.
Basic Features
- Choose from a range of Basic Features to have quick control over your audio and video settings.
You can choose basic features from the following:
- Audio Mute
- Video Mute
- Mute All
- and Switch Camera
Collaborative Tools
- Explore the Collaborative Tools available and decide whether you want them to be directly visible on the toolbar or accessible through the Hide in (…) menu.
You can choose collaborative tools from the following:
- Recording
- Screen sharing
- Chat
- Whiteboard
- Enable or disable PSTN Voice Integration based on your business requirements.
- Select your preferred Video Grid View to determine how participant videos are displayed during video calls.
You can choose video grid view from the following:
- Gallery
- Leader
- Both (Gallery and Leader)
Moderator Settings
These features provide advanced moderation capabilities for managing participant access, facilitating discussions, and maintaining security and privacy. To configure moderator settings, do the following:
- Navigate to the Moderator Settings section.
- Enable or disable additional controls for moderator and decide whether you want them to be directly visible on the toolbar or accessible through the Hide in (…) menu.
You can choose additional moderators control from the following:
- Floor Access Control: Temporary permission to share your audio and/or video (publish your stream) in a video meeting.
- Breakout Room: Create one or many rooms within a meeting where groups of participants can discuss.
- Lock Room: Keep uninvited participants away from a meeting room.
Toolbar Settings
Specify the behaviour for the bottom control bar:
- Movable: Users can freely reposition the bottom control bar as needed, offering flexibility in the user interface.
- Fixed: The bottom control bar remains in a fixed position, ensuring consistent access to essential controls.
- Hide after 10 seconds of inactivity: The bottom control bar automatically disappears after 10 seconds of user inactivity, maximizing screen space and minimizing distractions.
- Once you specified your toolbar settings, click on SAVE button.
After specifying the toolbar settings, proceed to configure the branding settings.
5.4 How to create branded video conferencing through video API
The branding settings allow you to customize the visual appearance and administration settings of your application. You can configure colors, text, and other elements to reflect your branding preferences. Follow these steps to configure the branding settings:
- On the Customize UI page, navigate to Branding tab.
Color Tab
- In the Color tab, select colors for different elements of your application. Customize the following:
- Background color
- Video stream color
- Chat and participant screen color
- Toolbar color
- User information bar color
- Exit button color
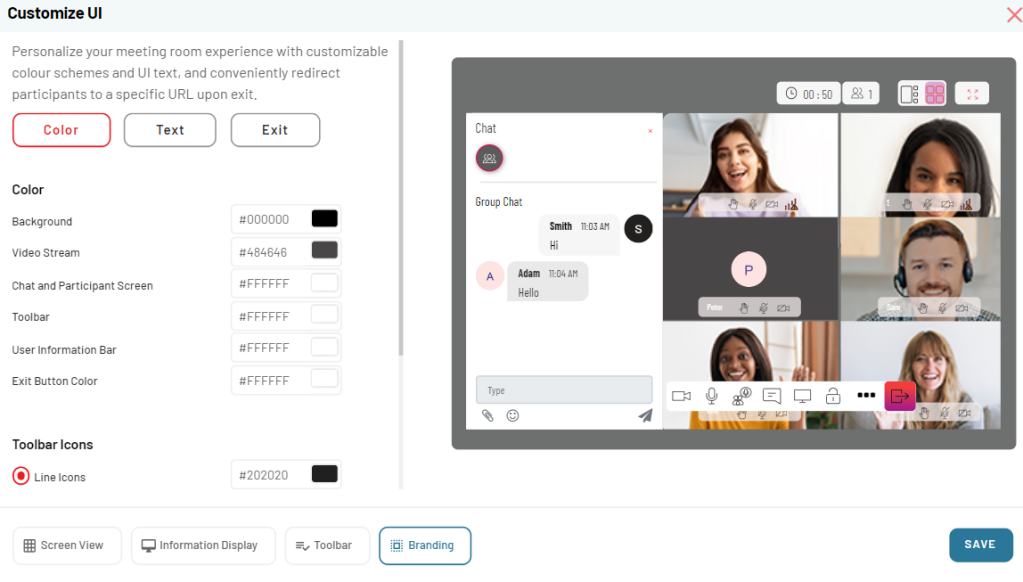
- Choose between different types of toolbar icons, such as:
- Line icons
- Solid icons
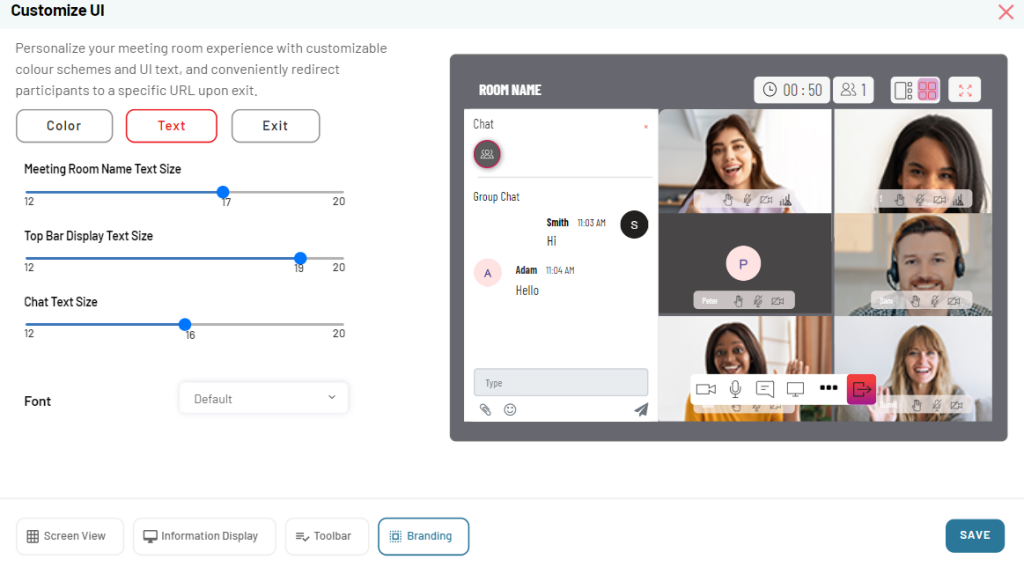
Text Tab
- In the Text Tab, configure font sizes for various text elements, including chat, top bar display and meeting room name.
Exit Tab
- In the Exit Tab section, enable or disable the administrator setting.
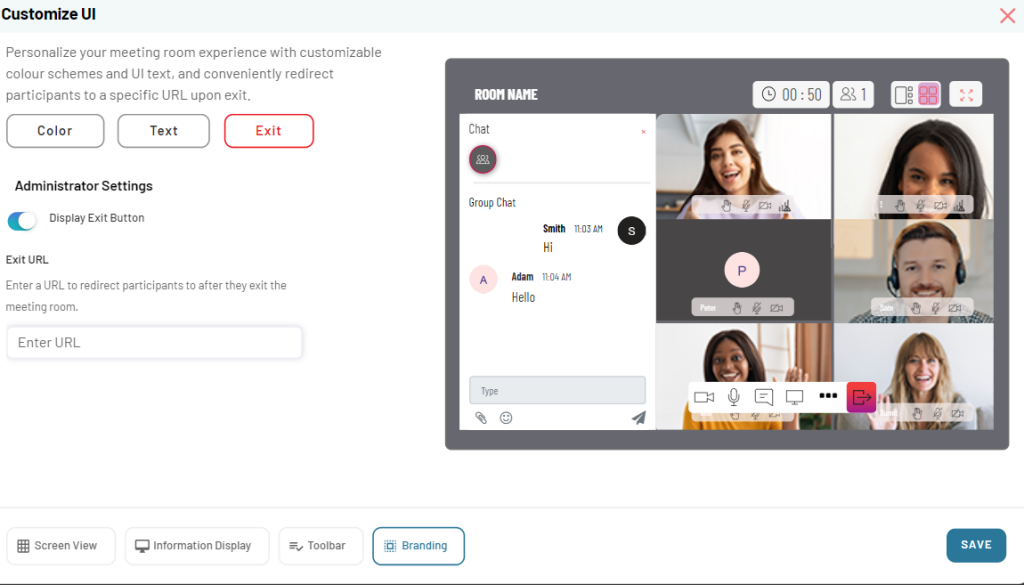
Based on your requirement, you can enable or disable the Administrator setting.
- Toggle to enable or disable the Display Exit button.
- In Exit URL, enter the URL that you want participants to receive after they:
- Sign out or exit from the session
- Disconnect from the session
Note: Ensure that the URL is prefixed with “https://”.
6. Configuring Low Code Add-On Features
This chapter uncovers the power of the versatile and user-friendly suite of low-code ranges from RTMP and HLS Live Streaming to Co-Browsing, Virtual Backgrounds, Extend Embed, Encryption, and Watermarking.
To customise your video calling app with the features of your specific need, do the followings:
- In the Configure box, click on the Go button. This will direct you to the Low-Code Features page.
Alternatively, you can follow these steps to navigate to the Configure for the selected project:
- Navigate to Video section in the left menu pane and select Dashboard option from the drop-down.
- Select the project for which you want to configure advanced features. This will take you to the project summary page.
- On the project summary page, select the Features tab.
- The Low Code Features page will open, presenting you with a range of advanced features, including Live Streaming capabilities, Collaborative functionalities, Recording options, and other advanced features to enhance your development experience.
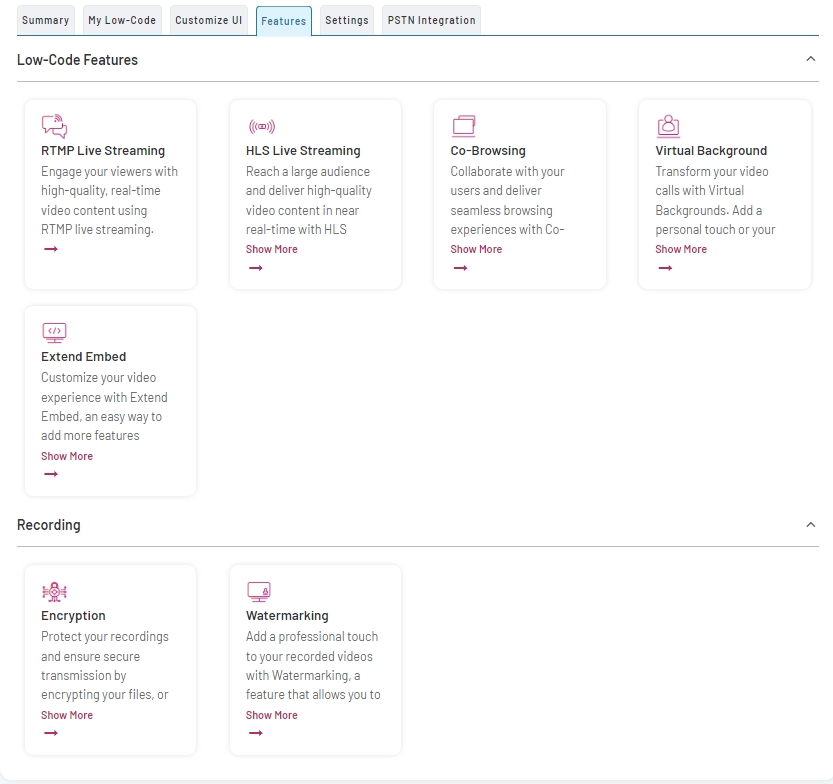
6.1 Configure Live Streaming Features
Live Streaming capabilities engage viewers with high-quality, real-time video content. Two types of streaming are available: RTMP Live Streaming and HTTP Live Streaming.
6.1.1 RTMP Live Streaming
To configure RTMP Live Streaming to your video application, follow these steps:
- Navigate to RTMP Live streaming box.
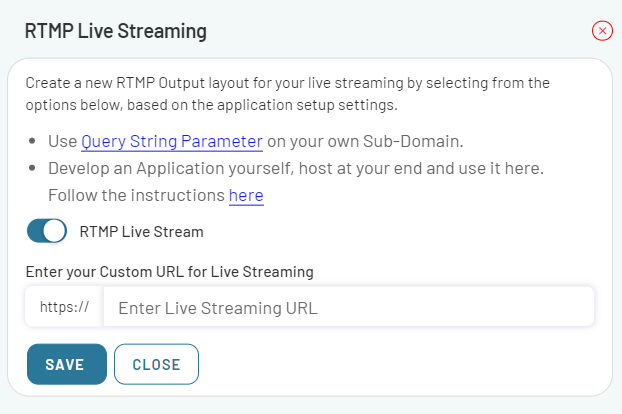
- Toggle the RTMP Live Streaming feature to enable or disable it as per your requirement.
- If you choose to enable live streaming, enter your custom URL for live streaming starting with “https
Note: The RTMP Output layout is dependent on the values specified during the application setup. You have the option to further customize the layout or create a completely new one by selecting from the following choices:
- Use the Query String Parameter on your own subdomain.
- Develop your own application, host it, and follow the instructions provided here.
6.1.2 How to configure HTTP Live Streaming
To configure HTTP Live Streaming to your video application, do the following:
- Navigate to the HLS Live Streaming box.
- Toggle the HLS Live Streaming feature to enable or disable it as per your requirement.
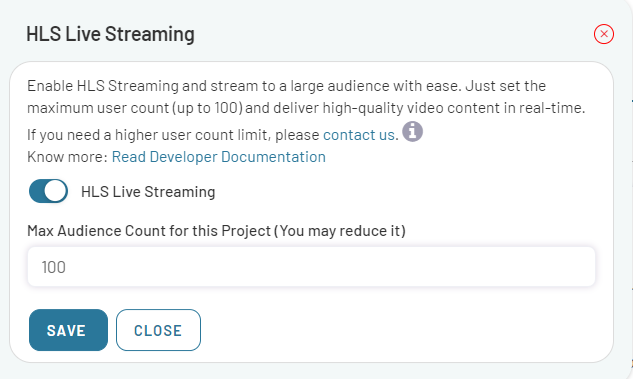
Set the Maximum User Count
- You can set the maximum user count for your project. By default, the limit is set to 100 viewers.
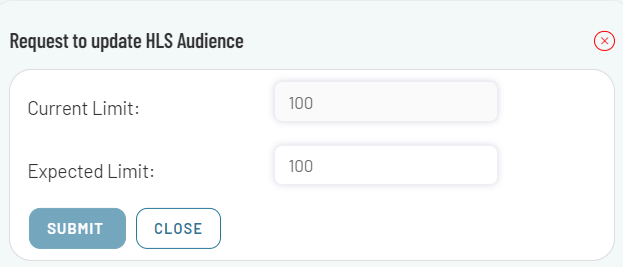
- If needed, you have the option to reduce the maximum user count. However, if you require a higher user count limit, submit your request by clicking on the Contact Us link.
6.2 Configure Collaborative features
Collaborative features enable real-time collaboration, allowing users to work together seamlessly through functionalities such as co-browsing.
6.2.1 How to configure Co-Browsing in WebRTC Video Calls
Co-Browsing allows multiple users to browse and control the same web page or app simultaneously. If you have opted for this feature, you need to add the URLs of your web pages, app, or website to enable collaborative browsing on them.
To configure Co-Browsing to your video application, do the following:
- Navigate to the Co-Browsing box.
- Toggle the Co-Browsing feature to enable or disable it as per your requirement.
This feature allows users to collaborate and navigate web pages together in real time.
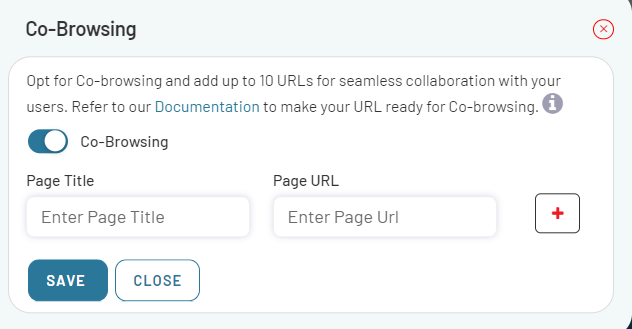
Enter the Page Title and URL
- In the required field, enter the Page Title associated with the web page you want to share during Co-browsing.
- Provide the corresponding URL of the web page.
- You can add a maximum of 10 URLs for Co-browsing.
- Click on SAVE.
6.3. Configure Advanced Features for WebRTC video API
6.3.1 Virtual Background
To add an image as your background during a video call, do the following:
- Navigate to the Virtual Background box.
- Toggle the Virtual Background feature to enable or disable it as per your requirement.
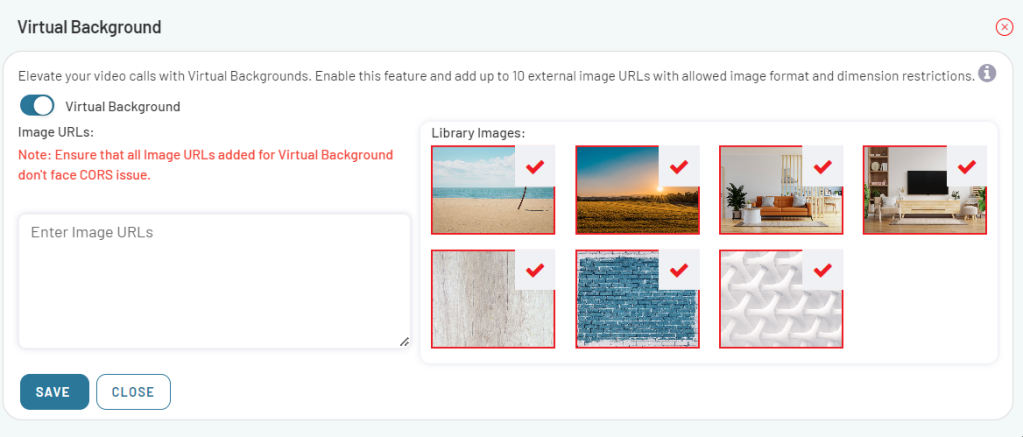
- Enter the desired image URLs.
Note: Ensure that all Image URLs added for Virtual Background do not face CORS (Cross-Origin Resource Sharing) issues.
- Alternatively, You can choose from a selection of pre-existing images available in the library.
- Once you have entered the desired image URL or selected an image from the existing library, click on SAVE button.
6.3.2 How to Extend WebRTC Video Embed
The Video Embed feature can be extended by incorporating your own JavaScript libraries, enabling you to introduce new functionalities, enhance the user interface and experience, and integrate with external CSS stylesheets. WebRTC is an extremely rich platform, and combining EnableX’s platform and your libraries, you can go to market in a few hours, compared to days or weeks using other approaches.
To add your own JavaScript library and customize your Video Embed, follow these steps:
- Select your preferred Script Type (such as JS and CSS).
- Enter up to 5 URLs, starting with https:// , to include the necessary JavaScript libraries.
- Enter the URLs (up to 5) that point to your desired JS or CSS libraries, starting with https://.
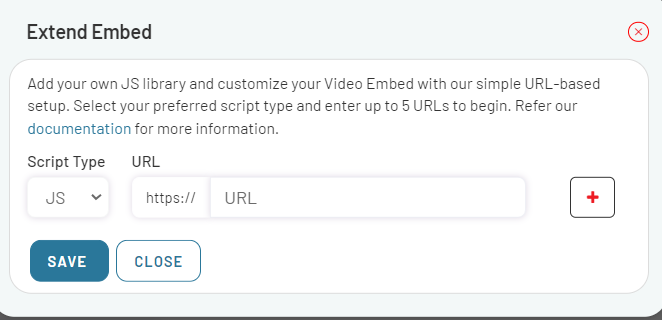
For detailed information, see Extend Video Embed
6.4 Recordings
6.4.1. Encryption
Video Recording Encryption is a feature that provides an additional layer of security for your EnableX Programmable Video Recordings. This feature allows you to encrypt your recordings with an encryption key, ensuring the confidentiality and integrity of the recorded content during storage and transmission.
To encrypt your video recordings:
- Enter your Encryption key and click on SAVE.
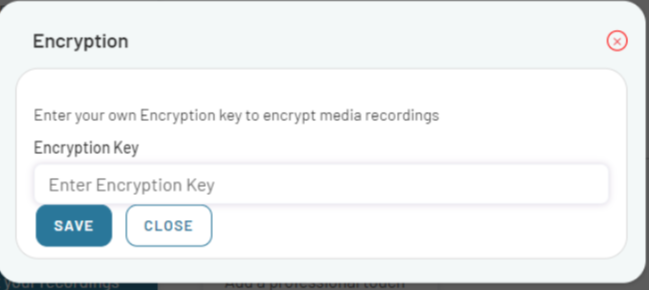
Note: Encryption is a service available with a subscription. When a user signs up for this service, the user himself needs to set an encryption key.
If you are interested in the encryption service, please contact us.
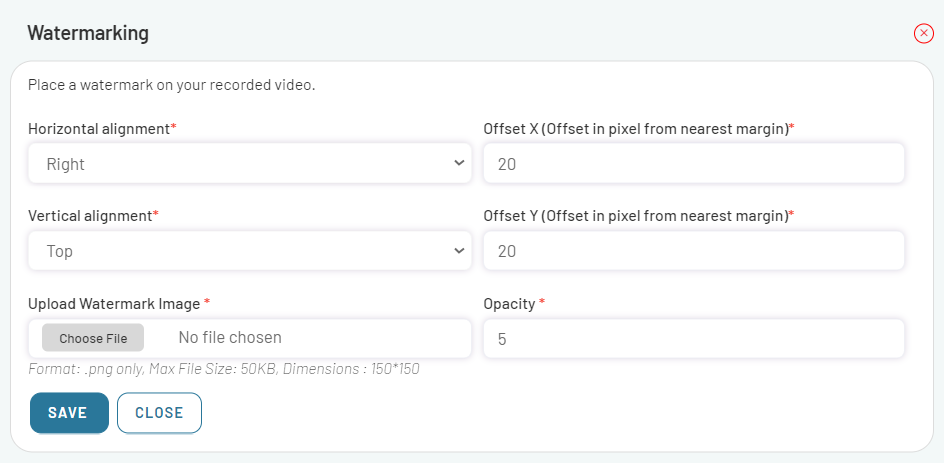
6.4.2 Watermarking
To Add a professional touch to your recorded videos with Watermarking, a feature that allows you to place your own watermark on your videos, do the following:
- Navigate to the Watermarking feature.
- Specify the mandatory settings to format the appearance of the watermark.
- Upload Watermark Image by clicking Choose File.
Note: The Image should be a .png file, no larger than 50KB and 150*150 pixels in dimension.
- Adjust the Opacity of your watermark from 1 to 5 to set the transparency level.
- Click on SAVE.
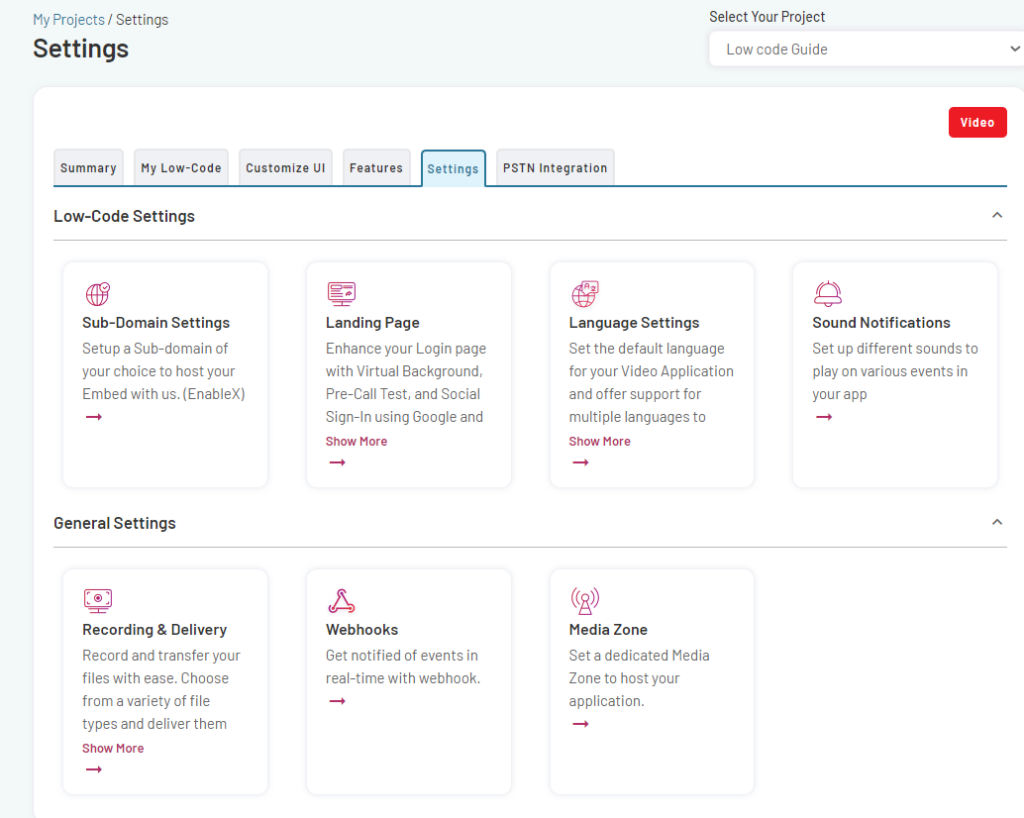
7. Configure Low-Code Settings
EnableX Low code offers a suite of settings which are designed to grant you control over various aspects of your video application without the need for extensive coding.
To configure Low-Code settings, follow these steps:
- Navigate to Video section in the left menu pane and select Dashboard option from the drop-down.
- Select the Low Code project for which you want to configure settings. This will take you to the project summary page.
- On the project summary page, select the Settings tab.
- The Low Code Settings page will open, presenting you with a suite of Low-Code Settings and General settings.
For Low-Code Settings, you can adjust:
- Sub-Domain settings
- Landing Page Settings
- Language Settings
- Sound Notification settings
Additionally, the same page provides you with General Settings to manage:
- Recording and Delivery
- Webhooks
- Media Zone
7.1. Configure Sub-domain Settings
This setting allows you to update or change the subdomain of the URL where your video is hosted.
- By modifying the subdomain, you can alter the web address used to access and view your video content.
- Changing the subdomain can be beneficial for rebranding, organizing videos into different sections, or personalizing the URL to reflect your brand or purpose.
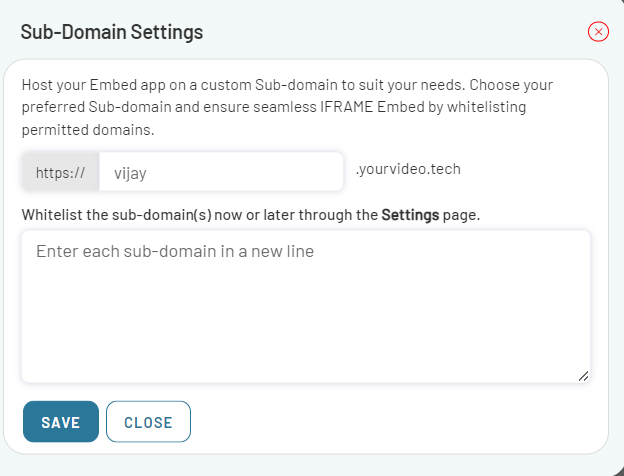
To customize the subdomain:
- Click on SUB-DOMAIN SETTINGS tab.
- Enter a name for the subdomain that you want to use for hosting the application.
To whitelist the Sub-Domain(s):
- Add the name(s) of the subdomain(s) you want to allow, with each subdomain on a new line.
- Click on SAVE button, once you have entered the desired subdomains.
- The specified subdomains will now be whitelisted, and they are allowed to use the custom subdomain feature for hosting your Embed app.
After customizing the subdomain, proceed to configure the Landing Page settings.
7.2 Configure Landing Page for WebRTC Video Calls
You can enhance the functionality and user experience of your landing and login pages. Choose the features that align with your needs and preferences.
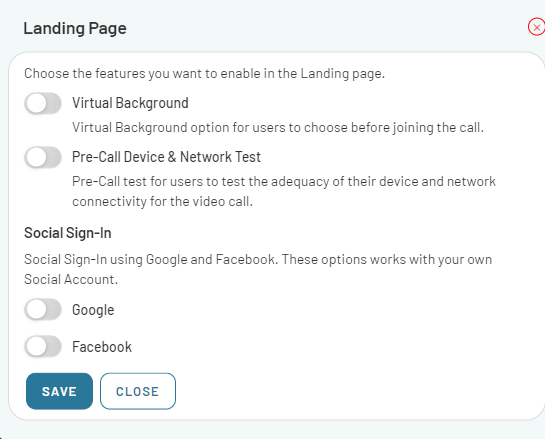
To enable or disable the features for the Landing page, you have the following choices:
Virtual Background:
- Enable or disable the option for users to choose a virtual background before joining the call..
Pre-Call Device & Network Test:
- Enable or disable the pre-call test for users to check their device and network connectivity before starting the video call.
Social Sign-In:
- Enable or disable the option for users to sign in using their Google or Facebook accounts. You can choose to enable Social Sign-In using Google, Facebook, or both, or disable it entirely.
- Click on SAVE to ensure that the chosen features are enabled or disabled according to your preferences.
7.3 Configure Language Settings
The language settings allow you to choose the default language for your Video Application and enable multiple language options for your users.
There are two aspects you can manage:
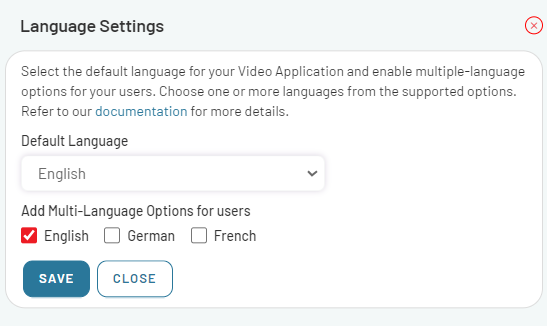
Default Language:
- Choose the Default Language you want to set for your Video Application.
Multi-Language Options:
- To add multi-language options, check the box next to each language you wish to include.
Note: If you want to allow your users to choose their language, check all the languages that you want to make available to them. Users will see Embed in the default language. However, an option to switch to other available languages is also provided.
- Supported language options include:
- English
- German
- French
- Click on SAVE button to ensure your Language selection.
7.4 Configure Sound Notification Settings
Different sounds can be played for different notification events in your application. The notification sounds can be applied to moderators and/or participants as needed. Notification sounds for events like starting or stopping a recording or when a new chat message is received can be applied to all the users (participants and moderators).
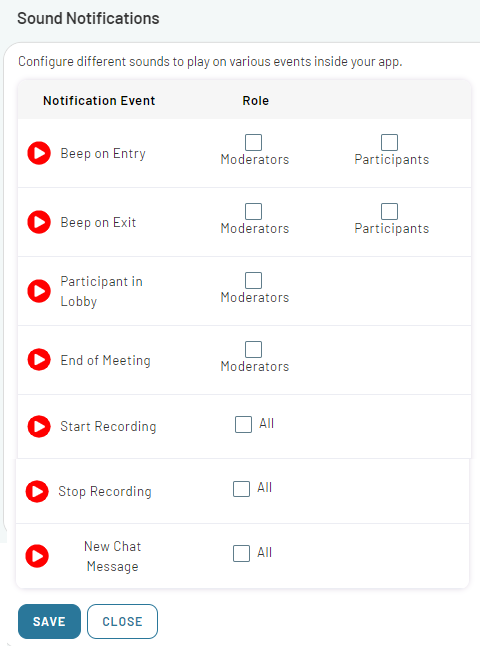
- Click on SAVE button to save your selections.
7.5 Configure Recording and Delivery Settings
You can set up an Archiving and Delivery service to capture and archive webinars and meeting room data including voice, video, captions/transcripts, and in-meeting chat messages, and make them available on a destination server, service, or platform of your choice.
- Navigate to the Recording & Delivery tab.
On the Recording & Delivery page, you have the option to choose the file types to deliver and specify the destination for the recorded files. To configure these settings:
Deliver File Types:
- Select the file type(s) you want to include in the delivery of recorded content. The available options in this case are:
- Individual Recording: Deliver each recording as a separate file.
- Live Recording: Deliver recorded content from live sessions.
- Transcoded: Deliver the content in a transcoded format.
- Meta data: Include metadata associated with the recorded content.
- Chat data: Include the chat data from the recorded sessions.
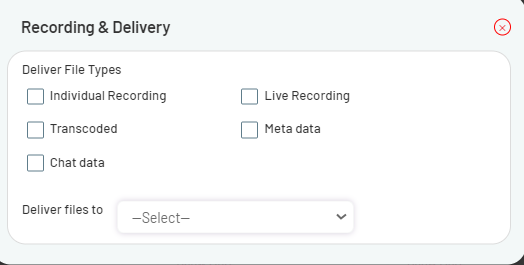
Deliver files to:
- Select the destination where the recorded file(s) will be delivered. Available destination options are:
- FTP to my server
- Secure a copy to my server
- Save on AWS S3
- Save on Google Drive
- Save on Microsoft Azure
7.5.1. Transfer to FTP/SFTP Host
- Select FTP to my server from the Deliver files to drop-down list. The FTP to my server section will display on the recording & delivery page.
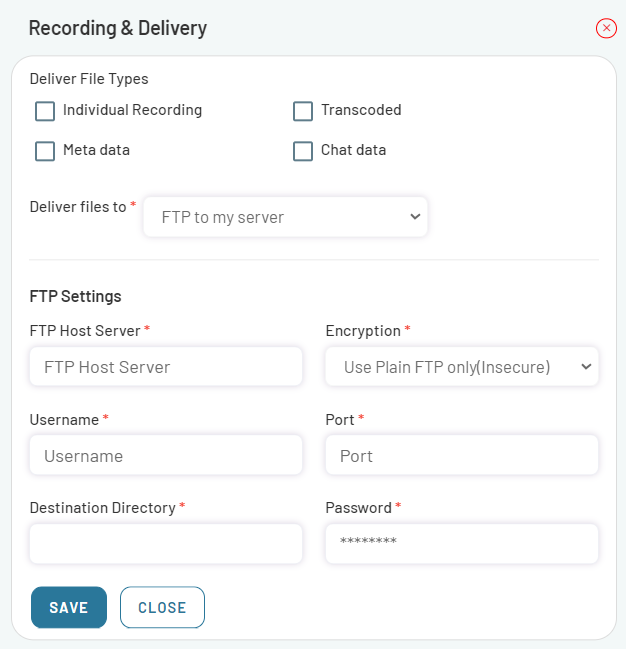
- Specify the details required for file transfer.
This includes:
- FTP server details: Enter the hostname or IP address of the FTP server where you want to transfer the files.
- Username: Specify the username associated with your FTP server account.
- Password: Enter the password for the provided username.
- Port (optional): If required, provide the port number for the FTP connection. If left blank, it will typically use the standard FTP port.
- Click on SAVE to submit the specified details.
The files will be transferred to the specified FTP server.
7.5.2. Transfer to using SCP
- Select Secure copy to my server from the Deliver files to drop-down list. The SFTP Settings section will display on the recording & delivery page.
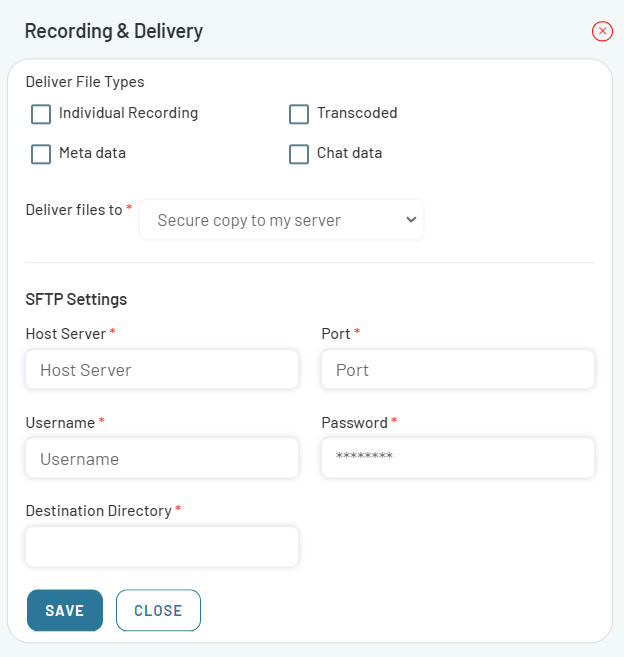
- Specify the details required for file transfer.
- Fill in the form as needed and submit it by clicking on SAVE button.
7.5.3 Transfer to AWS S3
- Select Save on AWS S3 from the Deliver files to drop-down list. The AWS S3 Settings section will display on the recording & delivery page.
- Specify the details required for file transfer.
- Fill in the form as needed and submit it by clicking on SAVE button.
7.5.4 Transfer to Google Drive
- Select Save on Google drive from the Deliver files to drop-down list. The Google drive Settings section will display on the recording & delivery page.
- Specify the details required for file transfer.
- Fill in the form as needed and submit it by clicking on SAVE button.
7.5.5 Transfer to Microsoft Azure
- Select Save on Microsoft Azure from the Deliver files to drop-down list. The Microsoft Azure Settings section will display on the recording & delivery page.
- Specify the details required for file transfer.
- Fill in the form as needed and submit it by clicking on SAVE button.
7.6 Configure Webhook Settings
Webhooks are an essential feature of the EnableX platform that allows you to receive real-time notifications about specific events. By configuring a webhook URL and selecting the desired events, you can effortlessly stay updated on crucial activities within your application. This chapter will guide you through the process of setting up webhooks and receiving notifications.
To set up webhooks and start receiving notifications, follow these steps:
- Navigate to Webhooks tab.
- Specify Webhook URL that will receive the webhook notifications.
Note: Ensure that the URL supports HTTPS and is capable of handling JSON payloads via HTTP POST requests.
Subscribe Events
- Navigate the Subscribe to the Notifications section.
- In this section, you will find a list of events that can trigger webhook notifications.
- Select the <event(s) name> you want to receive notifications for.
- Toggle the corresponding icon in front of each selected event(s).
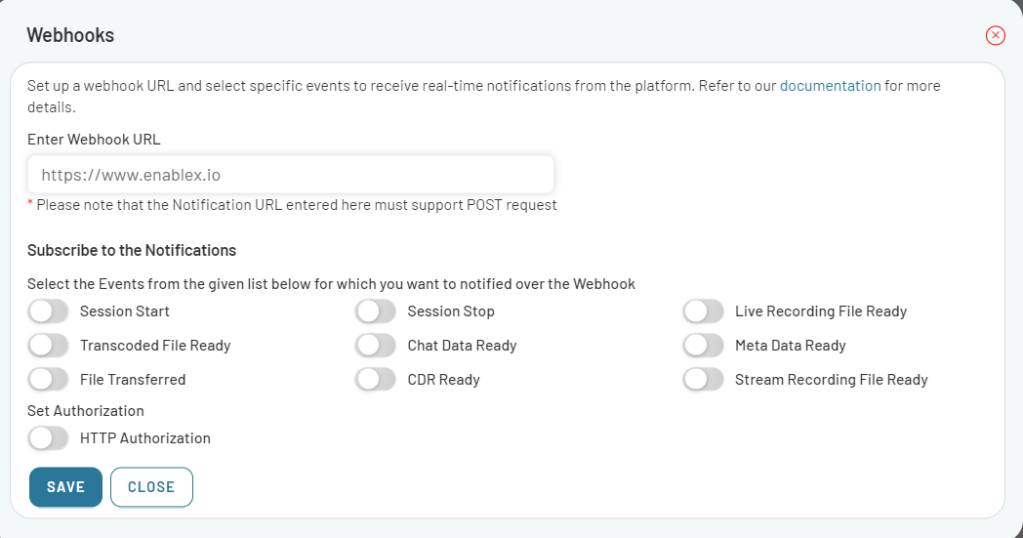
Set HTTP Authorization (Optional)
You can enable HTTP authorization if you want to authenticate your users. Authorization headers provide credentials that authenticate a user agent to a server, allowing it access to protected resources. To implement secured access in your webhook, EnableX supports HTTP Basic Authentication.
- If your application requires HTTP authorization to receive webhook notifications, follow these additional steps.
- Enable HTTP Authorization option.
- Enter the <Username> and <Password> associated with your application’s HTTP authorization.
- Once you have specified the webhook URL and selected the desired event(s), click on SAVE button to finalize the webhook configuration.
When working with webhooks in the EnableX platform, it’s important to note that the Notification URL is a project-specific setting. This means that each project can have its own unique Notification URL. However, it is possible to use the same Notification URL across multiple projects if you want to receive notifications in a centralized location.
When a webhook event occurs and a notification is sent to the specified Notification URL, the JSON data posted will include the app_id parameter. This parameter carries the identifier of the project from which the event originated. You can utilize this app_id to segregate and differentiate the data received for each project if needed. This allows you to maintain project-specific logic and handle notifications accordingly.
7.7 Configure Media Zone Settings
EnableX operates in multiple geographic regions through dedicated media zones. Depending on the geographic location of your participants, you can host your application in a particular media zone. The media and signalling traffic is hosted in specific regional data centers as per your preferred media zone. If you have subscribed to a different media zone, you can select it from the Media Zone (Preference 1) menu.

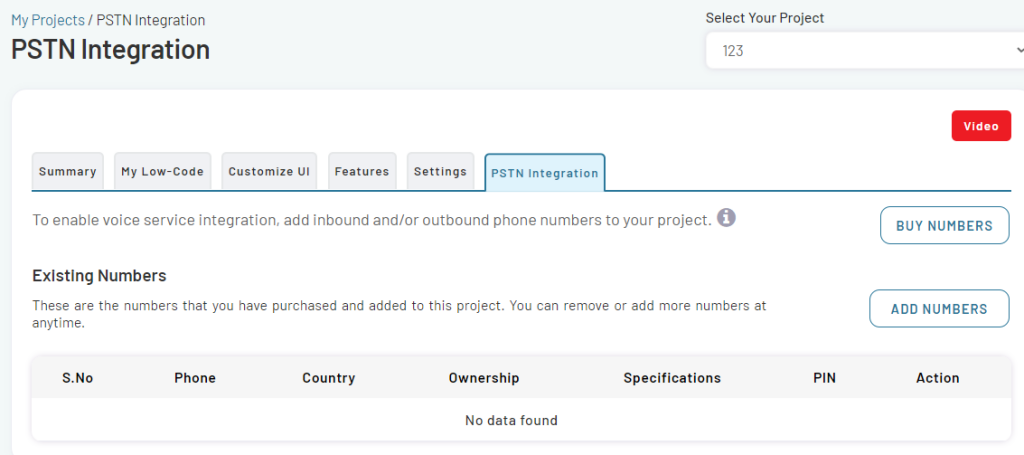
7.8 Configuring PSTN Integration Settings
If you want to integrate incoming and outgoing voice service, you need to add inbound and outbound phone numbers to your project. This helps users join the virtual sessions using a phone call, or be invited to the call through dial-out.
To add PSTN integration to your project, do the following:
- Navigate to Video section in the left menu pane and select Dashboard option from the drop-down.
- Select the project for which you want to configure PSTN voice Integration. This will take you to the project summary page.
- On the project summary page, select the PSTN Integration tab.
- The PSTN Integration form will open, where you can Buy Numbers and Add existing Numbers to the Video conference.
8. Project Management
All projects can be further managed using the manage icon next to each project name. To manage your existing Low-Code video projects, do the following:
On the Dashboard, navigate to the My Project section and identify the specific project you wish to manage. Click on the Manage icon next to the <Project>. This will direct to the Project Summary page.
The Summary page displays essential project details and offers advanced management options.
8.1 Project Details
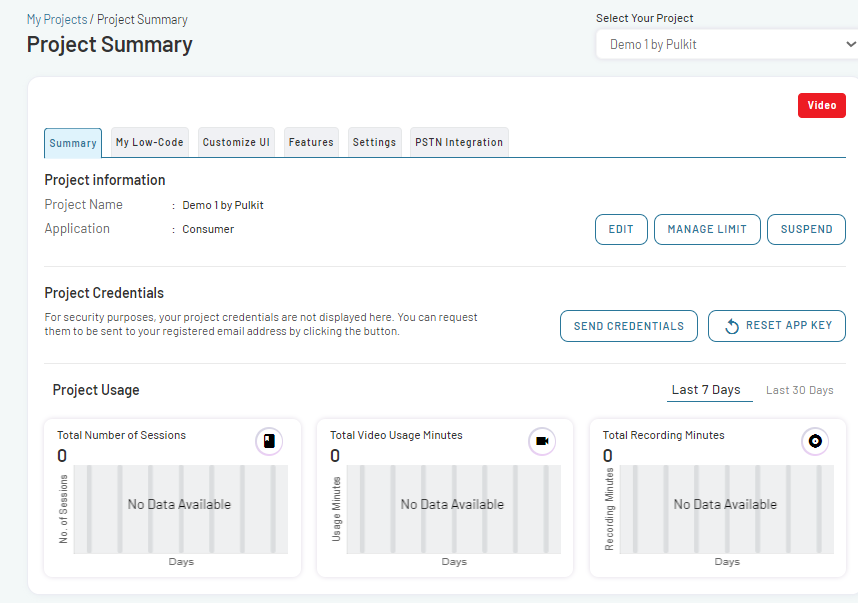
8.1.1 Project Information
In this section, basic information about the project is given.
- Project Name: Contains the name given during project creation.
- Application: Specifies the industry mentioned during project creation (e.g., Banking, Healthcare, Telecommunication).
8.1.2 Project Credentials
When you create a project, the API Access Credentials are sent to you via email. However, you may need to reset API Key or resend API Credentials. If needed, user can request Project Credentials and Reset App Key from the Summary page.
Send Credentials: This allows you to request project credentials to be sent to your registered email.
Reset App Key: This option resets the App Key (App ID & App Key).
8.1.3 Project Usage
This sections provides graphical displays for the following over the last 7 or 30 days:
- Total Number of Sessions
- Total Video Usage Minutes
- Total Recording Minutes
8.2 Advanced Manage Options
8.2.1 EDIT Option
- This option enables you to edit the Project Name, Application, Application description, and Project Description.
- You can also add other channels (Voice, SMS and WhatsApp) to your existing project.
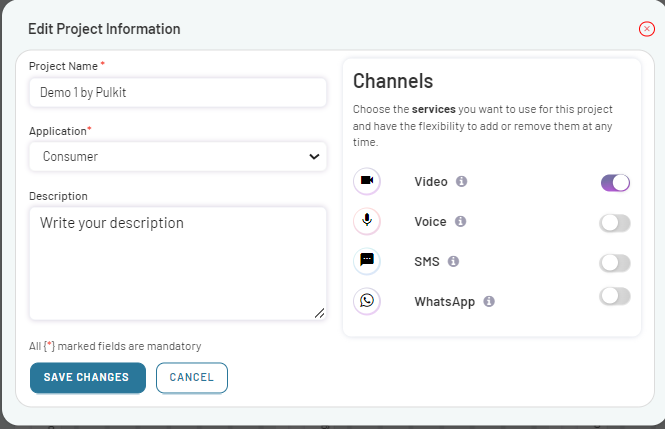
To edit the project Information, follow these steps:
- Navigate and click on EDIT tab on the Summary page.
- Make the necessary adjustments.
- Click on SAVE CHANGES.
- The updates will be immediately reflected on the Dashboard.
8.2.2 MANAGE LIMITS Option
The Manage Option is used to Manage the Wallet and the corresponding limits. Under Manage Limits Option, there are further various options which are as follows:
- Top Up
- Top Up History
- Manage Project Limit
- Allocation History
Top UP
The Top Up window provides options for managing the wallet balance. Users can either:
- Choose to add funds manually with a one-time top-up.
- Set an automated system to top up the wallet when the balance falls below a specific threshold.
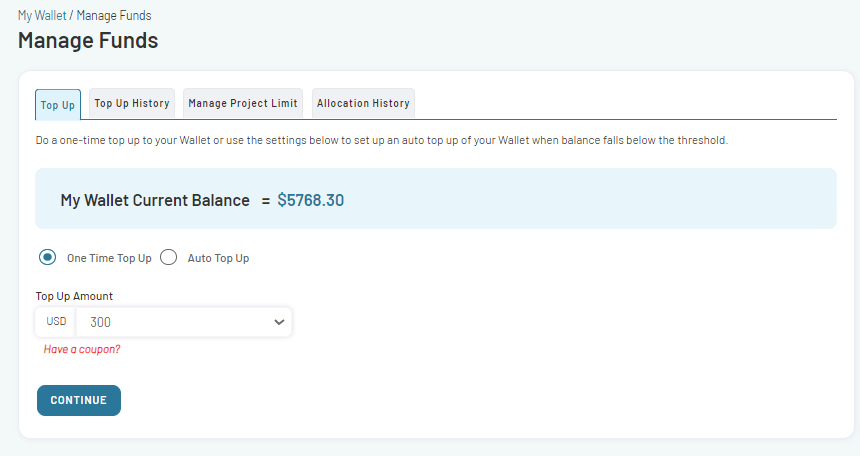
Additionally, there’s an option to apply a coupon, possibly for discounts or promotions, during the top-up process. The current balance of the wallet is also displayed for the user’s reference.
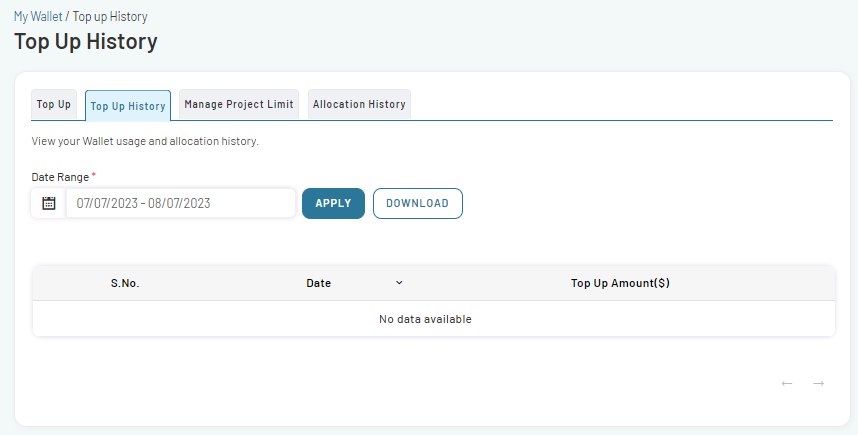
Top Up History
The Top Up History window allows users to review and track their wallet’s transaction history over a specified date range. It also provides a list of top-up amounts made to the wallet, organized by date. The user can adjust the date range to view transactions from different periods.
Manage Project Limit
The Manage Project Limit window provides tools for users to manage and adjust financial limits associated with a specific project. It allows users to allocate or release funds to/from the project from their main EnableX Wallet. All the financial values are presented in USD.
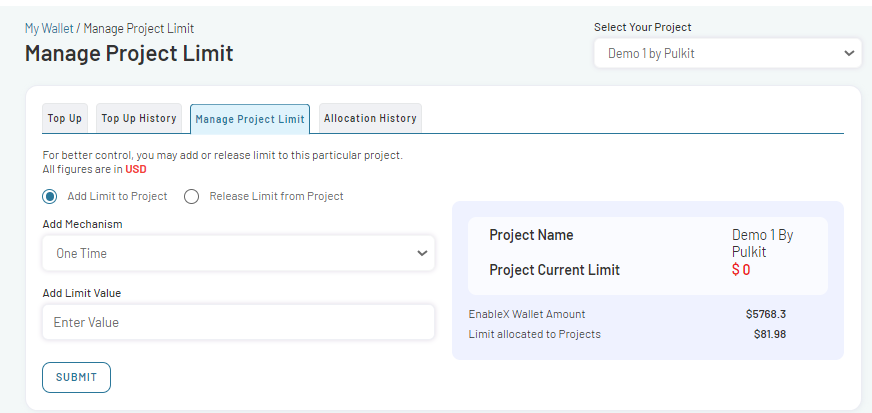
The interface offers:
- Options to either add funds to the project’s limit or release them back to the main wallet.
- A mechanism for one-time adjustments.
- Fields to specify the amount of funds to be adjusted.
- Display of the project’s name and its current financial limit.
- A view of the overall balance available in the EnableX Wallet.
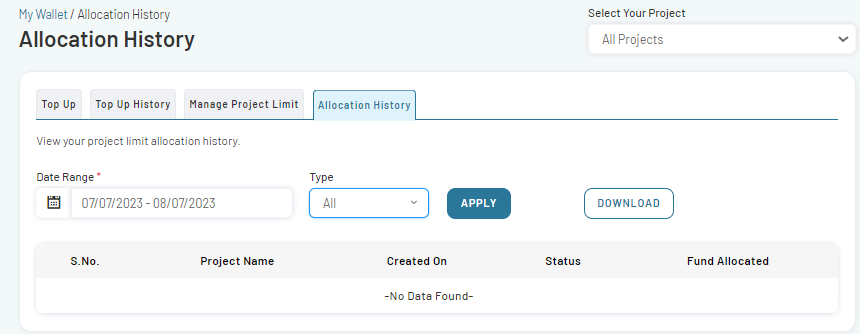
Allocation History
The Allocation History window provides an overview of the project limit allocation history, allowing users to track and manage the funds allocated to different projects within a specified date range.
Note: Options are available to load the wallet using an Auto Mechanism or when the balance falls below the minimum threshold.
8.2.3 SUSPEND Option
This option suspends an account temporarily. Suspending a project stops all ongoing sessions.
- Click on SUSPEND.
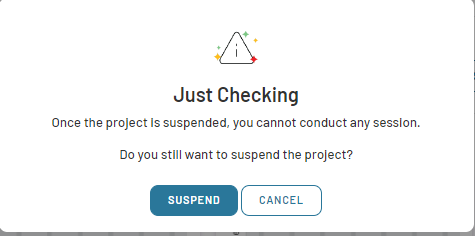
- A pop-up appears for confirmation, and the account is suspended.

- For suspended accounts, the SUSPAND tab will change to ACTIVATE reactivation.
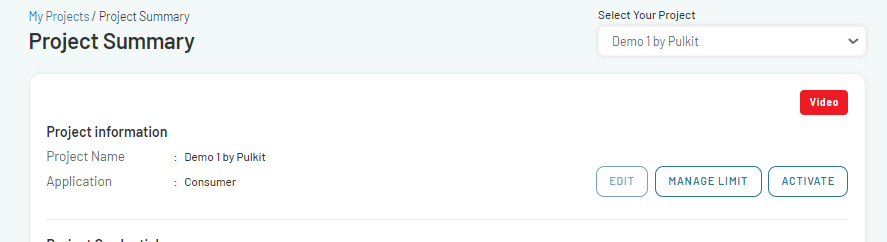
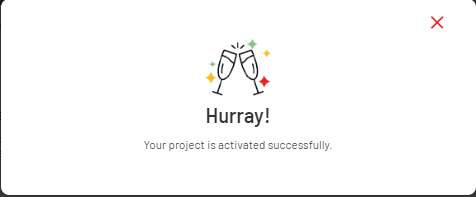
- To activate the suspended project, click on ACTIVATE tab.
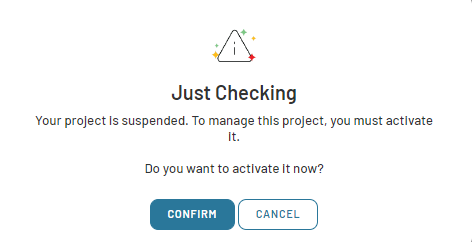
- A pop-up appears for confirmation, and the account is activated.
9. User Management
User management encompasses the systematic administration of user accounts, ensuring proper access rights within the software environment. This entails the construction, modification, and removal of user profiles, coupled with the precise delegation of permissions to various system components.
Accessing this section requires:
- From the main login interface, select the user icon located at the upper right corner.

The key functionalities provided within this section include:
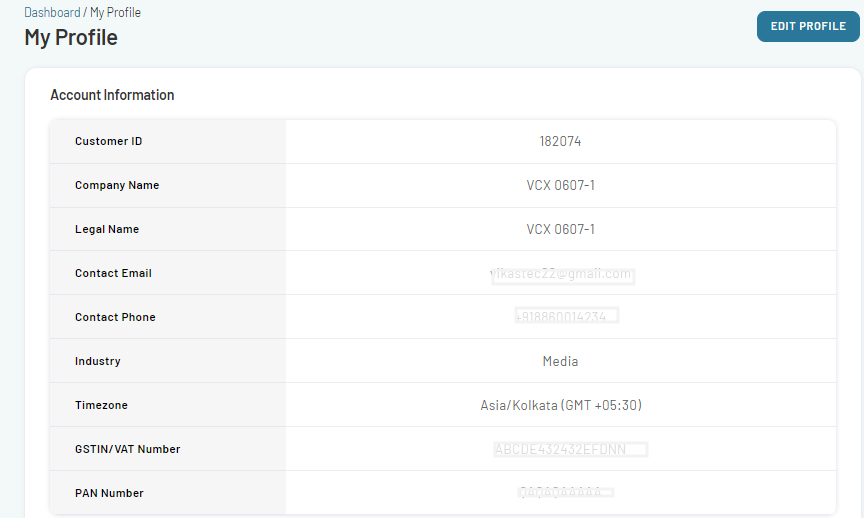
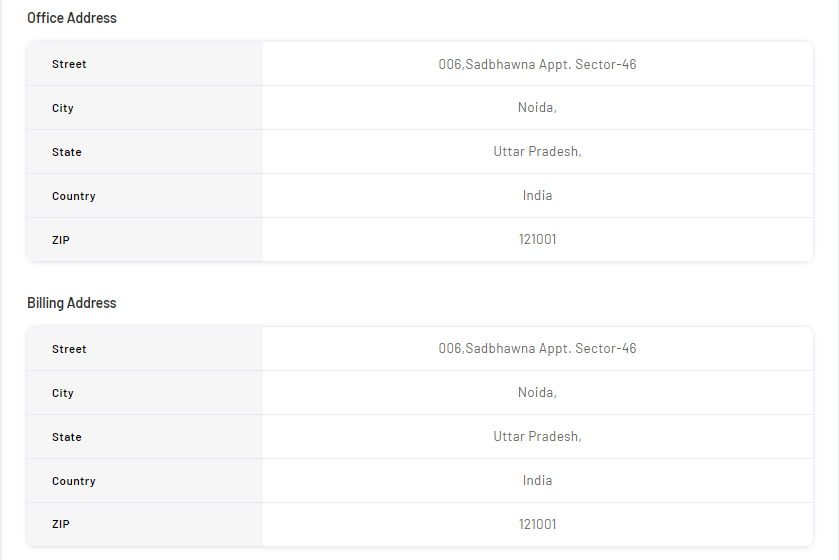
My Profile
This section presents comprehensive details related to the primary account with capabilities to modify them, ensuring the most up-to-date information is maintained. Key attributes within the profile:
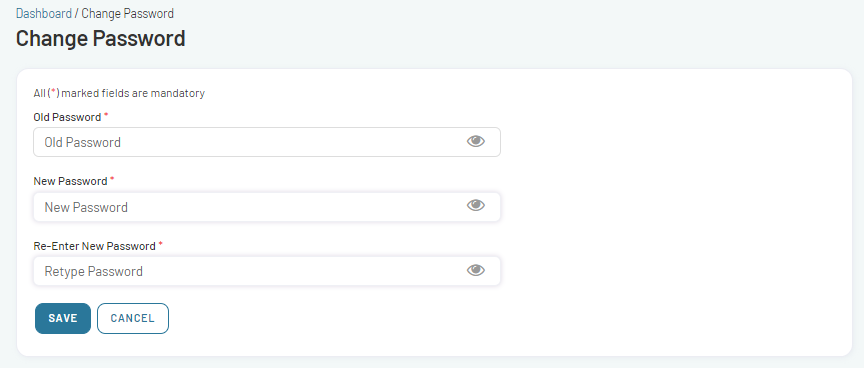
Change Password
This function facilitates a security measure where users can modify their existing password. The procedure:
User Management
For maintaining robust system security, data protection, and adherence to regulations, proficient user management is indispensable. It provides a mechanism to supervise user access, deter unauthorized activities, and optimize administrative tasks.
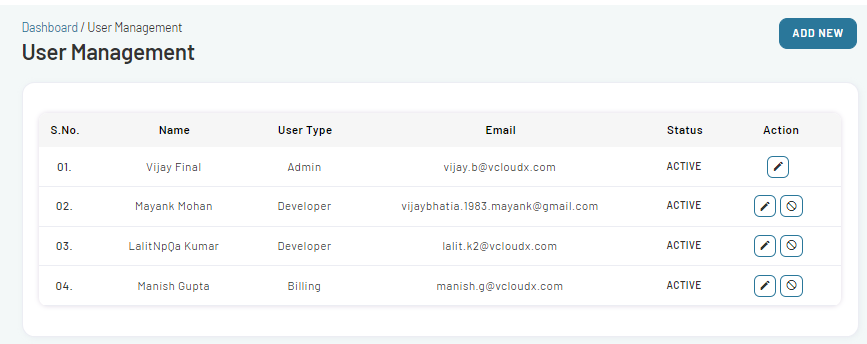
User Management serves to:
- Assign access based on specific roles and permissions.
- View a list of all created accounts with functionalities to either activate or suspend them.
Add New User
This function allows for the creation of a new user profile and the assignment of corresponding permissions.
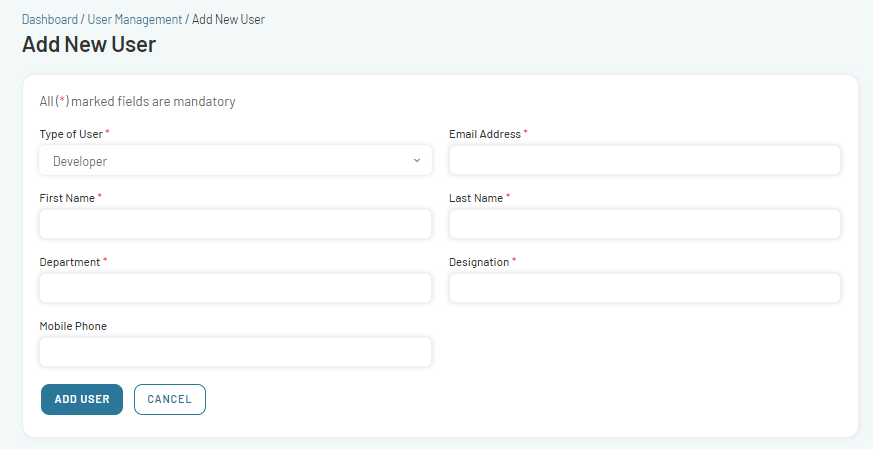
User Type
Administrators can determine the access level of a user based on their role:
Developer: For users involved in API-related development for video conferencing.
Billing: Designed for users overseeing billing and financial procedures.
Project Report: Grants users access to one or multiple accounts, specifically for reporting. An essential feature for an Admin Portal managing several clients. Selecting this option activates the Projects field, presenting a list of all projects for selection.