Building a powerful video conferencing app requires a comprehensive solution that encompasses seamless communication, robust features, and a user-friendly interface. If you are on the lookout for such a solution, look no further than the Android UI Kit by EnableX. With its versatile toolkit and the strength of the Android SDK, the Android UI Kit empowers developers to create immersive and feature-rich video conferencing experiences like never before.
Experience the best Android UI Kit for video calling applications
The EnableX Android UI Kit is a specialized toolkit designed to simplify the development of video user interfaces (UI) for Android applications. It provides pre-built UI components, widgets, and customization options that cater specifically to video application development. With the Android UI Kit, developers can quickly create visually appealing and functional video UI without the need for extensive coding or dealing with complex implementation details.
Why Developers Should Embrace Android Video UI Kit
The primary advantage of using Android Video UI Kit is its ability to significantly reduce development effort and time. With just a few lines of code, developers can achieve the magic of implementing video communication within their app. This framework ensures a seamless video UI experience with comprehensive device support, allowing developers to focus on building robust video applications without the need for extensive coding and handling complex implementation details.
Advantages of using the Android UI Kit for building a video conferencing application
It offers several advantages for developers, including:
- Reduced development effort and time: With just a few lines of code, developers can implement video communication within their app.
- Seamless video UI experience: The UI Kit ensures a smooth and intuitive video UI experience with comprehensive device support.
- Integration with WebRTC: The UI Kit integrates WebRTC technology, enabling real-time communication capabilities such as audio and video streaming within the app.
- Simplified customization: The UI Kit provides customization options, allowing developers to tailor the UI components to their specific needs.
Does EnableX’s Android UI Kit support low-code environments?
Yes, our UI Kit is adaptable to low-code environments. It offers integration with custom UI component settings configuration using Visual Builder. Additionally, users can change their UI components at runtime based on their requirements.
Permissions required to use EnableX Android UI Kit
To use the Android UI Kit, the app needs to have the following permissions:
- CAMERA: Required for accessing the device camera during video calls.
- RECORD_AUDIO: Required for accessing the device microphone during audio/video calls.
- INTERNET: Required for establishing network connectivity to enable communication with the EnableX platform.
- CHANGE_NETWORK_STATE: Required for managing network connectivity.
- MODIFY_AUDIO_SETTINGS: Required for adjusting audio settings during calls.
- BLUETOOTH: Required for Bluetooth functionality if needed in the app.
- BLUETOOTH_ADMIN: Required for Bluetooth administration if needed in the app.
- WAKE_LOCK: Required for preventing the device from sleeping during video calls.
Which Video communication features are supported by the Android UI Kit?
The Android UI Kit provides a range of video communication features, including:
- Real-time audio and video streaming.
- Switching between front and rear cameras during video calls.
- Muting and unmuting audio and video streams.
- Group and private chat functionality.
- Participant list to view and manage participants in a video call.
- Switching between different video layout options.
- Disconnecting from the video call.
- Raising hand to join the floor (for webinar mode).
- Recording the session (for moderators).
- Controlling audio and video for individual participants (for moderators).
- Dropping participants from the room (for moderators).
- Allowing or denying participants’ raised hand requests (for moderators in webinar mode).
What are the System Requirements for Android video calling UI Kit?
To use the Android UI Kit, you need to have Android Studio installed on your development machine. You can develop applications using either Kotlin or Java programming languages. Additionally, ensure that you have the necessary permissions and dependencies configured as mentioned in the documentation.
Wide Compatibility of EnableX Android UI Kit
The Android UI Kit is designed to be compatible with a wide range of Android devices. It supports different screen sizes, resolutions, and orientations. However, it’s always recommended to test your application on various devices to ensure optimal performance and compatibility.
Having covered common queries posed by developers, it’s time now to delve into the technical specifics. The following section will outline how to harness the Android UI Kit to create a real-time video meeting application:
Prerequisites
Before beginning the integration of the Android UI Kit, these steps must be followed.
- Create an account on the EnableX Platform
- Create a video project
- Get App ID and App Key
- Create rooms and generate token
- Android Studio installed on your development machine.
Create a Video Project
To develop a video conferencing App using Android UI Kit, first, you need to create a Video Project with EnableX Platform. To create a Video project, do the following:
- Navigate to My Dashboard, go to My Projects section and click on CREATE PROJECT button
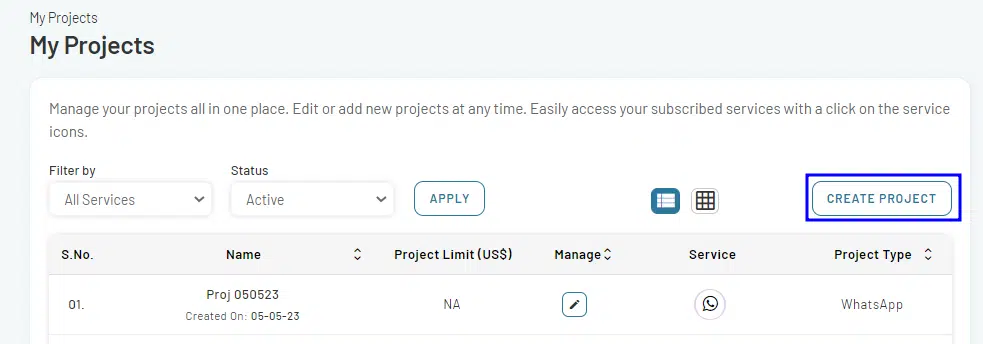
- A Create Project form will open. Enter the project-related information like project name, application and description and enable Video in the Channels section.

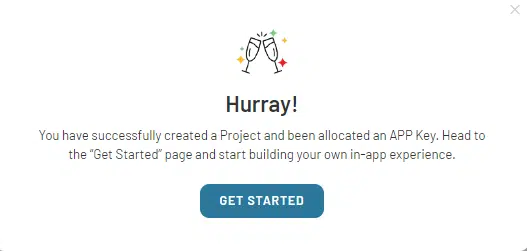
- Once you have filled in all the necessary information, click on the CREATE PROJECT button to create your project. A confirmation popup will then appear, confirming the successful creation of your project. Click on GET STARTED to proceed further.
Get APP ID and APP KEY for Android based Video API Conferencing
The App ID and App Key, serve as the username and password, respectively, in the HTTP Base Authentication Request Header of our Video Server API Call. When you create a project, the API Access Credentials are sent to you via email. However, you may need to reset API Key or resend API Credentials. To know more, read our comprehensive developer documentation.
Create Virtual rooms and Generate Token
Create Room
To create a room, make an HTTP POST request to the following API route: https://api.enablex.io/video/v2/rooms. You need to include the necessary parameters and values in the request body, which should be in JSON format. For example:
{
  "name": "Topic or Room Title",
  "owner_ref": "xyz",
  "settings": {
    "description": "Descriptive text",
    "mode": "group",
    "scheduled": false,
    "adhoc": false,
    "duration": 30,
    ……….
    ……..

    "role_based_recording": {
      "moderator": "audiovideo",
      "participant": "audio"
    },
    "live_recording": {
      "auto_recording": true,
      "url": "https://your-custom-view-url"
    }
  },
  "sip": {
    "enabled": false
  },
  "data": {
    "custom_key": ""
  }
}
To know more about Create Rooms, please read Create Room to carry out RTC Session .
Generate Token
To create a token for joining an RTC session on the EnableX platform, make a POST request to the API route: https://api.enablex.io/v2/rooms/{room-id}/tokens where {room-id} is the ID of the room you want to join. For example:
POST https://api.enablex.io/video/v2/rooms/{room_id}/tokens
Authorization: Basic XXXXXXX
Content-Type: application/json

{
     "name": "User Name",
     "role": "participant",
     "user_ref": "XXX",
     "data": {
        "custom_key": "String",
    "any_key": "String"
     }
}
Upon successful creation, the API will respond with a JSON object containing the result and the generated token (JWT_WEB_TOKEN).
{
     "result": 0,
     "token": "JWT_WEB_TOKEN"
 }
To know more about Token, please read Create Token to join a Room.
Integrate Android UI Kit into project
Once you have created a video project with the EnableX Platform and established a virtual video meeting room, the next step is to integrate it into your project. Follow these steps:
- Download the latest Android SDK (AAR file)
- Download the Latest Android UI Kit (AAR file)
- Add downloaded AAR files to the project’s lib folder
- Modify Your Project-Level Build.gradle File. Follow these steps:
- Navigate to your project’s root directory.
- Locate and open the build.gradle file.
- Find the allprojects.repositories section in the file.
- Insert the following block of code:
Insert the following block of code:
allprojects{
  repositories {
      flatDir {
        dirs 'libs'
      }
    }
  }
5. Add dependencies to your project
- Navigate to your App directory.
- Locate your application-level build.gradle file.
- Open the build.gradle file.
- Navigate to the dependencies section of the file.
- Append the following code:
implementation fileTree(dir: 'libs', include: ['*.aar', '*.jar'], exclude: [])
implementation('io.socket:socket.io-client:1.0.1') {
  exclude group: 'org.json', module: 'json'
}
implementation 'org.webrtc:google-webrtc:1.0.32006'
6. Define Device Permissions
Your app needs certain permissions to use features on the user’s phone. You tell Android about these permissions in your AndroidManifest.xml file.
<uses-permission android:name="android.permission.CAMERA" />
<uses-permission android:name="android.permission.RECORD_AUDIO" />
<uses-permission android:name="android.permission.INTERNET" />
<uses-permission android:name="android.permission.WRITE_EXTERNAL_STORAGE" />
<uses-permission android:name="android.permission.READ_EXTERNAL_STORAGE" />
<uses-permission android:name="android.permission.ACCESS_NETWORK_STATE" />
<uses-permission android:name="android.permission.BLUETOOTH" android:maxSdkVersion="30"/>
<uses-permission android:name="android.permission.BLUETOOTH_ADMIN" android:maxSdkVersion="30"/>
<uses-permission android:name="android.permission.WAKE_LOCK" />
<uses-permission android:name="android.permission.BLUETOOTH_SCAN"android:usesPermissionFlags="neverForLocation"/>
<uses-permission android:name="android.permission.BLUETOOTH_ADVERTISE" />
<uses-permission android:name="android.permission.BLUETOOTH_CONNECT" />
7. Implement Android Video UI Kit
Import the packages
Open your activity file. At the top of the file, add the given packages:
import com.enablex.enxuikit_android.observer.EnxVideoStateObserver
import com.enablex.enxuikit_android.view.EnxVideoView

Initialize the EnxVideoView Class
This step involves adding the reference of EnxVideoView to your layout.
- Initialize EnxVideoView.
- Set layout parameters.
- Add VideoView to your layout.
// Initialize EnxVideoView
enxVideoView = EnxVideoView(this,token,this, "Low Code Embed URL")
// Low Code Embed URL is optional, in case you want to import settings.

// Set Layout Parameters
val rlp = RelativeLayout.LayoutParams(RelativeLayout.LayoutParams.MATCH_PARENT, RelativeLayout.LayoutParams.MATCH_PARENT)

// Add VideoView to your Layout
this.addContentView(enxVideoView, rlp)

8. Handling Device Orientation and Back Button
In the development of Android real-time video applications, two crucial aspects that contribute to seamless and user-friendly experience are handling device orientation changes and managing the behavior of the back button. Let’s see how to implement these function:
android:configChanges="orientation|screenSize|keyboardHidden"

override fun onConfigurationChanged(newConfig: Configuration) {
  super.onConfigurationChanged(newConfig)
  enxVideoView?.configurationChanged(newConfig)
}
To implement back button, override onBackPressed function and call below function.
override fun onBackPressed() {
  enxVideoView?.backPressed()
}

9. Customised UI Screens
The Android UI Kit provides a broad range of customization of UI components. Users can utilize the UI components provided, to shape the application interface in alignment with their unique requirements. For instance, the bottom and top bar UI options can be adjusted using the following methods:
- Bottom Bar Customization: Bottom Bar design can be customized by passing a list of EnxButton to the configureBottomOptionList function. You can also create your own custom button, use the setImage function and pass two images (for normal and selected states), except for the disconnect button, which takes only a single parameter for image.
- Top Bar Customization: Top Bar design ca be adjusted by passing a list of EnxButton to the configureTopOptionList function. The setImage function can be used for setting images in two states for the REQUEST_FLOOR button. For USER_LIST and MENU, only a single image parameter is needed.
- Bottom Bar Background Color: The background color of the Bottom Bar can be updated by passing the resource id of the color to the updateBottomOptionView function.
- Top Bar Background Color: The background color of the Top Bar can be updated by passing the resource id of the color to the updateTopOptionView function.
- Participant List Options: Additional actions can be added for each participant in the participant list, enhancing the application’s versatility.
EnableX Android UI Kit offers more UI customization options. For more detailed Information about available UI customization options, Please read Android UI Kit: UI Screen Customization.
Integrate EnableX Functionality
- Utilize the EnableX Android UI Kit APIs to integrate key functionalities into your app.
Start a Video Call by Joining a Room
- To initiate a video call, you need to join a room using the joinRoom method .
- Pass the required token, to the joinRoom method to establish a connection with the video conferencing session.
EnxVideoView(
     token: token,
     embedUrl: "https://enablex22.vcloudx.com",
     connectError: (Map<dynamic, dynamic> map)

The token ensures secure access to the room.
Note: The embedURL is option, which you will receive from the visual builder page
Once you successfully join the room, you can interact with other participants, share audio and video streams, and engage in real-time communication.
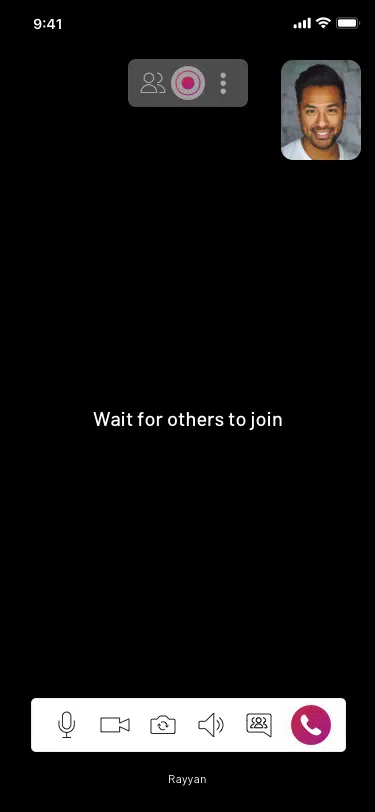
Video Preview – Android UI Kit