
EnableX introduces a Webhook Function Framework using which Video Embed may be extended to add new features, and functions or to update existing features, UI, UX. External CSS and JS Library may be provisioned work along Video Embed and get executed with associated Video Room Events.
Table of Contents
Overview
Apart from customization of UI and existing features of Video Embed, developers need an additional interface to help them extend Video Embed by adding new features and updating the UI and UX of available features.
To meet this requirement, EnableX introduces a Webhook function framework that helps developers to write code blocks to associate with a specific event in Video Room and make it available at runtime during Video Sessions.
Type of Code Inserts
EnableX allows the following external code inserts into the Video Embed Code:
Third-Party JS file
A third-party server-hosted JS file URL. The JS file(s) will be included in HTML HEAD to make it available at Browser End Point for execution.
Note the following:
- JS file URL may be Web Server Path or CDN endpoint
- Hosted on https
- CORS enabled host
<html lang="en">
 <head>
  <script src="https://YOUR-URL-TO-JS-LIB"></script>
 </head>
 <body>
 </body>
</html>
Third-Party CSS file
A third-party server-hosted CSS file URL. The CSS file will be included in HTML HEAD to make it available at Browser End Point for rendering. Note the following:
Note the following:
- CSS file URL may be Web Server Path or CDN endpoint
- Hosted on https
<html lang="en">
 <head>
  <link rel="stylesheet" href="https://YOUR-URL-TO-CSS-FILE"></script>
 </head>
 <body>
 </body>
</html>
Setup Code Inserts
Both types of inserts explained above may be set/configured through Portal. A new tool/form is introduced helps to add JS-URL or CSS-URL.
- Login to the Portal
- Go to Video / Settings
- Go to the Features tab
- Open up the External Libraries Section.
- In the form:
- Choose the type of file you want to add, viz. CSS, JS
- Enter the complete HTTPS URL to the CSS or JS.
- Repeat the process of adding new file(s) by clicking the “+” sign.
- Submit the form to make your files available in the Embed.
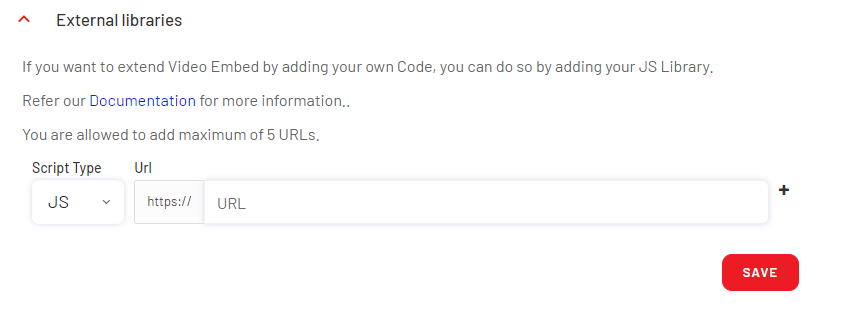
Note:
- You can add a maximum of 10 external files to Embed.
- You can add standard JS libraries, CSS, etc.
- You can write custom JS and CSS files.
Programming Interface
Using external inserts, you get access to all global variables and connected Room Objects. The Room Object further allows you to access all Web SDK methods and event notifications that you can work upon to add new features or update existing features/UX.
Note: If you want to add/update new features based on EnableX Web SDK, you should read through our Web SDK Documentation.
You can code for:
- Custom functions.
- Define EnableX Webhook functions (Listed later in the document) to execute your Code Block along with the associated event.
- Make use of data received with event notification from EnableX Video Session.
- Make use of global variables and room-object.
Webhook Functions
A third-party server-hosted JS file URL. The JS file(s) will be included in HTML HEAD to make it available at Browser End Point for execution.
Webhook functions help you to map your code block to a specific event to execute it when a related event occurs. You are required to define one or many of these functions, as per your requirement to execute your code at the right moment. If you don’t define any of these available Webhook functions, the execution of the related function is skipped.
Available Webhook Functions:
- Room Connection
enxHookRoomConnected()– Executed when an End Point gets connected to the Video Room.enxHookRoomDisconnected()– Executed when an End Point gets disconnected from the Video Room, either due to network fluctuation or explicit disconnect or at end of session. Reason of disconnection may be known by data received with related event.enxHookRoomReconnected()– Executed when an End Point gets re-connected to the Video Room.
- User Connection
enxHookUserConnected()– Executed when any user gets connected to Video Room,enxHookUserDisconnected()– Executive when any user gets disconnected from Video Room.
- Moderated Entry
enxHookRoomAwaited()– Executed when an End Point waits to get Moderator’s permission to get connected to the Video Room.enxHookRoomEntryAllowed()– Executed when an End Point is permitted by Moderator to get connected to the Video Room.enxHookRoomEntryDenied()– Executed when an End Point is denied by Moderator to get connected to the Video Room.
- Streams
enxHookStreamSubscribed()– Executed when an End Point subscribes successfully to one of the Remote Stream available in the Video Room.
- Messaging & Signaling
enxHookCustomSignalReceived()– Executed when an End Point receives custom signal from any other end point connected to the Video Room.
Note:
- Webhook Function names are case-sensitive.
- These functions have access to Room Object and all other global variables in the Embed.
Event Data
Each Endpoint keeps receiving Event Notifications from the connected Video Room with related data in JSON format. These data structures, as received, are made available to you in form of a key in Object named enxEvents.
Available Event Data:
- Room Connection
enxEvents.roomReconnected– Data received when Video Room is reconnectedenxEvents.roomDisconnected– Data received when disconnected from Video Room. It contains the reason for the disconnection.
- User Connection
enxEvents.userConnected– Data received when any user gets connected to the Video room. Data includes meta data of the connecting user as{ "clientId": "String", "name": "String", "role": "String"}enxEvents.userDisconnected– Data received when any user gets disconnected from the Video room. Data includes meta data of the disconnecting user as{ "clientId": "String", "name": "String", "role": "String"}
- Moderated Entry
enxEvents.roomEntryAllowed– Data received when an awaited user is allowed into the Video Room.enxEvents.roomEntryDenied– Data received when an awaited user is denied entry to Video Room.
- Streams
enxEvents.streamSubscribed– Data received when a Remote Stream is subscribed.
- Messaging & Signaling
enxEvents.customSignalReceived– Data received when a Custom Signaling event is received.
Coding Example
Example#1 Webhooking basics
- Code
- Write your code in a JS file. Try it in
enxHookRoomConnected()andenxHookRoomDisconnected()Webhook functions. - Host the JS file you a secured server. i.e. JS file is accessible over https://
- Write your code in a JS file. Try it in
// Your Custom Code Block in enxHookRoomConnected() function
function enxHookRoomConnected() {
	alert(“You are connected to Video Room”);
}

function enxHookRoomDisconnected() {
	alert(“You are disconnected from Video Room.”);
}
- Setup
- Follow the steps explained earlier in the document to add External Files for Video Embed.
- Add your JS file as JS URL insert
- Test
- You are done. Try to connect to your Embed and see your Code in action.
- This will show a JS Alert with “You are connected to Video Room” as soon as the End Point gets connected to the Video Room. It will show JS Alert with “You are disconnected from Video Room” when End Points gets disconnected.
Example#2 EnableX Face AI Implementation
- Read
- EnableX Face AI Documentation – to know it in detail.
- Code
- Download Face AI Library. Host it in your Server.
- Write your Face AI handling codes in a JS file. Preferably define it in
enxHookRoomConnected()Webhook function. - The Webhook function definition should also contain the following:
- Face AI event listeners – which you want to evaluate and get notified with data points.
- Calculate on data points received.
- Play/display the calculated data in HTML DOM.
// Your Custom Code Block for Face AI in enxHookRoomConnected() function
function enxHookRoomConnected() {
	const FaceAI  = new EnxFaceAI(); // Construct the Object

	// Config Face Detector Analysis
	config = {
		faceDetector: {
			maxInputFrameSize: 200,
			fullFrameDetection: true
		}
	};

	FaceAI.init(response, localStream, config, function (event) {
		// event.result == 0 - All Ok to process
	})

	window.addEventListener(`face-detector`, (evt) => {
		const faces = evt.detail.totalFaces;
		// Show on UI
	});
}
// Custom Code block ends
- Setup
- Follow the steps explained earlier in the document to add External Files for Video Embed.
- Add the hosted Face AI Library URL as JS URL Insert.
- Add your Face AI handling JS file as JS URL insert
- Follow the steps explained earlier in the document to add External Files for Video Embed.
- Test
- You are done. Try to connect to your Embed and see your Code in action.
Do’s & Don’ts for Developers
While developing JS Library to insert or prepare code blocks to insert against exposed events, developers must follow the guidelines given below:
Do’s
- Read through the Embed JS library to understand how it codes and works. Make note of variables and objects in use.
- Read through the Web SDK section that helps you understand how specific function works. This helps you even extend.
- Test out your updates thoroughly.
- Resolve CORS issue against JS inserts if any.
- While defining CSS Class/Object names, use unique Prefix (e.g. enxEmbed_CLASSNAME or enxEmbed_OBJECTNAME) to ensure it doesn’t affect existing class/object definition with the same name (if any).
Don’ts
- Don’t re-declare existing variables and objects.
- Don’t update the values of existing variables and objects. You may just refer to their values to use in your own code.